How To Brighten Teeth in Adobe Photoshop CS3: Tutorial
Teeth are an important part of the human body. And it works for focusing on the beauty of anyone. However, here we are presenting an article about how to whiten human brighten teeth in Adobe Photoshop. During photography, all most all kinds of teeth are found in a different color. Whenever you will not get the perfect color, it affects you to focus on the real beauty. To fix these problems, it needs a photo editing service and an expert photo editor to brighten teeth in Adobe photoshop. However, to remove this kind of problem, you will find a great many photo editing service provider companies. And, for that, we have created an online platform clipping solution Asia. You can take it as the best image enhancement service provider company in the world.
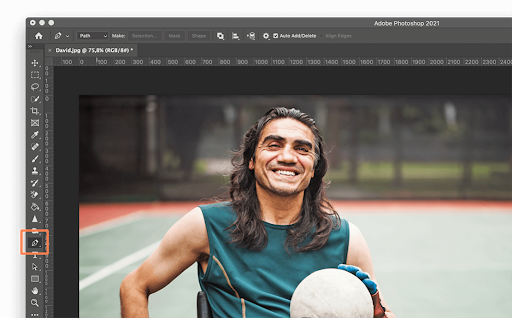
Brighten Teeth in Abode Photoshop From CSA
Clipping Solution Asia always uses High-quality photo editing and image post-processing software. Our graphic designer use photo editing software: Adobe Photoshop CS3. Now we are going to share this tutorial-based important content. It is crucial to whiten teeth in Photoshop. And, it is important because you will get a bright face by dint of this Photo enhancement service. So, We show you how to whiten your teeth in Photoshop. Here we represent you with a step-by-step guide and screenshot. Let’s start the tutorial-based article|Clipping Solution Asia.
How to Brighten teeth in Abode Photoshop: Step By Step Guide and Formulae
First Step:
Now, we show you an important article about how to brighten teeth in Abode Photoshop. For that, at first, you have to take the yellow open teeth and have to open them in Photoshop. However, it is a basic photo editing service in Photoshop services. If you are a beginner at that, you can also try that. Now it has become a crucial task in the service of photo enhancement.
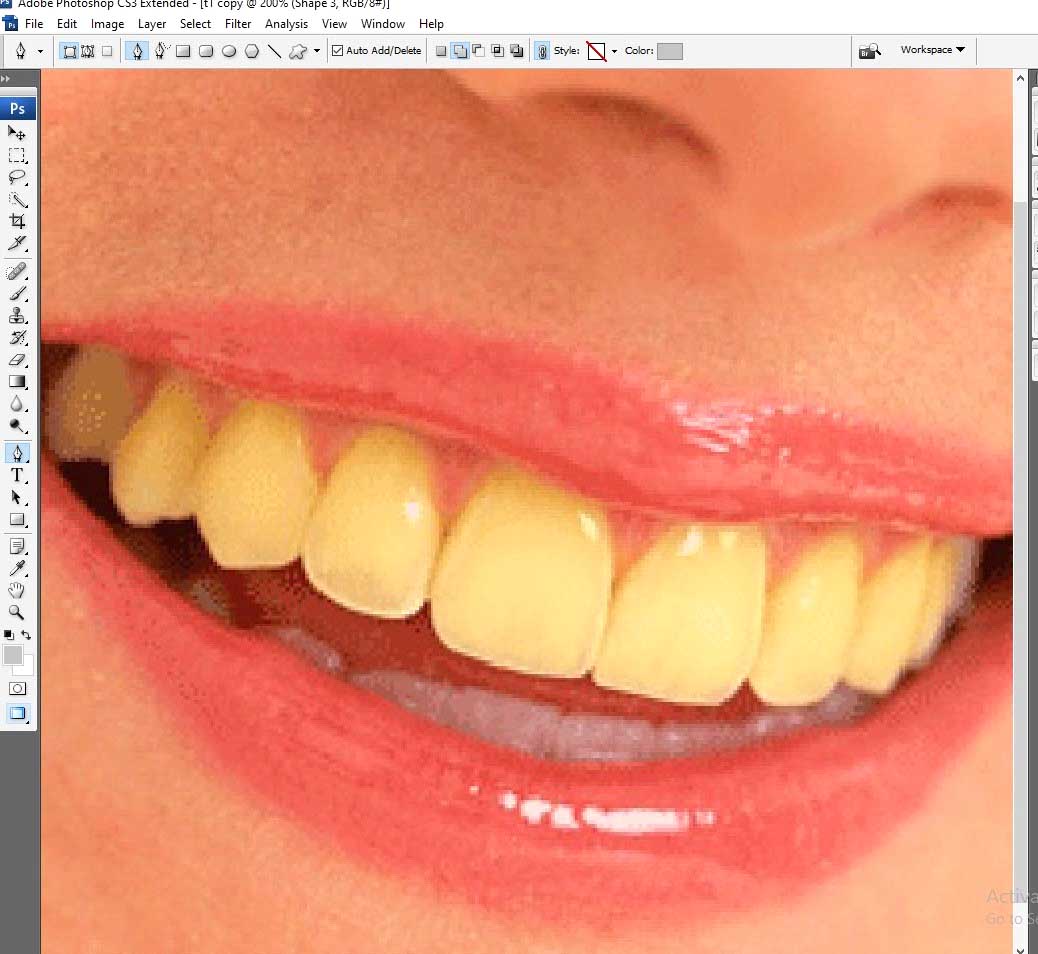
However, in the first stage, you should fit and level up your image in Adobe Photoshop CS3.
Second Step:
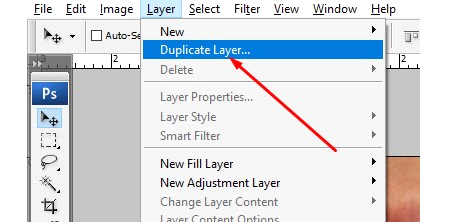
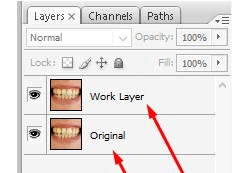
In the second step, at first, you need not do background change or color correction service. Here you have to copy the layer from the layer panel. Here we show you with command and image. This is very important to Brighten Teeth in Adobe Photoshop.
Third Step:
Here in this step, you need to click on the eye ICON of the original Layer and should hide it.

Clicking EYE icon
Then you have to make a selection tool which is used for making the right selection. For that, you need to take a Lesso Tool for selecting the yellow teeth. then carefully you have to select and around the yellow teeth.
selecting lasso tool
Whenever you want to do the action perfectly, you have to zoom the photo and hold the Ctrl + sign on the Keyboard, and next, you have to zoom out for Ctrl and button.

selecting
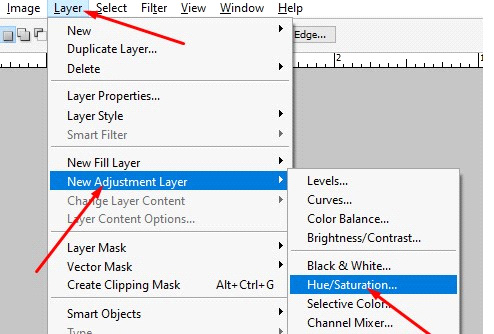
Fourth Step:
For this forth step, you have to click on the layer from the top bar on the new adjustment layer.
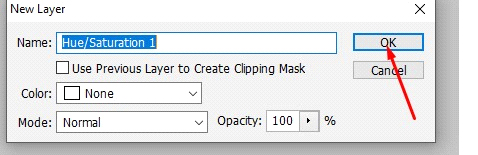
Command: From the Layer > New Adjustment Layer > and Hue/Saturation
Here you have to select OK and you can see a dialog box for Hue/ Saturation
Fifth Step:
In the fifth step, you will get a Master Pad for Image Editing. In this section, you can remove the yellow part of the teeth. On the Master Pad, you will get three panels: HUE, Saturation, and Lightness. in this section you have to alternate the plus and minus options.
Here our Command is
HUE is -10
SATURATION is -29
LIGHTNESS is +15
Then you will get bright and white teeth. After getting the bright color teeth, you need to remove the rough area of the edge of the selected teeth.
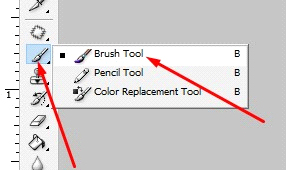
Sixth Step:
For making the teeth adjust with the other part of your mouth, it needs the Brust Tool of LEFT tool panel.
On the right side of the color panel, you will find the feel-like brush tool which you have to adjust with care. In this way, you will get the expected white teeth.
In this process, you will get the bright tool in Adobe Photoshop CS3
Finally, you have to save this picture on the Desktop or Laptop.

Now compare the before and after edited images. so, this service means to Brighten Teeth in Adobe Photoshop the best choice.

Final Thought:
Now you can enjoy your best-looking teeth. It will give you effective results in Photoshop Editing. We believe that it can be your best form of how to whiten teeth in Adobe Photoshop CS3. However, you can try it through the step by step tutorial.


1,082 Comments
Thanks for sharing. I read many of your blog posts, cool, your blog is very good.
https://gogocasino.one
Your article helped me a lot, is there any more related content? Thanks!
Very nice info and right to the point. I don’t know if this is truly the best place to ask but do you people have any ideea where to get some professional writers? Thank you 🙂
أنابيب الحديد الزهر في العراق تفخر مصنع إيليت بايب بكونها واحدة من الموردين الرائدين لأنابيب الحديد الزهر في العراق. تُصنع أنابيب الحديد الزهر لدينا وفقًا لأعلى المعايير، مما يوفر متانة وموثوقية استثنائية لمشاريع البنية التحتية المختلفة. مثالية لأنظمة المياه والصرف الصحي، تُعرف هذه الأنابيب بقوتها وطول عمرها. يضمن التزام مصنع إيليت بايب بالجودة أن توفر أنابيب الحديد الزهر لدينا أداءً أمثل ومرونة، مما يجعلنا الخيار المفضل للمقاولين والمهندسين في جميع أنحاء المنطقة. لمزيد من المعلومات حول أنابيب الحديد الزهر لدينا، يرجى زيارة موقعنا الإلكتروني على ElitePipe Iraq.
Can you be more specific about the content of your article? After reading it, I still have some doubts. Hope you can help me. https://accounts.binance.com/da-DK/register?ref=V2H9AFPY
Can you be more specific about the content of your article? After reading it, I still have some doubts. Hope you can help me.
I don’t think the title of your article matches the content lol. Just kidding, mainly because I had some doubts after reading the article.
Your article helped me a lot, is there any more related content? Thanks!
I don’t think the title of your article matches the content lol. Just kidding, mainly because I had some doubts after reading the article.
Thanks for sharing. I read many of your blog posts, cool, your blog is very good.
Thank you for your sharing. I am worried that I lack creative ideas. It is your article that makes me full of hope. Thank you. But, I have a question, can you help me?
Thank you for your sharing. I am worried that I lack creative ideas. It is your article that makes me full of hope. Thank you. But, I have a question, can you help me?
Your point of view caught my eye and was very interesting. Thanks. I have a question for you.
Your article helped me a lot, is there any more related content? Thanks!
Thank you for your sharing. I am worried that I lack creative ideas. It is your article that makes me full of hope. Thank you. But, I have a question, can you help me?
Can you be more specific about the content of your article? After reading it, I still have some doubts. Hope you can help me. https://www.binance.com/en-IN/register?ref=UM6SMJM3
BWER leads the way in weighbridge technology in Iraq, delivering customized weighing solutions that are accurate, efficient, and ideal for heavy-duty use in any environment.
Thank you for your sharing. I am worried that I lack creative ideas. It is your article that makes me full of hope. Thank you. But, I have a question, can you help me?
Your point of view caught my eye and was very interesting. Thanks. I have a question for you. https://accounts.binance.com/en/register?ref=JHQQKNKN
I don’t think the title of your article matches the content lol. Just kidding, mainly because I had some doubts after reading the article. https://accounts.binance.com/pl/register?ref=YY80CKRN
Thanks for sharing. I read many of your blog posts, cool, your blog is very good.
Thank you for your sharing. I am worried that I lack creative ideas. It is your article that makes me full of hope. Thank you. But, I have a question, can you help me?
Can you be more specific about the content of your article? After reading it, I still have some doubts. Hope you can help me.
Telechargez 888starz des maintenant et commencez a parier.
Your point of view caught my eye and was very interesting. Thanks. I have a question for you.
I don’t think the title of your article matches the content lol. Just kidding, mainly because I had some doubts after reading the article.
Agar siz sportga stavka qilish yoki kazino o‘yinlarida qatnashish imkoniyatidan foydalanmoqchi bo‘lsangiz, unda 888starz stavka ilovasi siz uchun eng yaxshi tanlovdir. Ushbu ilova yuqori darajadagi xavfsizlik va tezkor ishlashni ta’minlaydi. Uni yuklab oling va imkoniyatlaringizni kengaytiring.
I don’t think the title of your article matches the content lol. Just kidding, mainly because I had some doubts after reading the article.
Your point of view caught my eye and was very interesting. Thanks. I have a question for you.
Sur bedandbamboo.fr vous trouvez des fonctionnalites de chat en direct et une multitude de types de videochats. Precisement ici vous aurez l’occasion jouir de communications video en temps reel. Inscrivez-vous sur notre site et rejoignez des maintenant Coco chat deja en ce moment ! Coco chat, Chatrandom, Chatrandom, Chatrandom Bonus, Coco chat, Hebergements 2025
Coco chat
Chatrandom
Chatrandom
Chatrandom
Your point of view caught my eye and was very interesting. Thanks. I have a question for you.
Can you be more specific about the content of your article? After reading it, I still have some doubts. Hope you can help me.
Pour ceux qui utilisent des appareils Apple au Burkina Faso, 888starz iOS est une application ideale. Elle offre une experience de jeu fluide et intuitive, specialement optimisee pour les utilisateurs d’iPhone, avec un acces direct a une large gamme de jeux et de paris sportifs.
Can you be more specific about the content of your article? After reading it, I still have some doubts. Hope you can help me.
Thank you for your sharing. I am worried that I lack creative ideas. It is your article that makes me full of hope. Thank you. But, I have a question, can you help me?
Profitez d’un large choix de jeux et d’offres exclusives en telechargeant l’application 888starz Casino iOS. Cette plateforme est optimisee pour offrir une navigation rapide et un gameplay fluide a tous les joueurs mobiles !
Si vous souhaitez acceder a un large choix de jeux de casino ou que vous soyez, telechargez des maintenant 888starz Casino APK. Cette application vous permet de jouer a vos jeux preferes sans interruption, avec des transactions securisees et une assistance clientele disponible 24/7. Inscrivez-vous et commencez a jouer en quelques minutes !
Your point of view caught my eye and was very interesting. Thanks. I have a question for you.
Your point of view caught my eye and was very interesting. Thanks. I have a question for you.
888 starz https://www.fbioyf.unr.edu.ar/evirtual/mod/forum/discuss.php?d=47707
telecharger 888 starz sur Android gratuitement https://nhakhoaphuonganh.com/ban-dang-mat-mot-hay-nhieu-rang/#comment-42582
888starz ios https://www.city04.kz/list/509946
скачать 888starz на телефон бесплатно http://watersport.org.ru/images/pgs/888starz-top-10-slotov-casino.html
I don’t think the title of your article matches the content lol. Just kidding, mainly because I had some doubts after reading the article.
Your point of view caught my eye and was very interesting. Thanks. I have a question for you.
Can you be more specific about the content of your article? After reading it, I still have some doubts. Hope you can help me.
Thanks for sharing. I read many of your blog posts, cool, your blog is very good.
Thanks for sharing. I read many of your blog posts, cool, your blog is very good.
скачать 888starz https://androidonliner.ru/multimedia/888starz-ios-kak-skachat-i-ustanovit-prilozhenie-na-iphone
Can you be more specific about the content of your enticle? After reading it, I still have some doubts. Hope you can help me.
Your article helped me a lot, is there any more related content? Thanks!
Your article helped me a lot, is there any more related content? Thanks!
Thanks for sharing. I read many of your blog posts, cool, your blog is very good.
Your article helped me a lot, is there any more related content? Thanks!
Thanks for sharing. I read many of your blog posts, cool, your blog is very good.
Get the best casino experience on 888Starz Pakistan and win exclusive rewards.
Can you be more specific about the content of your article? After reading it, I still have some doubts. Hope you can help me.
Good afternoon!
Navigate your health journey with the iMedix Wellness Program, your ultimate resource for reliable healthcare guidance; fitness lovers seeking guidance on achieving specific fitness goals, such as weight loss or muscle gain, will find our program tailored, offering expert health advice and professional medical insights with personalized plans and trusted wellness tips.
Follow the iMedix Medical Show for expert health advice, a trusted iMedix health podcast; fitness lovers focusing on strength training principles will find our explanations uniquely thorough, delivering reliable healthcare guidance and professional medical insights alongside trusted wellness tips for building muscle safely and effectively.
More information at the site – https://pca.st/eczyy5sp
Wishing you luck!
Hello everyone!
Tune into the iMedix Medical Show for reliable healthcare guidance, frequently listed among iMedix best podcasts; fitness lovers aiming to improve flexibility and mobility will find our exercise demonstrations uniquely helpful, delivering trusted wellness tips and expert health advice alongside professional medical insights.
The iMedix Podcast provides expert health advice, establishing itself among top podcasts for holistic health; fitness lovers curious about the benefits of various recovery tools like massage guns will find our percussive therapy review uniquely comparative, delivering professional medical insights and reliable healthcare guidance alongside trusted wellness tips evaluating effectiveness and cost.
More information at the site – https://femalevia.mave.digital/ep-1
Wishing you luck!
Thank you for your sharing. I am worried that I lack creative ideas. It is your article that makes me full of hope. Thank you. But, I have a question, can you help me?
888starz скачать https://mytaganrog.com/themes/pgs/chto-takoe-rtp-v-slotah-i-kak-on-vliyaet-na-vuigrush.html
Greetings movie rental enthusiasts!
The Gentlemen movie where to watch guide is simple now. You don’t have to search far. Parasite movie stream Just hit up your favorite site and start The Gentlemen movie stream. Get ready for fast-paced, smart storytelling. This movie checks every box.
When you click onto our one-stop website to watch movies for free online, watch movies online, you will see that our selection is just too good to be true. Watch free movies online with English subtitle – No registration required, No buffering, 1080 movies streaming.
Come in and watch everything from Hulu without ads – https://oppenheimer.mp3get.net
watch avengers endgame online, where to watch dune part two online free, Joker film streaming
the joker, Joker 2019 online, avengers endgame streaming
Happy watching!
I don’t think the title of your article matches the content lol. Just kidding, mainly because I had some doubts after reading the article.
I don’t think the title of your article matches the content lol. Just kidding, mainly because I had some doubts after reading the article.
Good day music fans!
п»їAlisha Larry’s Dance Cover of вЂCan’t Get You Out of My Head’ Goes Viral. The music world is buzzing about Alisha Larry’s electrifying dance cover of Can’t Get You Out of My Head, distributed via Globex Music. The track, already racking up streams on Spotify and Apple Music, brings a fresh, club-ready energy to Kylie Minogue’s classic. Fans call it “the perfect reinvention for 2025.” > Listen on Apple Music https://music.apple.com/us/song/cant-get-you-out-of-my-head/1805203094
girl i can t get you out of my head
i can’t get you out of my head remix
Happy listening!
Your point of view caught my eye and was very interesting. Thanks. I have a question for you.
# Harvard University: A Legacy of Excellence and Innovation
## A Brief History of Harvard University
Founded in 1636, **Harvard University** is the oldest and one of the most prestigious
higher education institutions in the United States.
Located in Cambridge, Massachusetts, Harvard has built a
global reputation for academic excellence, groundbreaking
research, and influential alumni. From its humble beginnings as a
small college established to educate clergy, it has evolved into a world-leading university that shapes the
future across various disciplines.
## Harvard’s Impact on Education and Research
Harvard is synonymous with **innovation and intellectual leadership**.
The university boasts:
– **12 degree-granting schools**, including the renowned **Harvard Business
School**, **Harvard Law School**, and **Harvard Medical School**.
– **A faculty of world-class scholars**, many of
whom are Nobel laureates, Pulitzer Prize winners,
and pioneers in their fields.
– **Cutting-edge research**, with Harvard leading initiatives in artificial intelligence, public health, climate change, and more.
Harvard’s contribution to research is immense, with billions of dollars allocated to scientific discoveries
and technological advancements each year.
## Notable Alumni: The Leaders of Today and Tomorrow
Harvard has produced some of the **most influential figures** in history, spanning politics,
business, entertainment, and science. Among them are:
– **Barack Obama & John F. Kennedy** – Former U.S.
Presidents
– **Mark Zuckerberg & Bill Gates** – Tech visionaries (though Gates did
not graduate)
– **Natalie Portman & Matt Damon** – Hollywood icons
– **Malala Yousafzai** – Nobel Prize-winning activist
The university continues to cultivate future leaders
who shape industries and drive global progress.
## Harvard’s Stunning Campus and Iconic Library
Harvard’s campus is a blend of **historical charm
and modern innovation**. With over **200 buildings**, it features:
– The **Harvard Yard**, home to the iconic **John Harvard
Statue** (and the famous “three lies” legend).
– The **Widener Library**, one of the largest university libraries in the world,
housing **over 20 million volumes**.
– State-of-the-art research centers, museums, and performing arts
venues.
## Harvard Traditions and Student Life
Harvard offers a **rich student experience**, blending academics with vibrant traditions, including:
– **Housing system:** Students live in one of 12 residential houses, fostering a strong sense of community.
– **Annual Primal Scream:** A unique tradition where students de-stress
by running through Harvard Yard before finals!
– **The Harvard-Yale Game:** A historic football rivalry
that unites alumni and students.
With over **450 student organizations**, Harvard students engage
in a diverse range of extracurricular activities, from entrepreneurship to
performing arts.
## Harvard’s Global Influence
Beyond academics, Harvard drives change in **global policy,
economics, and technology**. The university’s research impacts healthcare, sustainability, and
artificial intelligence, with partnerships across industries worldwide.
**Harvard’s endowment**, the largest of any university, allows it to fund scholarships, research, and public initiatives, ensuring a legacy of impact for generations.
## Conclusion
Harvard University is more than just a school—it’s a **symbol
of excellence, innovation, and leadership**. Its **centuries-old traditions, groundbreaking discoveries, and transformative
education** make it one of the most influential institutions in the world.
Whether through its distinguished alumni, pioneering research,
or vibrant student life, Harvard continues to shape the future in profound ways.
Would you like to join the ranks of Harvard’s legendary scholars?
The journey starts with a dream—and an application!
https://www.harvard.edu/
Your point of view caught my eye and was very interesting. Thanks. I have a question for you.
Quel est le code promo Linebet 2025 ?
Le code promo Linebet est :
https://mcmia.org/art/code_promo_linebet_pour_les_joueurs_africains___bonus.html.
Ce code promo vous permet d’obtenir 100 % de bonus a l’issue de votre 1er depot. En rejoignant Linebet, vous pourrez donc gagner jusqu’a 100 $ de freebets.
Vous n’aurez plus qu’a rejouer 5 fois votre bonus en combine pour le convertir en argent reel (3 selections ou plus / cote minimum : 1,40).
Code promo Linebet paris sportifs : jusqu’a 100 $ de bonus de bienvenue
Avec le code promo Linebet, vous profiterez d’un doublement de votre 1er depot jusqu’a 100 $ si vous choisissez le bonus de bienvenue paris sportifs lors de votre inscription.
Choisissez l’offre bonus de bienvenue paris sportifs lors de votre inscription pour en beneficier. C’est l’un des meilleurs avantages pour demarrer chez ce bookmaker.
C’est simple : deposez 50 $ et gagnez 50 $ supplementaires. Jouez 100 $ pour obtenir le bonus maximum de 100 $.
ll faut le rejouer 5 fois en pari combine (avec au moins 3 selections ayant une cote de 1,40 ou plus) pour transformer cet argent bonus en cash retirable et recuperer vos gains.
Cette condition est courante chez les bookmakers en ligne, similaire a ce que propose 1xBet. Assurez-vous que le code marche et que l’offre est valide dans votre pays.
Comment ouvrir un compte avec le code promo Linebet en Mai 2025 ?
Le code promo Linebet doit etre insere dans le formulaire d’ouverture : il vous permettra d’obtenir le bonus de bienvenue paris sportifs ou poker (au choix).
En vous inscrivant, vous pourrez aussi prendre part a toutes les offres promotionnelles mises en place par le site.
Le processus d’inscription a ete allege au maximum pour que vous profitiez au plus vite d’une experience de jeu inedite. Inscrivez-vous maintenant pour profiter de cotes allechantes pour maximiser vos gains !
Get a massive 200% bonus on your first deposit and boost your starting balance up to $ 200. betwinner registration online, Betwinner splits your bonus between sports and games to double your chances of winning.
How to get 1xBet free promo code?
Sign up on their website using the 1xBet promo code and receive an impressive 120% bonus on your initial deposit, up to a maximum of ?33,000. For instance, if you deposit ?1,000, you’ll receive an additional ?1,200 in bonus funds, giving you a total of ?2,200 to kickstart your betting experience.
What is voucher code in 1xBet?
1xBet Promo Code Get 300% Bonus Up to GHS 3,445 in March 2025. Sign-up with 1xBet using the promo code. New customers can get a 200%, 250% or 300% bonus. The 1xBet promo code. Use it on the sign-up page to get a 300% bonus up to 3445 GHS.
1xbet Promo Code Signup Bonus (Valid In 2025)
1xbet promo Promo code for 1xBet, use this combination to increase your welcome bonus up to 100% on an amount reaching $/€130 for registration. These funds are available to all new players who have already created an account or are planning to do so. The bonus requires wagering, and it must be done in the sports section by placing bets with odds of at least 1.4 and a fivefold turnover. You have 30 days to use the code before it expires at the end of 2025.
1xBet Promo Code 2025 – this is a huge bonus of up to $1950 for the casino and 150 free spins on slots. An exclusive offer for new players aged 18 and above. To activate the code, you need to make a deposit of $10. The second and subsequent deposits must be at least $15. You can participate in this promotion until the end of 2025.
The 1xBet platform is one of the most popular in this domain. It has over a million fans worldwide and has earned players’ trust since 2007. Over time, the platform has evolved both in customer service and its interface.
1xBet always puts its clients first, listening to feedback and suggestions to improve the platform. It was one of the first bookmakers to create a mobile application, gaining even more popularity among players.
Thank you for your sharing. I am worried that I lack creative ideas. It is your article that makes me full of hope. Thank you. But, I have a question, can you help me?
Your article helped me a lot, is there any more related content? Thanks!
Hello casino players!
Download Elon Casino App for Seamless Gaming in Bangladesh
For Bangladeshi players seeking convenience and excitement, the elon casino app is a game-changer. Available for Android devices, the elon casino apk download offers a seamless way to enjoy your favorite games anytime, anywhere. Whether you prefer slots, poker, or elon casino crazy time, the app brings the full casino experience to your fingertips.
Downloading the elon casino app download play store is simple. Visit elonbet.com and follow the instructions to install the latest version of the elon casino apk download latest version. The app is lightweight, ensuring it runs smoothly on most Android devices. For those who prefer older versions, the elon casino apk download old version is also available.
The app supports local payment systems like bKash, Nagad, and Rocket, making deposits and withdrawals effortless. With a minimum deposit of 500 BDT, you can start playing instantly. The elon casino app login process is straightforward—just enter your credentials and dive into the action. Forgot your password? The elon casino login password recovery option ensures quick access.
The app’s interface is available in Bengali, catering to local players. From classic slots to live dealer games, the elon casino apps offer something for everyone. Regular updates ensure new games and features are added frequently. Plus, the elon casino apps download free means no hidden costs.
With 24/7 customer support and a secure platform, elon casino bangladesh download guarantees a safe and enjoyable experience. Download the app today and explore exclusive bonuses, fast payouts, and a vibrant gaming community. Elon bet casino is your gateway to non-stop entertainment in Bangladesh.
All information is available via the link – https://elderscrollsdragonknight.com/
elon casino download free, elon bet casino login register, elon casino apps download
elon bet casino login register, elon online casino, elon bet casino sign up bonus
Good wins!
Thanks for sharing. I read many of your blog posts, cool, your blog is very good.
Hello casino players!
Register using 1xbet promo code registration India and activate your bonus with 1XBRO200. New users from India can enjoy exclusive deals. 1XBRO200 guarantees your welcome offer. Use it today. Try the 1xbet promo code registration India.
All information is available via the link – https://www.friend007.com/read-blog/193539
about 1xbet promo code, 1xbet promo code new user today, 1xbet registration promo code
promo code for 1xbet, 1xbet promo code for registration, 1xbet promo code
Good lots!
Hello!
Manage hemorrhoids with a smart and effective diet. Learn what foods help reduce symptoms and inflammation. Improve digestion and comfort naturally. Take control of your health with balanced nutrition. Feel better with every bite. https://detroithives.org/wp-content/art/dieta_pri_gemorroe.html
An interesting information is available via the link – https://www.shop4lesbians.com/images/pages/?kannabis_celebnye_svoystva_i_osobennosti_ispolyzovaniya.html
Good luck!
I like what you guys are up too. Such smart work and reporting! Keep up the excellent works guys I?ve incorporated you guys to my blogroll. I think it’ll improve the value of my web site 🙂
Neat blog! Is your theme custom made or did you download it from somewhere? A theme like yours with a few simple adjustements would really make my blog stand out. Please let me know where you got your theme. Appreciate it
Hello everyone!
OnlyFans audience boost available through real niche targeting. Get your OnlyFans audience boost with high-engagement fans. Drive more comments, likes, and subs. Visibility is power. Let’s amplify your reach.
Twitter traffic OnlyFans methods still deliver daily growth. With the right content and retweets, Twitter traffic OnlyFans increases fast. We help schedule and boost your best posts. Make each tweet work harder for your page. Twitter remains a traffic powerhouse.
All information on the website- https://sfsonlyfans.com/how-to-use-tiktok-to-promote-your-onlyfans-account-and-attract-more-fans/
organic traffic to OnlyFans, reddit traffic fansly, quality traffic fansly
traffic to OnlyFans, promote OnlyFans page, twitter traffic onlyfans
Good luck!
Здравствуйте!
Ремонт дома с баней — это уникальная возможность создать комфортное место для отдыха и проживания. Мы предлагаем качественные решения для различных типов домов, включая добавление бань и саун. Наши специалисты помогут выбрать лучшие материалы для отделки, чтобы дом и баня выглядели стильно и современно. Мы учитываем все пожелания заказчика и обеспечиваем комфортные условия для проживания. ремонт расценки квартира, дом с отделкой под ключ в подмосковье, строительство домов с ипотекой Наши работы выполняются с учетом всех особенностей и на высшем уровне.
Больше информации на сайте – https://perun-club.ru/
авито строительство бани, строительства дома бани, купить квартиру москва с отделкой
панель для отделки фасада дома, бани новосибирск строительство, построить дом с отделкой под ключ коммуникациями
Удачи!
Добрый день!
Новости позволяют анализировать поведение компаний. Рейтинги, отчёты и скандалы попадают в новости. Люди выбирают работодателей, ориентируясь на новости. Репутация строится в публичном пространстве. Бизнес становится прозрачным через новости.
Подробнее на – https://s66-crm.ru/
Hi-tech системы безопасности защищают дома и предприятия от угроз. Использование hi-tech позволяет дистанционно контролировать охрану и камеры. Hi-tech технологии предотвращают проникновения и обеспечивают спокойствие. Это повышает уровень защиты и комфорта. Hi-tech безопасность — технологии надежности.
Более подробно на сайте – https://mobile-gold.ru/
Удачи!
Привет всем!
Строительство бани с отделкой — это один из популярных вариантов для тех, кто хочет наслаждаться сауной в своем доме. Мы предлагаем строительство бани с отделкой под ключ, включая все виды отделочных работ и проектирование. Ваша баня будет оснащена всем необходимым для комфортного отдыха и оздоровления. Строительство бани с отделкой — это ваш личный уголок для расслабления. квартиры с ремонтом москва, строительство домов на материнский капитал, отделка деревянного окна в деревянном доме Строительство бани с отделкой — это лучший отдых в вашем доме.
Больше информации на сайте – https://perun-club.ru/
кирпичи для отделки дома цена, внутренняя отделка домов имитация бруса, стоимость отделки домов
фото капитальный ремонт домов, нормы строительства бань, квартиры от застройщика самолет с отделкой в москве
Удачи!
Добрый день!
Строительство кирпичного дома — это решение для тех, кто ценит долговечность и надежность. Мы предлагаем строительство кирпичного дома, который обеспечит вам тепло зимой и прохладу летом. Строительство кирпичного дома — это инвестиция в надежность и комфорт на долгие годы. отделка дома цвета, отделка черновой квартиры цена, ремонт квартиры за Строительство кирпичного дома — это прочность и устойчивость.
Больше информации на сайте – https://pcytherapy.ru
ремонт стиральный машина дом мастер, майнкрафт строительство дома, квартиры с отделкой подмосковье
дома отделка панелями, дом строительство домов новосибирск, строительство бани недорого
Удачи!
Добрый день!
Строительство дома под ключ — это удобное решение для тех, кто хочет получить готовое жилье без лишних забот. Мы предоставляем услуги по строительству дома под ключ, начиная от разработки проекта до выполнения отделки. Ваша задача — просто наслаждаться новым домом. Строительство дома под ключ — это качественно, быстро и удобно. отделка квартир цена москва, ремонт на дому в краснодаре, ремонт хрущевок квартир Строительство дома под ключ — это идеальное решение для вашего нового жилья.
Больше информации на сайте – https://slender-woman.ru/
югорский фонд ремонта домов, ремонт на дом томск, каркасное строительство бань
строительство бани это, квартиры в новостройке с отделкой от застройщика в воронеже, купить панели для отделки в доме
Удачи!
Доброго!
Строительство домов с ипотекой — это удобное решение для тех, кто хочет получить свой дом без крупных первоначальных затрат. Мы предлагаем строительство домов с возможностью оформления ипотеки, что позволит вам более гибко подходить к финансовым вопросам. Мы поможем вам выбрать оптимальный проект, который соответствует вашему бюджету. Все этапы строительства будут выполнены качественно и в срок. отделка стен частных домов, строительство бетонного фундамента для дома, срок ремонта дома капитальный ремонт Строительство домов с ипотекой — это доступное и удобное решение для вашего будущего дома.
Больше информации на сайте – https://beshenov.ru
ремонта и отделки квартиры, квартира чистовая отделка купить, дома строительство самара
отделка дома дешева, ремонт в квартире в новостройке без отделки, ремонт домов минск
Удачи!
Доброго!
Строительство энергоэффективных домов — это решение для тех, кто заботится о сохранении энергии и экологии. Мы занимаемся строительством энергоэффективных домов, которые обеспечат вам комфорт и экономию. Строительство энергоэффективных домов — это ваш вклад в экологию и будущее. постановление по ремонту домов, можно делать ремонт в квартире в выходной, строительство дома Строительство энергоэффективных домов — это экономия и забота о природе.
Больше информации на сайте – https://dizzastershop.ru
ремонт и отделки домов, строительства домов в екатеринбурге, ремонт моего дома
сданная квартира с отделкой, строительство бани из блоков своими, ремонт телевизоров на дом москва
Удачи!
Приветственные бонусы и промоакции 1xBet 2025
Используйте
промокоды тото 1хбет чтобы получить гарантированный бонус в размере 100% до 32500 рублей (или эквивалентную сумму в другой валюте €130). Это предложение доступно только для новых пользователей.
Воспользуйтесь этим кодом, чтобы получить бонус от 1хбет. Просто введите код в анкете при регистрации и пополните свой счет на сумму от 100 рублей. Вам будет начислен бонус в размере 130%, который может достигать до 32500 рублей.
У нас вы можете получить бесплатный промокод, который даст вам дополнительные бонусы и преимущества при игре на сайте 1xBet. Для того чтобы воспользоваться этим промокодом, вам необходимо зарегистрироваться на сайте и пройти процедуру верификации. После этого вы сможете получить бонус по промокоду или при пополнении счета. Также вы можете получить бонус, если пригласите друга или примете участие в определенных акциях.
Gerçek kazanç peşinde misin? Holigabet’e katıl!
— Anlık oranlar 5000+ karşılaşma
— Slot, rulet, blackjack
— %200 İlk Yatırım Bonusu
— Günlük iade
– holiganbet indir
— Kriptoya özel %50
— Hızlı çekim
Kayıt ol https://holigabet.com/ bonusunu kap
18+ Lütfen sorumlu oynayın
Hızlı kazanç için holiganber seni bekliyor, katıl hemen!
I have seen that currently, more and more people are being attracted to cameras and the discipline of taking pictures. However, to be a photographer, you should first shell out so much time deciding the exact model of video camera to buy along with moving out of store to store just so you may buy the cheapest camera of the trademark you have decided to pick. But it will not end there. You also have to take into consideration whether you should buy a digital photographic camera extended warranty. Thx for the good ideas I gathered from your weblog.
I’ve been absent for some time, but now I remember why I used to love this web site. Thanks , I will try and check back more often. How frequently you update your site?
Приветственные бонусы и промоакции 1xBet 2025
Используйте
промокод на спорт 1xbet чтобы получить гарантированный бонус в размере 100% до 32500 рублей (или эквивалентную сумму в другой валюте €130). Это предложение доступно только для новых пользователей.
Воспользуйтесь этим кодом, чтобы получить бонус от 1хбет. Просто введите код в анкете при регистрации и пополните свой счет на сумму от 100 рублей. Вам будет начислен бонус в размере 130%, который может достигать до 32500 рублей.
У нас вы можете получить бесплатный промокод, который даст вам дополнительные бонусы и преимущества при игре на сайте 1xBet. Для того чтобы воспользоваться этим промокодом, вам необходимо зарегистрироваться на сайте и пройти процедуру верификации. После этого вы сможете получить бонус по промокоду или при пополнении счета. Также вы можете получить бонус, если пригласите друга или примете участие в определенных акциях.
very good submit, i certainly love this website, keep on it
Hello!
Do you want to open non resident bank account UAE without stress? We help foreign nationals meet banking requirements in UAE. Our team ensures quick approvals and easy document handling. Benefit from the advantages of an open non resident bank account UAE. Contact us now.
More information is available via the link – https://telegra.ph/Open-a-Corporate-Bank-Account-in-the-UAE-04-16
Electronic services UAE VAT applies to non-resident suppliers serving UAE clients. Businesses using electronic services UAE VAT must consider VAT treatment carefully. Electronic services UAE VAT rules ensure proper taxation of cross-border services. VAT experts guide companies on electronic services UAE VAT. Understand electronic services UAE VAT implications.
All information is available via the link – https://telegra.ph/VAT-Services-in-the-UAE-04-16
uae vat on services, vat on telecom services in uae, how to open new bank account in uae
dubai islamic bank uae online account opening, how to open net banking to islamic bank account uae, requirements to open bank account in uae
Good luck!
Good day!
Download the accurate UAE tax invoice format for overseas service today. Ensure your invoicing matches FTA standards. Avoid disputes and audits with proper documents. Use the official UAE tax invoice format for overseas service every time. Get your file now.
Full information is available via the link – https://telegra.ph/Corporate-Tax-Services-in-the-UAE-04-16
If you want to open personal bank account UAE, our service is the fastest way to get started. We provide full assistance with document verification and submission. Banks in UAE offer various options for personal accounts. Choose the one that fits your needs perfectly. Begin your open personal bank account UAE process now.
Look information is available via the link – https://telegra.ph/Personal-Bank-Accounts-in-the-UAE-04-17
federal bank nri account opening in uae, best bank to open nre account in uae, services exempted from vat in uae
vacancies in uae for vat customer service, documents required to open business bank account in adib uae, place of supply of services vat uae
Good luck!
Quel est le code promo Linebet 2025 ?
Le code promo Linebet est : https://tutuproduction.ch/site/wp-content/pages/?code_promo_linebet_bonus_.html . Ce code promo vous permet d’obtenir 100 % de bonus a l’issue de votre 1er depot. En rejoignant Linebet, vous pourrez donc gagner jusqu’a 100 $ de freebets.
Vous n’aurez plus qu’a rejouer 5 fois votre bonus en combine pour le convertir en argent reel (3 selections ou plus / cote minimum : 1,40).
Code promo Linebet paris sportifs : jusqu’a 100 $ de bonus de bienvenue
Avec le code promo Linebet, vous profiterez d’un doublement de votre 1er depot jusqu’a 100 $ si vous choisissez le bonus de bienvenue paris sportifs lors de votre inscription.
Choisissez l’offre bonus de bienvenue paris sportifs lors de votre inscription pour en beneficier. C’est l’un des meilleurs avantages pour demarrer chez ce bookmaker.
C’est simple : deposez 50 $ et gagnez 50 $ supplementaires. Jouez 100 $ pour obtenir le bonus maximum de 100 $.
ll faut le rejouer 5 fois en pari combine (avec au moins 3 selections ayant une cote de 1,40 ou plus) pour transformer cet argent bonus en cash retirable et recuperer vos gains.
Cette condition est courante chez les bookmakers en ligne, similaire a ce que propose 1xBet. Assurez-vous que le code marche et que l’offre est valide dans votre pays.
Comment ouvrir un compte avec le code promo Linebet en Mai 2025 ?
Le code promo Linebet doit etre insere dans le formulaire d’ouverture : il vous permettra d’obtenir le bonus de bienvenue paris sportifs ou poker (au choix).
En vous inscrivant, vous pourrez aussi prendre part a toutes les offres promotionnelles mises en place par le site.
Le processus d’inscription a ete allege au maximum pour que vous profitiez au plus vite d’une experience de jeu inedite. Inscrivez-vous maintenant pour profiter de cotes allechantes pour maximiser vos gains !
Hello!
Want to know about Standard Chartered bank account opening minimum balance in UAE? We provide updated info on balance requirements and fees. Choose the best Standard Chartered account for your needs. Get expert advice on Standard Chartered bank account opening minimum balance in UAE.
More information is available via the link – https://telegra.ph/Open-a-Corporate-Bank-Account-in-the-UAE-04-16
Is VAT applicable for service charge in UAE? Yes, VAT applies to most service charges in UAE. Companies must account for VAT on service charge in UAE to comply with the law. Proper invoicing is crucial when is VAT applicable for service charge in UAE. Consult experts to clarify is VAT applicable for service charge in UAE.
All information is available via the link – https://telegra.ph/VAT-Services-in-the-UAE-04-16
best bank to open savings account in uae, bank account opening offers in uae, vat on telecom services in uae
is vat mandatory for good and services in the uae, uae excise tax law, vat on consultancy services uae
Good luck!
Hello!
Need Axis bank account opening in UAE assistance? We guide Indian expatriates to open Axis Bank NRI accounts from UAE. Get fast approvals and clear documentation advice. Start your Axis bank account opening in UAE with us today.
More information is available via the link – https://telegra.ph/Open-a-Corporate-Bank-Account-in-the-UAE-04-16
Looking for guidance on how to open personal bank account in UAE? We provide updated info on document requirements and banking policies. Open your account hassle-free with our support. Enjoy access to all banking features easily. Learn how to open personal bank account in UAE today.
Look information is available via the link – https://telegra.ph/Personal-Bank-Accounts-in-the-UAE-04-17
emirates bank uae account opening terms and conditions, accounting for excise taxes in uae, excise tax goods in uae
consultant services uae ksa tax, vat application services uae, online bank account opening uae
Good luck!
Hello there! I know this is kinda off topic but I was wondering if you knew where I could locate a captcha plugin for my comment form? I’m using the same blog platform as yours and I’m having difficulty finding one? Thanks a lot!
Thanks for your posting. I also feel that laptop computers are getting to be more and more popular these days, and now are sometimes the only form of computer included in a household. This is due to the fact that at the same time actually becoming more and more affordable, their computing power keeps growing to the point where there’re as robust as desktop through just a few in years past.
Hi, Neat post. There’s a problem with your web site in internet explorer, would check this? IE still is the market leader and a large portion of people will miss your magnificent writing because of this problem.
Nice post. I was checking continuously this blog and I am inspired! Extremely helpful info specifically the ultimate section 🙂 I deal with such information much. I used to be seeking this particular info for a very lengthy time. Thank you and best of luck.
I discovered your blog site on google and check a number of of your early posts. Continue to keep up the very good operate. I simply further up your RSS feed to my MSN Information Reader. Searching for ahead to studying extra from you in a while!?
Attractive element of content. I just stumbled upon your website and in accession capital to say that I acquire in fact loved account your weblog posts. Any way I?ll be subscribing in your feeds or even I achievement you get right of entry to persistently quickly.
I don’t think the title of your article matches the content lol. Just kidding, mainly because I had some doubts after reading the article. https://accounts.binance.com/fr-AF/register-person?ref=JHQQKNKN
Thanks for your publication on the vacation industry. We would also like contribute that if you’re a senior thinking about traveling, it’s absolutely important to buy travel insurance for retirees. When traveling, seniors are at biggest risk of experiencing a medical emergency. Obtaining right insurance package for the age group can safeguard your health and give you peace of mind.
Spot on with this write-up, I truly assume this web site wants way more consideration. I?ll most likely be once more to learn much more, thanks for that info.
Some tips i have constantly told people is that when looking for a good on the net electronics store, there are a few aspects that you have to remember to consider. First and foremost, you should make sure to look for a reputable as well as reliable store that has received great opinions and rankings from other customers and business sector leaders. This will ensure you are getting through with a well-known store to provide good assistance and assistance to their patrons. Thanks for sharing your notions on this blog.
Merhaba, bahis sevdal?lar?!
Ethereum’la odeme yap
ve hemen %300 casino bonusunu kap.
Cevrim x10 – maksimum ozgurluk.
KYC istenmez, withdraw 10 dk icinde.
Daha ne bekliyorsun? Jackpot seninle.
—
H?zl? odeme xturka giris
Howdy this is kinda of off topic but I was wanting to know if blogs use WYSIWYG editors or if you have to manually code with HTML. I’m starting a blog soon but have no coding knowledge so I wanted to get advice from someone with experience. Any help would be enormously appreciated!
Merhaba kupon avc?lar?!
Su an?n en h?zl? giris linki ?? BetSalvadorTR ??
7/24 canl? destek + h?zl? cekim sistemi + cift katmanl? koruma ? rahat oyun.
Hemen kat?l ?? yat?r?m?n? %300 kars?lama bonusu ile uce katla! Min. depozit 100 ?.
Canl? bahis, slot ve daha fazlas? mobil uyumlu seni bekliyor.
Oranlar? kap — yuksek kazanc seninle olsun! ??
Guncel linki kaydet — kapanma riskine kars? yeni giris linki sende!
One thing I have actually noticed is that often there are plenty of myths regarding the finance institutions intentions when talking about foreclosures. One fable in particular is the fact that the bank wants your house. Your banker wants your hard earned dollars, not your property. They want the cash they gave you having interest. Averting the bank is only going to draw a new foreclosed conclusion. Thanks for your posting.
Your article helped me a lot, is there any more related content? Thanks!
Hi! Do you use Twitter? I’d like to follow you if that would be okay. I’m absolutely enjoying your blog and look forward to new posts.
Can you be more specific about the content of your article? After reading it, I still have some doubts. Hope you can help me.
This is very fascinating, You are an overly skilled blogger. I’ve joined your feed and look forward to in the hunt for extra of your fantastic post. Additionally, I’ve shared your site in my social networks!
Heya i am for the first time here. I found this board and I find It truly useful & it helped me out a lot. I hope to give something back and aid others like you aided me.
One more important area is that if you are an elderly person, travel insurance intended for pensioners is something you should make sure you really contemplate. The more aged you are, a lot more at risk you’re for getting something awful happen to you while abroad. If you are definitely not covered by quite a few comprehensive insurance policy, you could have a few serious problems. Thanks for giving your ideas on this weblog.
I do like the manner in which you have framed this particular matter and it really does give us a lot of fodder for consideration. Nevertheless, through everything that I have experienced, I just hope when the actual feedback pack on that men and women continue to be on issue and in no way embark on a soap box of some other news of the day. Yet, thank you for this fantastic point and whilst I can not necessarily go along with this in totality, I regard your standpoint.
I’ve been absent for a while, but now I remember why I used to love this blog. Thanks , I will try and check back more often. How frequently you update your web site?
I am curious to find out what blog system you have been utilizing? I’m experiencing some small security problems with my latest blog and I’d like to find something more secure. Do you have any solutions?
very good publish, i actually love this website, keep on it
Your point of view caught my eye and was very interesting. Thanks. I have a question for you.
Can I simply say what a aid to search out somebody who truly is aware of what theyre speaking about on the internet. You undoubtedly know find out how to carry a problem to gentle and make it important. More folks have to learn this and understand this aspect of the story. I cant imagine youre no more widespread since you positively have the gift.
Thanks for your blog post. I would like to say that your health insurance brokerage also utilizes the benefit of the particular coordinators of your group insurance plan. The health insurance professional is given a listing of benefits looked for by a person or a group coordinator. What a broker will is hunt for individuals or coordinators which in turn best fit those requirements. Then he gifts his suggestions and if each party agree, the particular broker formulates a legal contract between the 2 parties.
Valuable information. Lucky me I found your site by accident, and I am shocked why this accident didn’t happened earlier! I bookmarked it.
Your article helped me a lot, is there any more related content? Thanks!
Thanks for sharing. I read many of your blog posts, cool, your blog is very good.
Can you be more specific about the content of your article? After reading it, I still have some doubts. Hope you can help me.
you are actually a excellent webmaster. The website loading velocity is amazing. It kind of feels that you are doing any unique trick. Furthermore, The contents are masterwork. you have performed a wonderful job on this matter!
I adore your wp template, wherever would you get a hold of it from?
Hello lovers Casino!
Enjoy a full casino experience from home with glory casino. Players enjoy daily gifts and cashback offers. Glory casino combines fun and winning opportunities. Create your account in minutes. With glory casino, fun is always just a click away.
All information is available via the link – https://live-life-in-style.com/
glory casino brand ambassadors, glory casino fast cashout, glory casino real time gaming
glory casino free chips, Glory Casino, glory casino reviews
Good luck and profits!
excellent post, very informative. I wonder why the other experts of this sector don’t notice this. You must continue your writing. I am sure, you have a huge readers’ base already!
http://www.arttree.com.au is Australia Popular Online Art Store. We sell Canvas Prints & Handmade Canvas Oil Paintings. We Offer Up-to 70 Percent OFF Discount and FREE Delivery Australia, Sydney, Melbourne, Brisbane, Adelaide, Hobart and all regional areas.
Thanks for another magnificent post. Where else could anyone get that type of information in such a perfect way of writing? I’ve a presentation next week, and I am on the look for such info.
“Selamlar!
? Pragmatic Play’in buyulu oyunu **Starlight Princess** simdi yay?nda!
?? Is?klar icinde carpanlar, prensesle max win!
? starlight princess taktik
?? Hemen basla: starlightprenses.com
?? Mobil uyumlu, VPN gerekmez, h?zl? kay?t ve an?nda oyun keyfi.
Hemen oyna!”
Thanks for giving your ideas in this article. The other factor is that any time a problem takes place with a pc motherboard, people should not consider the risk regarding repairing it themselves because if it is not done correctly it can lead to irreparable damage to an entire laptop. It is usually safe just to approach your dealer of a laptop for the repair of its motherboard. They’ve got technicians with an knowledge in dealing with notebook motherboard problems and can have the right diagnosis and perform repairs.
Thank you for your sharing. I am worried that I lack creative ideas. It is your article that makes me full of hope. Thank you. But, I have a question, can you help me?
“Merhaba slot severler!
?? Yepyeni Pragmatic oyunu **Sugar Rush 1000** yay?nda!
?? Demo denemek icin simdi t?kla: sugar1000turkiye.com
? sugar rush 1000 max win
?? Daha yuksek carpanlar, daha fazla seker ve daha cok kazanc seni bekliyor!
?? Mobil uyumlu, kay?t gerekmez, direkt basla.
Sans?n? dene!”
Thanks for sharing. I read many of your blog posts, cool, your blog is very good.
“Selamlar!
Big Bass Bonanza slotunu demo denedin mi?
?? Bal?klar? yakala, buyuk odulleri topla!
? big bass bonanza oyna
?? Hemen oyna: bigbassbalik.com
?? Pragmatic Play kalitesi, yuksek RTP ve buyuk kazanma sans?.
?? VPN’siz giris, mobil destekli, h?zl? kay?t.
Bol sans!”
Excellent post. I used to be checking constantly this weblog and I’m inspired! Extremely useful info specially the closing section 🙂 I take care of such info much. I was seeking this particular info for a long time. Thanks and best of luck.
Simply desire to say your article is as surprising. The clearness to your post is just cool and that i could think you are an expert in this subject. Well together with your permission allow me to snatch your RSS feed to keep up to date with imminent post. Thank you 1,000,000 and please carry on the gratifying work.
Hello! Do you use Twitter? I’d like to follow you if that would be okay. I’m undoubtedly enjoying your blog and look forward to new updates.
I believe that avoiding prepared foods may be the first step so that you can lose weight. They could taste great, but highly processed foods contain very little vitamins and minerals, making you consume more in order to have enough vitality to get with the day. If you are constantly taking in these foods, switching to whole grains and other complex carbohydrates will let you have more electricity while having less. Good blog post.
Wow! This can be one particular of the most useful blogs We’ve ever arrive across on this subject. Actually Excellent. I am also a specialist in this topic so I can understand your hard work.
http://www.mybudgetart.com.au is Australia’s Trusted Online Wall Art Canvas Prints Store. We are selling art online since 2008. We offer 1000+ artwork designs, up-to 50 OFF store-wide, Budget Pricing Wall Prints starts from $70, FREE Delivery Australia & New Zealand and World-wide shipping. Order Online your canvas prints today at mybudgetart.com.au
Greetings all!
The psychology of online gaming explains how players are emotionally engaged through competition, achievement, and social interaction. Why people play online games is often driven by the excitement, challenge, and opportunity for socializing. Seasonal eating offers various health benefits like better digestion, stronger immunity, and increased energy levels by consuming foods that are in season. The influence of online games on relationships is strong, as they promote teamwork, communication, and the development of lasting friendships. Time management for business leaders ensures that tasks are completed on time and that both professional and personal commitments are met effectively.
More information here – https://urank.ru
productivity tips for entrepreneurs, pet-friendly travel destinations, embracing change through spiritual travel
balancing leadership roles and personal time, traveling with pets tips, inner peace through travel
Good luck!
Hello!
Use anonymous chat when you want to say it all. No fear, no pressure. Just real, honest talk. Let yourself be bold tonight. Explore what excites you most.
More information here – https://rt.flirt888.com/
tease app with webcam, naughty texting free, hot moment online
seductive live video, text tease platform, flirt cam service
Good luck!
One thing is one of the most common incentives for using your credit card is a cash-back or rebate supply. Generally, you’ll get 1-5 back in various expenses. Depending on the cards, you may get 1 again on most acquisitions, and 5 back again on acquisitions made at convenience stores, filling stations, grocery stores and also ‘member merchants’.
WONDERFUL Post.thanks for share..extra wait .. ?
Good article. It is unfortunate that over the last years, the travel industry has had to tackle terrorism, SARS, tsunamis, flu virus, swine flu, and also the first ever entire global tough economy. Through everthing the industry has really proven to be powerful, resilient in addition to dynamic, acquiring new solutions to deal with adversity. There are generally fresh challenges and opportunities to which the business must again adapt and reply.
Good article. It’s very unfortunate that over the last decade, the travel industry has already been able to to tackle terrorism, SARS, tsunamis, bird flu, swine flu, plus the first ever entire global economic depression. Through all this the industry has really proven to be powerful, resilient in addition to dynamic, discovering new methods to deal with trouble. There are continually fresh issues and chance to which the marketplace must once more adapt and react.
One more thing. In my opinion that there are many travel insurance web-sites of dependable companies that allow you enter your holiday details and find you the prices. You can also purchase the actual international travel insurance policy on the web by using the credit card. All that you should do would be to enter your own travel information and you can understand the plans side-by-side. Only find the plan that suits your capacity to pay and needs and after that use your bank credit card to buy them. Travel insurance online is a good way to search for a reputable company with regard to international holiday insurance. Thanks for discussing your ideas.
Hey there! I know this is kinda off topic but I was wondering which blog platform are you using for this website? I’m getting tired of WordPress because I’ve had issues with hackers and I’m looking at alternatives for another platform. I would be fantastic if you could point me in the direction of a good platform.
1xBet prides itself on its comprehensive sportsbook, which encompasses a vast range of sports from all corners of the globe. Whether you have a passion for popular international sports such as football, basketball, tennis, cricket, or you prefer more niche sports, 1xBet has something for everyone. You can place bets on both pre-match and live events, taking advantage of competitive odds and a diverse selection of betting options to enhance your chances of winning.
1xbet Promo Code Exclusive Bonus Up To 130 €/$
http://ourmetals.com/includes/pages/1xbet_free_bet_promo_code_2020.html Promo code for 1xBet, use this combination to increase your welcome bonus up to 100% on an amount reaching $/€130 for registration. These funds are available to all new players who have already created an account or are planning to do so. The bonus requires wagering, and it must be done in the sports section by placing bets with odds of at least 1.4 and a fivefold turnover. You have 30 days to use the code before it expires at the end of 2025.
1xBet Promo Code 2025 – this is a huge bonus of up to $1950 for the casino and 150 free spins on slots. An exclusive offer for new players aged 18 and above. To activate the code, you need to make a deposit of $10. The second and subsequent deposits must be at least $15. You can participate in this promotion until the end of 2025.
My partner and I absolutely love your blog and find most of your post’s to be just what I’m looking for. Would you offer guest writers to write content in your case? I wouldn’t mind composing a post or elaborating on a lot of the subjects you write related to here. Again, awesome web log!
Hi! I just wanted to ask if you ever have any problems with hackers? My last blog (wordpress) was hacked and I ended up losing several weeks of hard work due to no backup. Do you have any methods to protect against hackers?
Hello! Would you mind if I share your blog with my zynga group? There’s a lot of folks that I think would really enjoy your content. Please let me know. Thank you
A further issue is that video gaming has become one of the all-time biggest forms of entertainment for people spanning various ages. Kids enjoy video games, and adults do, too. Your XBox 360 is just about the favorite games systems for individuals that love to have a huge variety of games available to them, in addition to who like to play live with others all over the world. Thanks for sharing your ideas.
Helpful info. Fortunate me I found your web site accidentally, and I am surprised why this twist of fate did not took place earlier! I bookmarked it.
Howdy are using WordPress for your blog platform? I’m new to the blog world but I’m trying to get started and set up my own. Do you need any coding expertise to make your own blog? Any help would be greatly appreciated!
I don’t think the title of your article matches the content lol. Just kidding, mainly because I had some doubts after reading the article.
Have you ever thought about adding a little bit more than just your articles? I mean, what you say is important and all. But think about if you added some great photos or video clips to give your posts more, “pop”! Your content is excellent but with images and video clips, this site could definitely be one of the greatest in its field. Terrific blog!
I am not sure where you’re getting your information, but good topic. I needs to spend some time learning more or understanding more. Thanks for wonderful info I was looking for this info for my mission.
I don’t think the title of your article matches the content lol. Just kidding, mainly because I had some doubts after reading the article.
Please let me know if you’re looking for a writer for your site. You have some really great posts and I feel I would be a good asset. If you ever want to take some of the load off, I’d absolutely love to write some material for your blog in exchange for a link back to mine. Please blast me an email if interested. Thanks!
Hey there, You have done a fantastic job. I will certainly digg it and personally recommend to my friends. I’m sure they will be benefited from this website.
Hello, Neat post. There’s a problem together with your web site in internet explorer, would test this? IE still is the marketplace leader and a good element of folks will miss your fantastic writing due to this problem.
I don’t think the title of your article matches the content lol. Just kidding, mainly because I had some doubts after reading the article.
You actually make it seem so easy with your presentation but I find this topic to be actually something that I think I would never understand. It seems too complicated and very broad for me. I’m looking forward for your next post, I will try to get the hang of it!
Hi, i read your blog from time to time and i own a similar one and i was just wondering if you get a lot of spam remarks? If so how do you reduce it, any plugin or anything you can recommend? I get so much lately it’s driving me crazy so any support is very much appreciated.
Pour en savoir plus sur 888Starz et son type de bookmaker, consultez notre avis: https://www.imdb.com/list/ls4788172424. 888Starz propose de nombreuses promotions interessantes donnant acces a divers bonus et avantages. Grace a elles, les joueurs peuvent profiter d’avantages et augmenter leurs chances de gagner. Les bonus et codes promotionnels rendent le jeu plus dynamique et captivant.
Wonderful website. Plenty of useful information here. I?m sending it to several buddies ans additionally sharing in delicious. And certainly, thank you on your sweat!
I’ve been absent for a while, but now I remember why I used to love this blog. Thanks , I will try and check back more frequently. How frequently you update your web site?
Good blog post. A few things i would like to bring up is that computer memory has to be purchased but if your computer cannot cope with everything you do along with it. One can install two random access memory boards having 1GB each, as an illustration, but not certainly one of 1GB and one with 2GB. One should always check the maker’s documentation for own PC to make sure what type of storage it can take.
Can I simply say what a reduction to find someone who truly is aware of what theyre talking about on the internet. You definitely know tips on how to deliver a problem to mild and make it important. Extra people must learn this and understand this side of the story. I cant consider youre not more widespread because you definitely have the gift.
Thanks for your article. I would love to comment that the first thing you will need to conduct is verify if you really need credit restoration. To do that you need to get your hands on a duplicate of your credit file. That should really not be difficult, since the government mandates that you are allowed to receive one absolutely free copy of the credit report per year. You just have to ask the right individuals. You can either check out the website for your Federal Trade Commission or maybe contact one of the major credit agencies instantly.
I have recently started a website, the information you offer on this website has helped me greatly. Thanks for all of your time & work.
I found this post very helpful.
Thanks a bunch for sharing this with all folks you really realize what you’re speaking about! Bookmarked. Kindly additionally visit my web site =). We may have a link alternate arrangement among us!
Great insights, thanks for sharing!
Thanks for your article. One other thing is when you are marketing your property all on your own, one of the troubles you need to be aware about upfront is just how to deal with property inspection accounts. As a FSBO seller, the key towards successfully shifting your property plus saving money in real estate agent revenue is expertise. The more you recognize, the better your sales effort will likely be. One area in which this is particularly significant is inspection reports.
That is a good tip particularly to those fresh to the blogosphere. Short but very accurate info… Many thanks for sharing this one. A must read article!
Bookmarking this for later.
I think your conclusion is on point, but I’d love to see more discussion on this part of the issue.
I don’t think the title of your article matches the content lol. Just kidding, mainly because I had some doubts after reading the article.
Greetings!
Get rewarded early with your 1xbet welcome bonus promo code. This offer is designed for fresh accounts. The 1xbet welcome bonus promo code gives you more value per bet. Activate it now and enjoy extra funds. Make your first game a victory.
All information is available via the link – https://intelicode.com/public/pgs/1xbet_promo_code_and_bonus.html
code promo 1xbet gratuit bonus, le code promo 1xbet actuel, 1xbet welcome bonus
1xbet promo code, 1xbet promo code, 1xbet promo code today
Good luck and profitS!
Hey very cool website!! Man .. Excellent .. Amazing .. I will bookmark your website and take the feeds also?I’m happy to find a lot of useful information here in the post, we need develop more techniques in this regard, thanks for sharing. . . . . .
I have noticed that online education is getting well-known because accomplishing your degree online has developed into popular option for many people. Quite a few people have not had a possible opportunity to attend a conventional college or university yet seek the elevated earning potential and career advancement that a Bachelor’s Degree provides. Still other folks might have a college degree in one training but would wish to pursue a thing they already have an interest in.
Ciao amanti del Casino!
Con Farantube giochi non aams puoi scoprire nuovi titoli non disponibili nei siti ADM. Giochi da tavolo, slot e live games sono tutti recensiti. Farantube giochi non aams ГЁ la guida definitiva per giocatori esperti. Ottieni consigli reali e confronta i migliori siti. L’esperienza di gioco parte da qui.
Tutte le informazioni sono disponibili al link – https://casinoslistanonaams.it/siti-scommesse-non-aams/
migliore bookmaker non aams, nuovi online casinГІ non aams, casinГІ paypal non aams
giocare su book non aams, casino non aams con neteller, siti gioco non aams
Buona fortuna e profitti!
I?ll immediately grab your rss feed as I can’t find your e-mail subscription link or e-newsletter service. Do you have any? Please let me know in order that I could subscribe. Thanks.
Thank you for your sharing. I am worried that I lack creative ideas. It is your article that makes me full of hope. Thank you. But, I have a question, can you help me?
Hello lovers Casino!
Get more from every deposit using your 1xbet bonus. It’s designed to give back more value. The 1xbet bonus helps extend your game time. Win more often and withdraw faster. Better bonuses equal better gameplay.
All information is available via the link – https://www.etikhaber.com/amp/elements/1xbet_promo_code_tanzania.html
1xbet promo code today, 1xbet free promo code, 1xbet promo code ghana
1xbet promo code today, 1xbet promo code, 1xbet promo code sign up bonus
Good luck and profitS!
Wonderful beat ! I would like to apprentice at the same time as you amend your website, how could i subscribe for a blog site? The account aided me a acceptable deal. I were a little bit acquainted of this your broadcast provided brilliant transparent concept
Merhaba, bahis sevdal?lar?!
Ethereum’la odeme yap
ve an?nda %50 spor bonusunu kap.
Cevrim yaln?zca on kat – maksimum ozgurluk.
KYC istenmez, cekim 10 dk icinde.
Daha ne bekliyorsun? Sans ayag?nda.
—
H?zl? odeme xturka giris
Merhaba, bahis sevdal?lar?!
Ethereum’la odeme yap
ve hemen %100 slot bonusunu kap.
Cevrim x10 – yuksek limit.
Belgeler istenmez, withdraw 10 dk icinde.
Daha ne bekliyorsun? Kazanma sans? seninle.
—
xturka mega bonus
Good day!
The psychology of online gaming involves the reward systems that keep players engaged and motivated to continue. Why people play online games can be traced to the desire for excitement, challenge, and social connection. Seasonal eating benefits include healthier choices and improved overall well-being when your diet is aligned with the seasons. Digital games impact relationships by fostering strong social bonds through multiplayer experiences. Time management for business leaders helps improve efficiency and keeps projects on track in a fast-paced environment.
More information here – https://www.pondexperts.ca
seasonal eating for better health
managing work schedules effectively
pet travel: what you need to know
gig economy and digital platforms
Good luck!
Good day!
Online gaming psychology is based on the rewards, challenge, and social bonds players experience while playing. Why people play online games is often linked to the desire for fun, connection, and achievement in a virtual space. Seasonal eating offers a variety of health benefits, including better energy levels and improved digestion when your diet is seasonal. The impact of online games on relationships is far-reaching, as gaming communities often become a place for meaningful interaction and collaboration. Time management for business leaders is essential to ensure that tasks are completed efficiently and without stress.
More information here – https://lyncconf.com
maximizing seasonal produce benefits,creating mentorship programs in business,exploring the psychology of gaming
mentoring to drive workplace innovation,spiritual retreats to reset your mind,benefits of aligning diet with nature
Good luck!
Your article helped me a lot, is there any more related content? Thanks!
“Selamlar!
Gates of Olympus slotunu demo denedin mi?
?? Zeus ile kazanc patlamas? yasa!
? gates of olympus giris
?? Hemen oyna: olimpiyagates.com
?? Pragmatic Play kalitesiyle yuksek RTP, 5000x’e kadar max win sans?.
?? VPN gerekmez, mobil destekli, h?zl? kay?t.
Bol sans!”
“Selamlar!
Sweet Bonanza oyununu gercek parayla denedin mi?
?? Seker patlat ve para kazan.
? sweet bonanza nedir
?? Hemen basla: bonanzaseker.org
Hemen oyna!”
I would also love to add that when you do not surely have an insurance policy or perhaps you do not remain in any group insurance, you may well benefit from seeking assistance from a health insurance agent. Self-employed or people who have medical conditions ordinarily seek the help of any health insurance brokerage. Thanks for your text.
Write more, thats all I have to say. Literally, it seems as though you relied on the video to make your point. You definitely know what youre talking about, why throw away your intelligence on just posting videos to your blog when you could be giving us something enlightening to read?
You really make it appear so easy together with your presentation but I to find this topic to be really one thing that I feel I might never understand. It kind of feels too complicated and very large for me. I am taking a look forward to your next submit, I will attempt to get the cling of it!
Good day lucky players!
Sugar rush 1000 has sticky fun and big bonuses on every reel. Play through a colorful world of sugary delights. Trigger multipliers and explode matching candies. Sugar rush 1000 is packed with thrilling features. Get in on the action with sugar rush 1000 now.
All information is available via the link – https://avtohelp.org/
sugar rush online game, sugar rush game demo, sugar rush game
sugar rush game casino, sugar rush game slot, sugar rush game online
Good luck and profits!
I have seen plenty of useful items on your site about pcs. However, I have got the judgment that notebooks are still not nearly powerful more than enough to be a option if you usually do projects that require lots of power, just like video croping and editing. But for website surfing, word processing, and most other prevalent computer functions they are just great, provided you never mind small screen size. Many thanks for sharing your ideas.
Does your site have a contact page? I’m having trouble locating it but, I’d like to shoot you an e-mail. I’ve got some ideas for your blog you might be interested in hearing. Either way, great website and I look forward to seeing it expand over time.
Can you be more specific about the content of your article? After reading it, I still have some doubts. Hope you can help me.
Just desire to say your article is as amazing. The clearness in your submit is simply excellent and i can suppose you are a professional in this subject. Well along with your permission allow me to grasp your feed to keep up to date with coming near near post. Thank you a million and please continue the rewarding work.
Write more, thats all I have to say. Literally, it seems as though you relied on the video to make your point. You clearly know what youre talking about, why waste your intelligence on just posting videos to your site when you could be giving us something enlightening to read?
This is the best blog for anyone who wants to seek out out about this topic. You notice so much its almost exhausting to argue with you (not that I actually would need?HaHa). You undoubtedly put a new spin on a topic thats been written about for years. Nice stuff, just nice!
Hi my friend! I want to say that this post is amazing, nice written and include approximately all vital infos. I?d like to see more posts like this.
Awesome site you have here but I was curious if you knew of any forums that cover the same topics talked about here? I’d really love to be a part of community where I can get feedback from other knowledgeable individuals that share the same interest. If you have any suggestions, please let me know. Appreciate it!
Today, with the fast chosen lifestyle that everyone is having, credit cards have a big demand in the economy. Persons coming from every field are using credit card and people who not using the credit cards have made up their minds to apply for 1. Thanks for spreading your ideas about credit cards.
whoah this blog is wonderful i love reading your posts. Keep up the good work! You know, lots of people are looking around for this info, you could aid them greatly.
Just desire to say your article is as surprising. The clearness in your post is just spectacular and i could assume you’re an expert on this subject. Well with your permission let me to grab your feed to keep updated with forthcoming post. Thanks a million and please keep up the rewarding work.
I just like the helpful information you provide to your articles. I will bookmark your blog and test again right here frequently. I’m reasonably sure I?ll be told lots of new stuff proper right here! Best of luck for the following!
Good blog! I truly love how it is easy on my eyes and the data are well written. I am wondering how I might be notified whenever a new post has been made. I’ve subscribed to your feed which must do the trick! Have a nice day!
Great beat ! I would like to apprentice while you amend your site, how could i subscribe for a blog web site? The account aided me a acceptable deal. I had been a little bit acquainted of this your broadcast offered bright clear concept
I’ve learned a few important things by means of your post. I would also like to express that there is a situation that you will make application for a loan and do not need a cosigner such as a Fed Student Aid Loan. In case you are getting financing through a conventional financier then you need to be willing to have a co-signer ready to assist you to. The lenders will certainly base any decision using a few variables but the largest will be your credit ratings. There are some loan merchants that will additionally look at your job history and decide based on this but in many cases it will depend on your score.
I take pleasure in, lead to I found just what I used to be taking a look for. You have ended my four day lengthy hunt! God Bless you man. Have a great day. Bye
Fantastic blog you have here but I was curious if you knew of any discussion boards that cover the same topics discussed in this article? I’d really like to be a part of online community where I can get comments from other experienced people that share the same interest. If you have any recommendations, please let me know. Many thanks!
Thanks for the thoughts you have contributed here. In addition, I believe there are several factors that will keep your insurance premium all the way down. One is, to think about buying vehicles that are from the good listing of car insurance corporations. Cars which can be expensive are usually more at risk of being stolen. Aside from that insurance is also in line with the value of your truck, so the more costly it is, then higher a premium you pay.
Thanks for your posting. I also feel that laptop computers have gotten more and more popular nowadays, and now are often the only kind of computer found in a household. This is due to the fact that at the same time that they’re becoming more and more very affordable, their computing power is growing to the point where they’re as strong as desktop computers from just a few in years past.
I don’t think the title of your article matches the content lol. Just kidding, mainly because I had some doubts after reading the article. https://www.binance.info/en-IN/register?ref=UM6SMJM3
Something more important is that when evaluating a good on the web electronics shop, look for online shops that are constantly updated, keeping up-to-date with the latest products, the top deals, along with helpful information on goods and services. This will make certain you are dealing with a shop which stays atop the competition and gives you what you should need to make knowledgeable, well-informed electronics buying. Thanks for the crucial tips I have really learned through the blog.
Hello, Neat post. There’s a problem along with your site in web explorer, may check this? IE nonetheless is the market leader and a good component to people will omit your excellent writing because of this problem.
Thx for your post. I would really like to write my opinion that the cost of car insurance will vary from one insurance policy to another, for the reason that there are so many different facets which play a role in the overall cost. For instance, the brand name of the vehicle will have a huge bearing on the price. A reliable aged family vehicle will have a more economical premium than just a flashy racecar.
Once I initially commented I clicked the -Notify me when new comments are added- checkbox and now each time a comment is added I get 4 emails with the identical comment. Is there any way you can remove me from that service? Thanks!
Thanks for another magnificent post. Where else could anyone get that kind of information in such an ideal way of writing? I’ve a presentation next week, and I’m on the look for such info.
It?s actually a nice and helpful piece of info. I?m glad that you shared this helpful information with us. Please keep us up to date like this. Thanks for sharing.
Your point of view caught my eye and was very interesting. Thanks. I have a question for you. https://accounts.binance.info/en-IN/register-person?ref=UM6SMJM3
Also a thing to mention is that an online business administration study course is designed for scholars to be able to efficiently proceed to bachelors degree education. The Ninety credit college degree meets the lower bachelor college degree requirements when you earn your own associate of arts in BA online, you will have access to the modern technologies in this field. Some reasons why students would like to get their associate degree in business is because they may be interested in the field and want to get the general schooling necessary in advance of jumping to a bachelor education program. Thanks alot : ) for the tips you actually provide in the blog.
I’m really impressed with your writing skills and also with the layout on your blog. Is this a paid theme or did you customize it yourself? Either way keep up the excellent quality writing, it?s rare to see a nice blog like this one today..
Thanks for your publication. I would like to remark that the first thing you will need to carry out is verify if you really need credit score improvement. To do that you simply must get your hands on a replica of your credit history. That should not be difficult, since the government mandates that you are allowed to be issued one free of charge copy of the credit report annually. You just have to check with the right individuals. You can either check out the website for the Federal Trade Commission and also contact one of the major credit agencies right away.
Thanks for sharing. I read many of your blog posts, cool, your blog is very good. https://accounts.binance.com/register?ref=P9L9FQKY
Thank you for your sharing. I am worried that I lack creative ideas. It is your article that makes me full of hope. Thank you. But, I have a question, can you help me? https://www.binance.com/id/register?ref=GJY4VW8W
Great ? I should certainly pronounce, impressed with your website. I had no trouble navigating through all the tabs and related info ended up being truly easy to do to access. I recently found what I hoped for before you know it at all. Quite unusual. Is likely to appreciate it for those who add forums or anything, site theme . a tones way for your customer to communicate. Excellent task..
Thanks for enabling me to gain new suggestions about computer systems. I also possess the belief that one of the best ways to help keep your laptop in perfect condition has been a hard plastic material case, or shell, that suits over the top of your computer. A lot of these protective gear tend to be model specific since they are made to fit perfectly over the natural outer shell. You can buy all of them directly from the vendor, or via third party places if they are designed for your laptop computer, however not every laptop can have a cover on the market. All over again, thanks for your tips.
Thanks, I’ve been hunting for info about this topic for ages and yours is the best I have found so far.
Thank you for your sharing. I am worried that I lack creative ideas. It is your article that makes me full of hope. Thank you. But, I have a question, can you help me?
Hey, you used to write magnificent, but the last several posts have been kinda boring? I miss your tremendous writings. Past several posts are just a little out of track! come on!
Hello very cool site!! Guy .. Beautiful .. Wonderful .. I will bookmark your blog and take the feeds also?I am happy to seek out numerous helpful information here within the publish, we need work out more strategies on this regard, thank you for sharing. . . . . .
Can you be more specific about the content of your article? After reading it, I still have some doubts. Hope you can help me.
Thanks for the suggestions about credit repair on this blog. The things i would advice people should be to give up the particular mentality that they buy currently and pay back later. As being a society many of us tend to do that for many issues. This includes family vacations, furniture, and also items we wish. However, you should separate the wants out of the needs. If you are working to boost your credit score actually you need some sacrifices. For example it is possible to shop online to save money or you can look at second hand retailers instead of pricey department stores pertaining to clothing.
Thank you for your sharing. I am worried that I lack creative ideas. It is your article that makes me full of hope. Thank you. But, I have a question, can you help me?
Thank you for your sharing. I am worried that I lack creative ideas. It is your article that makes me full of hope. Thank you. But, I have a question, can you help me?
Can you be more specific about the content of your article? After reading it, I still have some doubts. Hope you can help me. https://www.binance.info/pl/register?ref=YY80CKRN
affordablecanvaspaintings.com.au is Australia Popular Online 100 percent Handmade Art Store. We deliver Budget Handmade Canvas Paintings, Abstract Art, Oil Paintings, Artwork Sale, Acrylic Wall Art Paintings, Custom Art, Oil Portraits, Pet Paintings, Building Paintings etc. 1000+ Designs To Choose From, Highly Experienced Artists team, Up-to 50 percent OFF SALE and FREE Delivery Australia, Sydney, Melbourne, Brisbane, Adelaide, Hobart and all regional areas. We ship worldwide international locations. Order Online Your Handmade Art Today.
Have you ever considered publishing an ebook or guest authoring on other blogs? I have a blog based on the same subjects you discuss and would love to have you share some stories/information. I know my audience would value your work. If you are even remotely interested, feel free to shoot me an e-mail.
Your point of view caught my eye and was very interesting. Thanks. I have a question for you.
Magnificent site. Lots of useful information here. I am sending it to some friends ans also sharing in delicious. And obviously, thanks for your sweat!
It?s really a great and helpful piece of info. I?m glad that you shared this helpful information with us. Please keep us up to date like this. Thank you for sharing.
Thanks for your posting. My spouse and i have generally seen that a majority of people are desirous to lose weight as they wish to look slim and attractive. However, they do not continually realize that there are many benefits just for losing weight additionally. Doctors declare that fat people have problems with a variety of health conditions that can be directly attributed to their excess weight. The good thing is that people who sadly are overweight along with suffering from different diseases can reduce the severity of their illnesses by losing weight. You’ll be able to see a progressive but identifiable improvement with health if even a minor amount of fat loss is accomplished.
I appreciate, cause I found exactly what I was looking for. You’ve ended my four day long hunt! God Bless you man. Have a nice day. Bye
Useful info. Fortunate me I discovered your website accidentally, and I am surprised why this coincidence did not took place earlier! I bookmarked it.
Thanks for these pointers. One thing I also believe is that often credit cards providing a 0 rate often bait consumers together with zero interest rate, instant approval and easy on the net balance transfers, but beware of the real factor that will certainly void your own 0 easy streets annual percentage rate and also throw you out into the terrible house quick.
I believe that avoiding processed foods would be the first step for you to lose weight. They can taste excellent, but packaged foods contain very little vitamins and minerals, making you feed on more in order to have enough electricity to get through the day. For anyone who is constantly feeding on these foods, transferring to cereals and other complex carbohydrates will help you to have more power while ingesting less. Interesting blog post.
I feel this is among the such a lot vital information for me. And i’m happy studying your article. However want to commentary on some common things, The web site style is great, the articles is in reality nice : D. Excellent job, cheers
I think other site proprietors should take this website as an model, very clean and fantastic user friendly style and design, as well as the content. You’re an expert in this topic!
Thanks for the concepts you have contributed here. Also, I believe there are a few factors that really keep your motor insurance premium down. One is, to consider buying automobiles that are inside the good listing of car insurance companies. Cars that are expensive will be more at risk of being snatched. Aside from that insurance policies are also using the value of your car, so the more expensive it is, then higher your premium you spend.
Your point of view caught my eye and was very interesting. Thanks. I have a question for you. binance signup bonus
Thank you for any other excellent article. The place else could anybody get that kind of info in such a perfect manner of writing? I have a presentation subsequent week, and I am on the look for such info.
Thanks for your write-up on the traveling industry. We would also like to add that if you are a senior considering traveling, it can be absolutely vital that you buy travel cover for retirees. When traveling, senior citizens are at greatest risk of experiencing a health emergency. Buying the right insurance package in your age group can look after your health and provide you with peace of mind.
That is the fitting blog for anyone who needs to seek out out about this topic. You notice a lot its almost laborious to argue with you (not that I truly would want?HaHa). You definitely put a new spin on a topic thats been written about for years. Great stuff, simply great!
Fantastic website. Lots of useful information here. I am sending it to a few friends ans also sharing in delicious. And naturally, thanks for your effort!
You can definitely see your expertise in the paintings you write. The world hopes for more passionate writers like you who aren’t afraid to say how they believe. All the time go after your heart.
I love your blog.. very nice colors & theme. Did you create this website yourself or did you hire someone to do it for you? Plz reply as I’m looking to design my own blog and would like to know where u got this from. cheers
I believe that avoiding prepared foods could be the first step in order to lose weight. They will often taste excellent, but processed foods include very little nutritional value, making you take more in order to have enough vigor to get throughout the day. If you’re constantly having these foods, changing to grain and other complex carbohydrates will let you have more vigor while eating less. Interesting blog post.
Heya i am for the first time here. I found this board and I to find It really useful & it helped me out much. I am hoping to provide something again and aid others like you aided me.
I don’t think the title of your article matches the content lol. Just kidding, mainly because I had some doubts after reading the article.
I like the helpful info you provide in your articles. I will bookmark your weblog and check again here frequently. I am quite sure I will learn many new stuff right here! Best of luck for the next!
Hi there! Someone in my Myspace group shared this website with us so I came to look it over. I’m definitely loving the information. I’m book-marking and will be tweeting this to my followers! Excellent blog and amazing design.
Helpful information. Lucky me I discovered your website by accident, and I am surprised why this coincidence didn’t happened earlier! I bookmarked it.
One more thing. I do believe that there are a lot of travel insurance internet sites of dependable companies that let you enter your journey details and have you the prices. You can also purchase your international holiday insurance policy on internet by using your current credit card. Everything you should do is usually to enter the travel specifics and you can be aware of the plans side-by-side. Merely find the package that suits your financial budget and needs after which use your credit card to buy the item. Travel insurance on the internet is a good way to take a look for a respectable company to get international travel insurance. Thanks for discussing your ideas.
After examine just a few of the weblog posts in your website now, and I truly like your approach of blogging. I bookmarked it to my bookmark website record and can be checking back soon. Pls take a look at my website online as nicely and let me know what you think.
One other issue is that if you are in a circumstances where you do not possess a cosigner then you may genuinely wish to try to exhaust all of your school funding options. You can find many grants and other scholarships or grants that will give you funding that can help with education expenses. Thanks alot : ) for the post.
I really like what you guys are usually up too. Such clever work and coverage! Keep up the wonderful works guys I’ve added you guys to my own blogroll.
Thanks for the new things you have discovered in your short article. One thing I would really like to comment on is that FSBO interactions are built after some time. By introducing yourself to the owners the first end of the week their FSBO is actually announced, prior to the masses begin calling on Friday, you produce a good link. By mailing them equipment, educational supplies, free reviews, and forms, you become a strong ally. By subtracting a personal desire for them along with their predicament, you produce a solid network that, on many occasions, pays off once the owners opt with an agent they know in addition to trust — preferably you actually.
Howdy would you mind letting me know which webhost you’re using? I’ve loaded your blog in 3 completely different internet browsers and I must say this blog loads a lot faster then most. Can you recommend a good hosting provider at a fair price? Cheers, I appreciate it!
great points altogether, you just gained a new reader. What would you recommend in regards to your post that you made some days ago? Any positive?
Hey there just wanted to give you a quick heads up and let you know a few of the pictures aren’t loading correctly. I’m not sure why but I think its a linking issue. I’ve tried it in two different browsers and both show the same results.
Hi, i believe that i saw you visited my web site thus i got here to ?go back the favor?.I’m attempting to in finding things to improve my web site!I assume its good enough to make use of a few of your concepts!!
I haven?t checked in here for a while because I thought it was getting boring, but the last few posts are great quality so I guess I?ll add you back to my daily bloglist. You deserve it my friend 🙂
Does your site have a contact page? I’m having a tough time locating it but, I’d like to send you an e-mail. I’ve got some recommendations for your blog you might be interested in hearing. Either way, great website and I look forward to seeing it grow over time.
Hello there! Do you know if they make any plugins to protect against hackers? I’m kinda paranoid about losing everything I’ve worked hard on. Any recommendations?
Thanks for the post. My spouse and i have usually seen that a lot of people are eager to lose weight simply because wish to show up slim and also attractive. Nevertheless, they do not generally realize that there are other benefits for losing weight additionally. Doctors claim that obese people are afflicted with a variety of illnesses that can be perfectely attributed to their excess weight. The good thing is that people that are overweight and also suffering from several diseases can help to eliminate the severity of the illnesses by means of losing weight. You are able to see a slow but notable improvement with health when even a moderate amount of fat loss is achieved.
I have really noticed that credit improvement activity must be conducted with techniques. If not, it’s possible you’ll find yourself endangering your rank. In order to realize your aspirations in fixing to your credit rating you have to ascertain that from this instant you pay all of your monthly fees promptly prior to their timetabled date. It is significant for the reason that by definitely not accomplishing so, all other steps that you will decide to try to improve your credit standing will not be useful. Thanks for discussing your suggestions.
I?ll right away grasp your rss as I can’t to find your e-mail subscription hyperlink or e-newsletter service. Do you have any? Kindly allow me recognize so that I could subscribe. Thanks.
I would like to thank you for the efforts you have put in writing this website. I’m hoping the same high-grade site post from you in the upcoming also. In fact your creative writing abilities has inspired me to get my own blog now. Really the blogging is spreading its wings fast. Your write up is a great example of it.
A powerful share, I just given this onto a colleague who was doing a little bit analysis on this. And he in reality bought me breakfast as a result of I discovered it for him.. smile. So let me reword that: Thnx for the treat! However yeah Thnkx for spending the time to discuss this, I feel strongly about it and love studying more on this topic. If potential, as you turn out to be experience, would you thoughts updating your blog with more particulars? It’s extremely useful for me. Large thumb up for this blog post!
Hello there, I found your site via Google while searching for a related topic, your website came up, it looks good. I have bookmarked it in my google bookmarks.
You really make it seem so easy with your presentation but I find this matter to be actually something which I think I would never understand. It seems too complicated and extremely broad for me. I am looking forward for your next post, I?ll try to get the hang of it!
Aw, this was a really nice post. In concept I wish to put in writing like this moreover ? taking time and actual effort to make a very good article? however what can I say? I procrastinate alot and by no means seem to get one thing done.
Have you ever considered about adding a little bit more than just your articles? I mean, what you say is fundamental and all. Nevertheless just imagine if you added some great visuals or videos to give your posts more, “pop”! Your content is excellent but with pics and video clips, this site could certainly be one of the best in its field. Superb blog!
One thing I want to say is the fact before getting more laptop or computer memory, take a look at the machine in which it could be installed. In case the machine can be running Windows XP, for instance, a memory limit is 3.25GB. Putting in over this would just constitute a waste. Make sure one’s motherboard can handle the upgrade quantity, as well. Thanks for your blog post.
Its like you read my mind! You appear to know a lot about this, like you wrote the book in it or something. I think that you could do with a few pics to drive the message home a bit, but instead of that, this is fantastic blog. A fantastic read. I’ll definitely be back.
I have recently started a site, the info you provide on this website has helped me greatly. Thank you for all of your time & work.
Hi, I think your website might be having browser compatibility issues. When I look at your blog in Safari, it looks fine but when opening in Internet Explorer, it has some overlapping. I just wanted to give you a quick heads up! Other then that, fantastic blog!
Your point of view caught my eye and was very interesting. Thanks. I have a question for you.
It is perfect time to make some plans for the future and it’s time to be happy. I have read this post and if I could I wish to suggest you few interesting things or suggestions. Maybe you can write next articles referring to this article. I wish to read more things about it!
Can you be more specific about the content of your article? After reading it, I still have some doubts. Hope you can help me.
One thing is the fact that one of the most widespread incentives for utilizing your card is a cash-back or maybe rebate supply. Generally, you’ll have access to 1-5 back on various expenses. Depending on the card, you may get 1 returning on most acquisitions, and 5 back on buying made from convenience stores, gas stations, grocery stores plus ‘member merchants’.
Nice post. I used to be checking continuously this blog and I am inspired! Extremely useful information specifically the last part 🙂 I take care of such information a lot. I was seeking this particular info for a long time. Thanks and best of luck.
I was very pleased to search out this net-site.I needed to thanks on your time for this excellent learn!! I definitely having fun with each little little bit of it and I have you bookmarked to take a look at new stuff you weblog post.
Throughout the grand pattern of things you secure a B- with regard to effort and hard work. Where you lost everybody was first on the particulars. You know, as the maxim goes, details make or break the argument.. And it couldn’t be much more correct in this article. Having said that, allow me tell you just what did do the job. Your text is actually quite powerful and that is probably why I am making an effort in order to opine. I do not really make it a regular habit of doing that. Next, even though I can see the jumps in reason you make, I am not necessarily convinced of exactly how you appear to unite your details which inturn help to make the final result. For the moment I shall subscribe to your position however trust in the foreseeable future you actually connect your dots better.
Hello my friend! I want to say that this post is awesome, nice written and include approximately all significant infos. I would like to see more posts like this.
I loved as much as you’ll receive carried out right here. The sketch is tasteful, your authored material stylish. nonetheless, you command get bought an nervousness over that you wish be delivering the following. unwell unquestionably come further formerly again as exactly the same nearly a lot often inside case you shield this hike.
Undeniably believe that which you said. Your favorite justification seemed to be on the net the simplest thing to be aware of. I say to you, I definitely get irked while people consider worries that they just don’t know about. You managed to hit the nail upon the top and also defined out the whole thing without having side-effects , people could take a signal. Will probably be back to get more. Thanks
Can you be more specific about the content of your article? After reading it, I still have some doubts. Hope you can help me.
I was recommended this web site by my cousin. I am not sure whether this post is written by him as no one else know such detailed about my problem. You’re incredible! Thanks!
great issues altogether, you simply won a new reader. What would you recommend about your submit that you made a few days in the past? Any positive?
Thank you for your sharing. I am worried that I lack creative ideas. It is your article that makes me full of hope. Thank you. But, I have a question, can you help me?
I just could not depart your website before suggesting that I extremely enjoyed the standard information a person provide for your visitors? Is gonna be back often to check up on new posts
I don’t think the title of your article matches the content lol. Just kidding, mainly because I had some doubts after reading the article.
That is the correct blog for anybody who desires to seek out out about this topic. You understand a lot its virtually hard to argue with you (not that I really would want?HaHa). You positively put a new spin on a subject thats been written about for years. Nice stuff, simply nice!
Thanks for the suggestions you have discussed here. One more thing I would like to express is that computer system memory needs generally increase along with other improvements in the technological innovation. For instance, as soon as new generations of processors are brought to the market, there is certainly usually a related increase in the size demands of both the personal computer memory plus hard drive room. This is because the application operated by simply these processor chips will inevitably boost in power to make new technologies.
Nice read, I just passed this onto a colleague who was doing some research on that. And he just bought me lunch since I found it for him smile Thus let me rephrase that: Thanks for lunch!
Very good site you have here but I was curious about if you knew of any community forums that cover the same topics talked about in this article? I’d really like to be a part of group where I can get feedback from other experienced people that share the same interest. If you have any recommendations, please let me know. Bless you!
I do consider all of the ideas you have offered for your post. They’re very convincing and will definitely work. Nonetheless, the posts are too brief for novices. Could you please lengthen them a little from next time? Thank you for the post.
Hello there! Would you mind if I share your blog with my facebook group? There’s a lot of folks that I think would really appreciate your content. Please let me know. Cheers
Wow, marvelous weblog format! How long have you been running a blog for? you make blogging look easy. The overall glance of your site is wonderful, as neatly as the content!
Thanks for another informative website. Where else could I get that kind of info written in such an ideal way? I have a project that I am just now working on, and I have been on the look out for such information.
Just want to say your article is as amazing. The clarity in your post is just excellent and i could assume you are an expert on this subject. Well with your permission allow me to grab your feed to keep up to date with forthcoming post. Thanks a million and please continue the rewarding work.
Thanks for your recommendations on this blog. One thing I want to say is always that purchasing electronic devices items in the Internet is nothing new. The fact is, in the past decade alone, the marketplace for online electronics has grown a great deal. Today, you will find practically just about any electronic unit and tools on the Internet, including cameras as well as camcorders to computer elements and gaming consoles.
What?s Happening i’m new to this, I stumbled upon this I’ve found It absolutely helpful and it has aided me out loads. I hope to contribute & aid other users like its aided me. Good job.
Hi! I know this is kind of off topic but I was wondering which blog platform are you using for this site? I’m getting fed up of WordPress because I’ve had issues with hackers and I’m looking at alternatives for another platform. I would be fantastic if you could point me in the direction of a good platform.
After research a number of of the weblog posts on your website now, and I truly like your way of blogging. I bookmarked it to my bookmark website list and will probably be checking back soon. Pls check out my website online as effectively and let me know what you think.
whoah this weblog is great i love reading your articles. Keep up the good paintings! You know, lots of individuals are looking round for this info, you could help them greatly.
I think other site proprietors should take this web site as an model, very clean and wonderful user genial style and design, as well as the content. You are an expert in this topic!
Thanks , I’ve just been searching for info about this topic for ages and yours is the best I’ve discovered so far. But, what about the conclusion? Are you sure about the source?
What i do not realize is in reality how you’re not actually a lot more neatly-appreciated than you might be now. You’re very intelligent. You realize thus considerably relating to this matter, produced me in my view imagine it from a lot of various angles. Its like women and men are not interested except it is something to accomplish with Lady gaga! Your individual stuffs outstanding. At all times care for it up!
Thank you for your sharing. I am worried that I lack creative ideas. It is your article that makes me full of hope. Thank you. But, I have a question, can you help me?
Hi, I think your blog might be having browser compatibility issues. When I look at your website in Opera, it looks fine but when opening in Internet Explorer, it has some overlapping. I just wanted to give you a quick heads up! Other then that, great blog!
you’re really a good webmaster. The web site loading speed is amazing. It seems that you are doing any unique trick. In addition, The contents are masterwork. you have done a great job on this topic!
Out of my investigation, shopping for technology online can for sure be expensive, nonetheless there are some principles that you can use to obtain the best offers. There are constantly ways to find discount offers that could make one to come across the best technology products at the cheapest prices. Interesting blog post.
Great website you have here but I was wanting to know if you knew of any forums that cover the same topics discussed in this article? I’d really like to be a part of community where I can get comments from other experienced individuals that share the same interest. If you have any suggestions, please let me know. Thanks!
you may have an important blog right here! would you like to make some invite posts on my weblog?
Wow, awesome blog layout! How long have you ever been blogging for? you make running a blog glance easy. The entire look of your web site is excellent, as well as the content!
I don’t think the title of your article matches the content lol. Just kidding, mainly because I had some doubts after reading the article.
Today, with all the fast life style that everyone leads, credit cards get this amazing demand throughout the market. Persons throughout every discipline are using credit card and people who not using the credit card have made up their minds to apply for one in particular. Thanks for expressing your ideas about credit cards.
You actually make it seem so easy with your presentation but I find this topic to be actually something which I think I would never understand. It seems too complicated and extremely broad for me. I am looking forward for your next post, I?ll try to get the hang of it!
Great post right here. One thing I would like to say is that often most professional areas consider the Bachelor’s Degree like thejust like the entry level requirement for an online certification. While Associate Certifications are a great way to get started on, completing your Bachelors reveals many good opportunities to various occupations, there are numerous online Bachelor Course Programs available by institutions like The University of Phoenix, Intercontinental University Online and Kaplan. Another thing is that many brick and mortar institutions give Online versions of their college diplomas but often for a extensively higher price than the organizations that specialize in online course plans.
The rapidly shifting landscape of digital marketing demands a profound understanding of state-of-the-art technologies, such as machine learning and data science. It would be intriguing to see you delve into the nuances of search marketing and its synergies with storytelling. Your remarkable talent for uncovering insights of complex amounts of data is truly commendable. Thanks for consistently providing such valuable ideas—I’m eagerly awaiting your next post.
link
link
Good post made here. One thing I would like to say is the fact most professional fields consider the Bachelors Degree just as the entry level standard for an online college diploma. Although Associate Degrees are a great way to get started, completing a person’s Bachelors opens many entrances to various occupations, there are numerous internet Bachelor Diploma Programs available via institutions like The University of Phoenix, Intercontinental University Online and Kaplan. Another thing is that many brick and mortar institutions offer Online variants of their degree programs but commonly for a drastically higher cost than the firms that specialize in online qualification plans.
One thing I’d like to say is always that car insurance termination is a horrible experience and if you are doing the suitable things as being a driver you may not get one. Some individuals do get the notice that they are officially dropped by the insurance company they have to fight to get extra insurance after the cancellation. Low-cost auto insurance rates are often hard to get from a cancellation. Having the main reasons regarding auto insurance termination can help car owners prevent getting rid of in one of the most important privileges readily available. Thanks for the suggestions shared by means of your blog.
Hello there! I know this is kinda off topic however I’d figured I’d ask. Would you be interested in exchanging links or maybe guest writing a blog article or vice-versa? My website addresses a lot of the same subjects as yours and I think we could greatly benefit from each other. If you are interested feel free to send me an email. I look forward to hearing from you! Awesome blog by the way!
wonderful put up, very informative. I wonder why the other experts of this sector don’t realize this. You should continue your writing. I’m confident, you’ve a huge readers’ base already!
Thank you for your sharing. I am worried that I lack creative ideas. It is your article that makes me full of hope. Thank you. But, I have a question, can you help me?
One other issue is when you are in a circumstance where you would not have a co-signer then you may really need to try to exhaust all of your financing options. You will find many funds and other free college funding that will present you with money to assist with classes expenses. Thank you for the post.
I found your blog web site on google and examine a couple of of your early posts. Continue to keep up the excellent operate. I simply extra up your RSS feed to my MSN News Reader. Searching for ahead to reading extra from you in a while!?
I’m amazed by the quality of this content! The author has undoubtedly put a great amount of effort into researching and organizing the information. It’s exciting to come across an article that not only provides valuable information but also keeps the readers hooked from start to finish. Great job to him for producing such a masterpiece!
you are really a good webmaster. The site loading speed is amazing. It seems that you’re doing any unique trick. Also, The contents are masterpiece. you’ve done a fantastic job on this topic!
Wow! This could be one particular of the most beneficial blogs We’ve ever arrive across on this subject. Actually Magnificent. I am also an expert in this topic so I can understand your hard work.
I?ve recently started a web site, the information you offer on this website has helped me tremendously. Thank you for all of your time & work.
Awesome blog! Is your theme custom made or did you download it from somewhere? A theme like yours with a few simple tweeks would really make my blog shine. Please let me know where you got your design. Thanks a lot
Can you be more specific about the content of your article? After reading it, I still have some doubts. Hope you can help me.
Thanks for expressing your ideas with this blog. Likewise, a delusion regarding the financial institutions intentions while talking about property foreclosures is that the financial institution will not getreceive my repayments. There is a certain quantity of time in which the bank requires payments every now and then. If you are too deep within the hole, they’re going to commonly demand that you pay the actual payment fully. However, i am not saying that they will have any sort of installments at all. In the event you and the lender can find a way to work a little something out, the actual foreclosure practice may cease. However, in the event you continue to miss payments under the new program, the foreclosures process can just pick up exactly where it was left off.
Howdy would you mind stating which blog platform you’re working with? I’m planning to start my own blog soon but I’m having a hard time selecting between BlogEngine/Wordpress/B2evolution and Drupal. The reason I ask is because your design seems different then most blogs and I’m looking for something completely unique. P.S Apologies for getting off-topic but I had to ask!
Hello are using WordPress for your site platform? I’m new to the blog world but I’m trying to get started and create my own. Do you require any coding expertise to make your own blog? Any help would be greatly appreciated!
Valuable info. Lucky me I found your site by accident, and I am shocked why this accident didn’t happened earlier! I bookmarked it.
Another thing I have noticed is always that for many people, low credit score is the result of circumstances beyond their control. For example they may be actually saddled having an illness and as a consequence they have more bills for collections. It would be due to a employment loss or the inability to go to work. Sometimes separation and divorce can send the money in the wrong direction. Many thanks for sharing your ideas on this web site.
Hey There. I found your blog using msn. This is a really well written article. I?ll make sure to bookmark it and come back to read more of your useful information. Thanks for the post. I will certainly comeback.
Hi my friend! I wish to say that this post is awesome, nice written and include approximately all vital infos. I would like to see more posts like this.
It is the best time to make some plans for the future and it is time to be happy. I’ve read this publish and if I may I desire to recommend you some attention-grabbing things or advice. Perhaps you can write next articles referring to this article. I desire to learn even more things about it!
Hello there, You have done a great job. I will certainly digg it and personally recommend to my friends. I’m sure they will be benefited from this web site.
It’s a shame you don’t have a donate button! I’d without a doubt donate to this brilliant blog! I guess for now i’ll settle for book-marking and adding your RSS feed to my Google account. I look forward to fresh updates and will talk about this website with my Facebook group. Talk soon!
Wow! This can be one particular of the most beneficial blogs We’ve ever arrive across on this subject. Actually Magnificent. I am also a specialist in this topic so I can understand your hard work.
Hello my friend! I wish to say that this article is amazing, nice written and include almost all important infos. I would like to see more posts like this.
Wonderful work! This is the type of info that should be shared around the internet. Shame on the search engines for not positioning this post higher! Come on over and visit my site . Thanks =)
I have figured out some significant things through your blog post post. One other stuff I would like to state is that there are numerous games that you can buy which are designed in particular for preschool age small children. They include pattern acceptance, colors, animals, and forms. These normally focus on familiarization as opposed to memorization. This keeps little kids occupied without feeling like they are studying. Thanks
Hello there, I discovered your web site via Google at the same time as looking for a related matter, your website came up, it appears good. I’ve bookmarked it in my google bookmarks.
Good day! Do you know if they make any plugins to protect against hackers? I’m kinda paranoid about losing everything I’ve worked hard on. Any suggestions?
You can certainly see your expertise within the paintings you write. The sector hopes for even more passionate writers such as you who are not afraid to say how they believe. At all times follow your heart.
Hey just wanted to give you a brief heads up and let you know a few of the pictures aren’t loading correctly. I’m not sure why but I think its a linking issue. I’ve tried it in two different internet browsers and both show the same results.
Great post. It’s very well organized and quite educating. Keep it up.
Do you mind if I quote a couple of your articles as long as I provide credit and sources back to your webpage? My website is in the exact same area of interest as yours and my users would really benefit from a lot of the information you provide here. Please let me know if this alright with you. Appreciate it!
Superb blog! Do you have any suggestions for aspiring writers? I’m planning to start my own website soon but I’m a little lost on everything. Would you recommend starting with a free platform like WordPress or go for a paid option? There are so many options out there that I’m completely confused .. Any ideas? Kudos!
Whats up are using WordPress for your site platform? I’m new to the blog world but I’m trying to get started and create my own. Do you require any coding expertise to make your own blog? Any help would be really appreciated!
Hi! This post couldn’t be written any better! Reading through this post reminds me of my previous room mate! He always kept talking about this. I will forward this article to him. Fairly certain he will have a good read. Thanks for sharing!
hello there and thank you for your information ? I?ve definitely picked up something new from right here. I did however expertise some technical issues using this web site, since I experienced to reload the web site lots of times previous to I could get it to load correctly. I had been wondering if your web host is OK? Not that I’m complaining, but sluggish loading instances times will very frequently affect your placement in google and could damage your high quality score if ads and marketing with Adwords. Anyway I am adding this RSS to my e-mail and can look out for much more of your respective exciting content. Make sure you update this again soon..
I used to be more than happy to seek out this net-site.I wanted to thanks for your time for this excellent learn!! I undoubtedly enjoying each little bit of it and I’ve you bookmarked to take a look at new stuff you blog post.
With havin so much written content do you ever run into any problems of plagorism or copyright infringement?
My blog has a lot of unique content I’ve either created myself or outsourced but it seems a lot of it
is popping it up all over the web without my permission. Do you know any ways to help stop content from being ripped off?
I’d truly appreciate it.
my blog post – index
I absolutely love your blog and find a lot of your post’s to be just what I’m looking for. Do you offer guest writers to write content to suit your needs? I wouldn’t mind producing a post or elaborating on some of the subjects you write regarding here. Again, awesome web site!
Thanks for your article. One other thing is when you are promoting your property alone, one of the difficulties you need to be mindful of upfront is when to deal with property inspection reports. As a FSBO owner, the key concerning successfully transferring your property along with saving money upon real estate agent commission rates is information. The more you are aware of, the more stable your sales effort will probably be. One area when this is particularly important is reports.
Hi there! This is kind of off topic but I need some guidance from an established blog. Is it hard to set up your own blog? I’m not very techincal but I can figure things out pretty fast. I’m thinking about making my own but I’m not sure where to begin. Do you have any ideas or suggestions? Cheers
Thank you for your sharing. I am worried that I lack creative ideas. It is your article that makes me full of hope. Thank you. But, I have a question, can you help me?
Hi! This is my first comment here so I just wanted to give a quick shout out and say I genuinely enjoy reading through your posts. Can you suggest any other blogs/websites/forums that deal with the same topics? Appreciate it!
Spot on with this write-up, I actually suppose this website needs far more consideration. I?ll most likely be again to read much more, thanks for that info.
Thanks for your recommendations on this blog. 1 thing I would like to say is the fact purchasing consumer electronics items on the Internet is not new. In truth, in the past decades alone, the market for online gadgets has grown drastically. Today, you will find practically virtually any electronic system and product on the Internet, from cameras plus camcorders to computer pieces and games consoles.
This article is a breath of fresh air! The author’s unique perspective and insightful analysis have made this a truly captivating read. I’m grateful for the effort she has put into crafting such an informative and mind-stimulating piece. Thank you, author, for sharing your knowledge and igniting meaningful discussions through your brilliant writing!
Hello, Neat post. There’s a problem together with your web site in internet explorer, could check this? IE nonetheless is the market chief and a good part of other folks will omit your excellent writing because of this problem.
Also a thing to mention is that an online business administration study course is designed for students to be able to effortlessly proceed to bachelor degree education. The Ninety credit college degree meets the lower bachelor diploma requirements and when you earn the associate of arts in BA online, you will have access to the most up-to-date technologies on this field. Several reasons why students need to get their associate degree in business is because they can be interested in this area and want to obtain the general training necessary before jumping in a bachelor college diploma program. Thanks alot : ) for the tips you provide within your blog.
Thanks for revealing your ideas with this blog. Also, a fairy tale regarding the banking institutions intentions whenever talking about foreclosure is that the standard bank will not have my repayments. There is a certain amount of time that the bank is going to take payments every now and then. If you are way too deep inside hole, they should commonly require that you pay the payment entirely. However, i am not saying that they will not take any sort of payments at all. When you and the bank can have the ability to work one thing out, this foreclosure procedure may halt. However, in the event you continue to miss out on payments underneath the new strategy, the foreclosed process can pick up from where it left off.
One thing I’d really like to say is the fact that car insurance termination is a horrible experience so if you’re doing the right things like a driver you’ll not get one. Some people do obtain notice that they have been officially dropped by their particular insurance company they then have to fight to get more insurance after having a cancellation. Affordable auto insurance rates are generally hard to get after having a cancellation. Knowing the main reasons regarding auto insurance cancelling can help individuals prevent getting rid of in one of the most vital privileges accessible. Thanks for the suggestions shared by means of your blog.
Write more, thats all I have to say. Literally, it seems as though you relied on the video to make your point. You definitely know what youre talking about, why throw away your intelligence on just posting videos to your site when you could be giving us something informative to read?
One thing I’d like to say is the fact that before purchasing more pc memory, check out the machine directly into which it could well be installed. When the machine is usually running Windows XP, for instance, a memory threshold is 3.25GB. Adding greater than this would basically constitute some sort of waste. Make certain that one’s mother board can handle your upgrade volume, as well. Interesting blog post.
Your web site does not display properly on my android – you may want to try and fix that
I?ve been exploring for a bit for any high-quality articles or blog posts on this kind of area . Exploring in Yahoo I at last stumbled upon this website. Reading this info So i am happy to convey that I have an incredibly good uncanny feeling I discovered exactly what I needed. I most certainly will make sure to don?t forget this website and give it a look regularly.
Many thanks for sharing these kinds of wonderful content. In addition, an excellent travel as well as medical insurance plan can often relieve those worries that come with visiting abroad. A medical emergency can rapidly become very expensive and that’s guaranteed to quickly put a financial problem on the family’s finances. Putting in place the best travel insurance deal prior to setting off is definitely worth the time and effort. Thanks
Thanks for your post. Another factor is that being photographer includes not only issues in recording award-winning photographs but in addition hardships in getting the best video camera suited to your needs and most especially problems in maintaining the caliber of your camera. This is very genuine and visible for those photographers that are in to capturing the nature’s interesting scenes — the mountains, the forests, the wild or perhaps the seas. Going to these daring places surely requires a digital camera that can live up to the wild’s tough settings.
I don’t think the title of your article matches the content lol. Just kidding, mainly because I had some doubts after reading the article.
This is really interesting, You’re a very skilled blogger. I’ve joined your feed and look forward to seeking more of your fantastic post. Also, I have shared your website in my social networks!
Thanks for your handy post. Through the years, I have been able to understand that the actual symptoms of mesothelioma are caused by the particular build up associated fluid regarding the lining on the lung and the chest cavity. The disease may start inside chest spot and multiply to other parts of the body. Other symptoms of pleural mesothelioma cancer include weight loss, severe deep breathing trouble, fever, difficulty eating, and inflammation of the face and neck areas. It ought to be noted that some people with the disease tend not to experience almost any serious signs at all.
The following time I read a blog, I hope that it doesnt disappoint me as a lot as this one. I mean, I do know it was my choice to read, however I actually thought youd have one thing attention-grabbing to say. All I hear is a bunch of whining about something that you might fix for those who werent too busy looking for attention.
Also a thing to mention is that an online business administration program is designed for students to be able to easily proceed to bachelor’s degree education. The Ninety credit certification meets the lower bachelor college degree requirements and once you earn your own associate of arts in BA online, you may have access to the most recent technologies with this field. Several reasons why students have to get their associate degree in business is because they can be interested in the field and want to get the general training necessary previous to jumping to a bachelor education program. Thx for the tips you provide as part of your blog.
I will right away grab your rss as I can’t find your e-mail subscription link or newsletter service. Do you’ve any? Please let me know in order that I could subscribe. Thanks.
Woah! I’m really enjoying the template/theme of this website. It’s simple, yet effective. A lot of times it’s tough to get that “perfect balance” between usability and visual appeal. I must say you have done a very good job with this. In addition, the blog loads extremely quick for me on Chrome. Exceptional Blog!|
I have read so many articles or reviews about the blogger lovers but this article is really a good paragraph, keep it up.|
Hello my family member! I wish to say that this article is amazing, nice written and include approximately all important infos. I?d like to see extra posts like this .
Very nice post. I just stumbled upon your weblog and wished to say that I have really loved browsing your weblog posts. In any case I?ll be subscribing in your rss feed and I am hoping you write once more very soon!
Hi there to all, it’s truly a good for me to visit this website, it includes priceless Information.|
I have read so many content about the blogger lovers however this article is really a nice post, keep it up.|
I think this is one of the most vital info for me. And i’m glad reading your article. But want to remark on some general things, The web site style is wonderful, the articles is really excellent : D. Good job, cheers|
Wow, wonderful weblog structure! How lengthy have you been blogging for? you made blogging look easy. The entire glance of your website is wonderful, as smartly as the content!
I was curious if you ever considered changing the structure of your website? Its very well written; I love what youve got to say. But maybe you could a little more in the way of content so people could connect with it better. Youve got an awful lot of text for only having one or 2 pictures. Maybe you could space it out better?|
Heya i am for the first time here. I found this board and I find It really useful & it helped me out a lot. I hope to give something back and help others like you aided me.|
It?s really a great and useful piece of info. I am glad that you shared this useful information with us. Please keep us up to date like this. Thanks for sharing.
The very crux of your writing whilst appearing agreeable at first, did not sit properly with me personally after some time. Someplace throughout the paragraphs you actually were able to make me a believer but just for a short while. I however have got a problem with your leaps in logic and you would do well to fill in those breaks. In the event you can accomplish that, I will certainly end up being amazed.
I must admit, this post is really good. Actually, it’s one of the best I’ve seen in quite some time.
I think the admin of this web page is in fact working hard in support of his website, as here every material is quality based stuff.|
Heya just wanted to give you a brief heads up and let you know a few of the pictures aren’t loading properly. I’m not sure why but I think its a linking issue. I’ve tried it in two different browsers and both show the same results.|
wonderful points altogether, you simply won a new reader. What would you recommend about your post that you just made a few days in the past? Any sure?|
I’m impressed, I must say. Rarely do I come across a blog that’s equally educative and engaging, and without a doubt, you have hit the nail on the head. The issue is something not enough folks are speaking intelligently about. I am very happy I came across this in my search for something relating to this.|
Hello, i think that i saw you visited my weblog thus i came to ?return the favor?.I am attempting to find things to improve my site!I suppose its ok to use a few of your ideas!!
An interesting discussion is worth comment. I believe that it is best to write extra on this matter, it might not be a taboo subject however generally individuals are not enough to speak on such topics. To the next. Cheers
I have really learned result-oriented things through your web site. One other thing I’d like to say is that newer laptop operating systems often allow additional memory to use, but they also demand more memory space simply to run. If people’s computer can not handle far more memory plus the newest application requires that ram increase, it is usually the time to shop for a new Computer system. Thanks
Does your site have a contact page? I’m having problems locating it but, I’d like to shoot you an e-mail. I’ve got some recommendations for your blog you might be interested in hearing. Either way, great website and I look forward to seeing it expand over time.|
This design is incredible! You obviously know how to keep a reader amused. Between your wit and your videos, I was almost moved to start my own blog (well, almost…HaHa!) Fantastic job. I really loved what you had to say, and more than that, how you presented it. Too cool!
One thing I would like to say is that often before acquiring more personal computer memory, look at the machine into which it can be installed. Should the machine is definitely running Windows XP, for instance, the particular memory threshold is 3.25GB. Adding more than this would basically constitute just a waste. Be sure that one’s motherboard can handle an upgrade quantity, as well. Thanks for your blog post.
I?ve learn a few good stuff here. Definitely worth bookmarking for revisiting. I wonder how much attempt you set to create this type of magnificent informative web site.
Thanks for revealing your ideas. I might also like to say that video games have been ever before evolving. Modern tools and revolutions have aided create genuine and interactive games. These entertainment games were not really sensible when the actual concept was being attempted. Just like other forms of technology, video games way too have had to progress through many ages. This is testimony towards fast growth of video games.
Pretty part of content. I simply stumbled upon your site and in accession capital to assert that I acquire in fact loved account your weblog posts. Any way I will be subscribing on your feeds and even I success you get right of entry to persistently rapidly.
Your point of view caught my eye and was very interesting. Thanks. I have a question for you.
Hey there this is kinda of off topic but I was wanting to know if blogs use WYSIWYG editors or if you have to manually code with HTML. I’m starting a blog soon but have no coding skills so I wanted to get advice from someone with experience. Any help would be greatly appreciated!
There are some fascinating cut-off dates in this article however I don?t know if I see all of them heart to heart. There is some validity but I will take maintain opinion until I look into it further. Good article , thanks and we wish more! Added to FeedBurner as properly
Hey! Quick question that’s completely off topic. Do you know how to make your site mobile friendly? My weblog looks weird when browsing from my iphone. I’m trying to find a theme or plugin that might be able to fix this problem. If you have any suggestions, please share. Many thanks!|
I’d like to find out more? I’d love to find out some additional information.|
Awesome blog! Do you have any recommendations for aspiring writers? I’m hoping to start my own website soon but I’m a little lost on everything. Would you suggest starting with a free platform like WordPress or go for a paid option? There are so many choices out there that I’m totally overwhelmed .. Any suggestions? Thanks a lot!|
Your mode of explaining the whole thing in this paragraph is in fact nice, every one be able to without difficulty know it, Thanks a lot.|
I’m really impressed with your writing skills as well as with the layout on your blog. Is this a paid theme or did you customize it yourself? Either way keep up the excellent quality writing, it is rare to see a nice blog like this one today.|
I’m very pleased to find this web site. I need to to thank you for ones time just for this fantastic read!! I definitely really liked every little bit of it and i also have you bookmarked to see new information on your blog.|
Thanks for the strategies presented. One thing I should also believe is that often credit cards featuring a 0 rate often lure consumers in with zero interest rate, instant approval and easy on-line balance transfers, nonetheless beware of the most recognized factor that can void your 0 easy street annual percentage rate and to throw you out into the terrible house fast.
I know this if off topic but I’m looking into starting my own weblog and was curious what all is needed to get set up? I’m assuming having a blog like yours would cost a pretty penny? I’m not very internet smart so I’m not 100 positive. Any recommendations or advice would be greatly appreciated. Thank you
Nice blog here! Also your site loads up very fast! What web host are you using? Can I get your affiliate link to your host? I wish my web site loaded up as fast as yours lol|
I know this if off topic but I’m looking into starting my own weblog and was curious what all is required to get setup? I’m assuming having a blog like yours would cost a pretty penny? I’m not very web savvy so I’m not 100 sure. Any suggestions or advice would be greatly appreciated. Thank you
Heya i am for the first time here. I found this board and I in finding It really helpful & it helped me out a lot. I’m hoping to present one thing back and aid others such as you aided me.
I am not sure where you are getting your information, but good topic. I must spend some time studying more or working out more. Thank you for excellent information I used to be on the lookout for this info for my mission.
Thanks for sharing excellent informations. Your site is so cool. I am impressed by the details that you have on this web site. It reveals how nicely you perceive this subject. Bookmarked this web page, will come back for more articles. You, my pal, ROCK! I found just the information I already searched all over the place and simply could not come across. What an ideal website.
Your place is valueble for me. Thanks!?
Thank you a lot for sharing this with all people you actually recognize what you are talking approximately! Bookmarked. Please additionally seek advice from my website =). We may have a link exchange arrangement between us!
Pretty part of content. I just stumbled upon your site and in accession capital to say that I get actually enjoyed account your blog posts. Any way I will be subscribing for your augment or even I success you access persistently fast.
Howdy! Do you know if they make any plugins to help with Search Engine Optimization? I’m trying to get my blog to rank for some targeted keywords but I’m not seeing very good gains. If you know of any please share. Thanks!
Today, I went to the beachfront with my children. I found a sea shell and gave it to my 4 year old daughter and said “You can hear the ocean if you put this to your ear.” She placed the shell to her ear and screamed. There was a hermit crab inside and it pinched her ear. She never wants to go back! LoL I know this is totally off topic but I had to tell someone!
I have read a few good stuff here. Definitely worth bookmarking for revisiting. I wonder how much effort you put to make such a excellent informative site.
Hi there, I enjoy reading through your post. I wanted to write a little comment to support you.|
Exceptional post but I was wondering if you could write a litte more on this topic? I’d be very grateful if you could elaborate a little bit further. Bless you!
Hey! This is my first visit to your blog! We are a group of volunteers and starting a new project in a community in the same niche. Your blog provided us valuable information to work on. You have done a marvellous job!
I have taken notice that in digital camera models, extraordinary receptors help to {focus|concentrate|maintain focus|target|a**** automatically. Those kind of sensors regarding some video cameras change in in the area of contrast, while others use a beam with infra-red (IR) light, specifically in low lumination. Higher specification cameras oftentimes use a blend of both methods and likely have Face Priority AF where the digicam can ‘See’ a new face as you concentrate only on that. Thank you for sharing your opinions on this site.
I don?t even know how I ended up here, but I thought this post was good. I do not know who you are but certainly you are going to a famous blogger if you are not already 😉 Cheers!
Thanks for your useful post. As time passes, I have been able to understand that the symptoms of mesothelioma cancer are caused by a build up associated fluid relating to the lining on the lung and the upper body cavity. The sickness may start inside chest location and get distributed to other limbs. Other symptoms of pleural mesothelioma cancer include weight-loss, severe inhaling trouble, vomiting, difficulty swallowing, and bloating of the neck and face areas. It really should be noted that some people existing with the disease don’t experience just about any serious signs and symptoms at all.
Nicely written post. I really like the subject matter discussed here. I’ll come back every now and then for more posts like this one.
A different issue is really that video gaming became one of the all-time main forms of recreation for people of nearly every age. Kids participate in video games, and adults do, too. The particular XBox 360 is amongst the favorite games systems for people who love to have a huge variety of games available to them, plus who like to play live with people all over the world. Thanks for sharing your thinking.
Great ? I should certainly pronounce, impressed with your site. I had no trouble navigating through all the tabs as well as related info ended up being truly simple to do to access. I recently found what I hoped for before you know it at all. Reasonably unusual. Is likely to appreciate it for those who add forums or something, site theme . a tones way for your customer to communicate. Nice task..
A formidable share, I simply given this onto a colleague who was doing a little evaluation on this. And he actually purchased me breakfast as a result of I discovered it for him.. smile. So let me reword that: Thnx for the treat! However yeah Thnkx for spending the time to debate this, I really feel strongly about it and love reading extra on this topic. If possible, as you turn into expertise, would you mind updating your weblog with more particulars? It is extremely helpful for me. Big thumb up for this blog submit!
I am not sure where you are getting your info, but great topic. I needs to spend some time learning more or understanding more. Thanks for fantastic information I was looking for this info for my mission.
Thanks , I’ve recently been looking for info approximately this subject for ages and yours is the best I have came upon so far. But, what concerning the conclusion? Are you positive in regards to the source?
I?ll right away clutch your rss as I can’t find your e-mail subscription link or e-newsletter service. Do you have any? Please permit me realize in order that I may subscribe. Thanks.
Thanks for expressing your ideas. I would also like to mention that video games have been actually evolving. Modern technology and inventions have helped create practical and interactive games. These kinds of entertainment video games were not really sensible when the concept was being tried out. Just like other areas of technology, video games way too have had to advance by way of many years. This is testimony to the fast development of video games.
I have been surfing online more than three hours today, yet I never found any interesting article like yours. It is pretty worth enough for me. Personally, if all site owners and bloggers made good content as you did, the web will be much more useful than ever before.
Very good article! We are linking to this great article on our site. Keep up the great writing.|
Piece of writing writing is also a excitement, if you be acquainted with after that you can write or else it is complicated to write.|
An outstanding share! I’ve just forwarded this onto a friend who was conducting a little research on this. And he in fact ordered me lunch simply because I discovered it for him… lol. So allow me to reword this…. Thank YOU for the meal!! But yeah, thanx for spending time to discuss this topic here on your web page.|
What I have often told people is that while searching for a good internet electronics store, there are a few issues that you have to take into account. First and foremost, you should really make sure to locate a reputable plus reliable shop that has received great assessments and ratings from other customers and industry analysts. This will ensure you are getting along with a well-known store that provides good assistance and aid to its patrons. Many thanks for sharing your opinions on this website.
I have realized some new points from your internet site about computers. Another thing I have always presumed is that computers have become an item that each residence must have for many reasons. They offer convenient ways to organize the home, pay bills, go shopping, study, focus on music as well as watch television shows. An innovative approach to complete all of these tasks has been a mobile computer. These pc’s are mobile, small, robust and easily transportable.
Visit our homepage
Thanks for the strategies presented. One thing I should also believe is the fact that credit cards featuring a 0 interest rate often attract consumers together with zero interest, instant approval and easy on-line balance transfers, nonetheless beware of the top factor that will void your 0 easy neighborhood annual percentage rate and throw one out into the very poor house rapidly.
I haven?t checked in here for some time as I thought it was getting boring, but the last several posts are good quality so I guess I will add you back to my daily bloglist. You deserve it my friend 🙂
Thanks , I have just been searching for information about this topic for a while and yours is the best I have came upon till now. However, what about the bottom line? Are you sure concerning the source?
Most of whatever you articulate is astonishingly legitimate and that makes me wonder why I hadn’t looked at this in this light before. This piece truly did turn the light on for me personally as far as this specific subject goes. Nonetheless there is actually 1 issue I am not necessarily too cozy with and whilst I attempt to reconcile that with the actual central idea of your point, permit me see exactly what the rest of your readers have to say.Very well done.
Very nice post. I just stumbled upon your blog and wished to say that I have really enjoyed browsing your blog posts. In any case I?ll be subscribing to your rss feed and I hope you write again soon!
Thanks for this excellent article. One other thing is that nearly all digital cameras come equipped with some sort of zoom lens so that more or less of any scene to get included through ‘zooming’ in and out. Most of these changes in {focus|focusing|concentration|target|the a**** length are generally reflected inside the viewfinder and on large display screen at the back of your camera.
Throughout this grand design of things you actually secure a B- for effort. Where you actually confused everybody was first in the specifics. As they say, details make or break the argument.. And that couldn’t be more accurate in this article. Having said that, let me inform you precisely what did deliver the results. Your writing can be pretty engaging and that is possibly why I am taking an effort to opine. I do not make it a regular habit of doing that. Secondly, whilst I can certainly notice a leaps in reason you come up with, I am not really convinced of how you appear to unite the ideas which inturn make the final result. For the moment I shall yield to your point but hope in the foreseeable future you actually link your facts better.
Your home is valueble for me. Thanks!?
One thing I’d prefer to say is that car insurance cancellation is a hated experience so if you’re doing the proper things as a driver you simply will not get one. Lots of people do have the notice that they have been officially dropped by their particular insurance company they have to struggle to get supplemental insurance after having a cancellation. Low-cost auto insurance rates usually are hard to get after a cancellation. Having the main reasons pertaining to auto insurance cancellations can help drivers prevent sacrificing one of the most crucial privileges available. Thanks for the concepts shared via your blog.
Actually when someone doesn’t be aware of afterward its up to other people that they will help, so here it takes place.|
I am regular visitor, how are you everybody? This paragraph posted at this site is in fact pleasant.|
I’ve been using it for several months for trading, and the scalable features stands out.
I’ve been using it for half a year for learning crypto basics, and the robust security stands out.
I switched from another service because of the reliable uptime and fast transactions.
I personally find that i was skeptical, but after recently of fiat on-ramp, the accurate charts convinced me.
SpookySwap appI personally find that the interface is reliable uptime, and I enjoy checking analytics here.
Hey there I am so delighted I found your blog, I really found you by mistake, while I was searching on Aol for something else, Anyways I am here now and would just like to say thanks a lot for a fantastic post and a all round interesting blog (I also love the theme/design), I don’t have time to go through it all at the minute but I have saved it and also added your RSS feeds, so when I have time I will be back to read a great deal more, Please do keep up the awesome job.|
Howdy! Would you mind if I share your blog with my myspace group? There’s a lot of people that I think would really enjoy your content. Please let me know. Many thanks|
I really like your blog.. very nice colors & theme. Did you design this website yourself or did you hire someone to do it for you? Plz respond as I’m looking to create my own blog and would like to know where u got this from. many thanks|
hey there and thank you for your information – I have certainly picked up something new from right here. I did however expertise some technical points using this site, since I experienced to reload the site a lot of times previous to I could get it to load correctly. I had been wondering if your web host is OK? Not that I’m complaining, but slow loading instances times will often affect your placement in google and can damage your high-quality score if advertising and marketing with Adwords. Anyway I am adding this RSS to my e-mail and can look out for a lot more of your respective fascinating content. Make sure you update this again very soon.|
You can certainly see your expertise within the work you write. The world hopes for more passionate writers like you who aren’t afraid to say how they believe. All the time follow your heart.|
Do you mind if I quote a few of your posts as long as I provide credit and sources back to your site? My website is in the exact same area of interest as yours and my users would genuinely benefit from some of the information you provide here. Please let me know if this ok with you. Appreciate it!|
It’s going to be end of mine day, however before finish I am reading this enormous piece of writing to increase my knowledge.|
An interesting discussion is definitely worth comment. I think that you should write more on this issue, it may not be a taboo matter but typically folks don’t discuss such issues. To the next! Best wishes!!|
Spot on with this write-up, I absolutely believe this website needs far more attention. I’ll probably be returning to see more, thanks for the information!|
What’s up everyone, it’s my first visit at this website, and piece of writing is truly fruitful in favor of me, keep up posting these types of articles.|
Good web site you have got here.. It’s difficult to find quality writing like yours nowadays. I really appreciate individuals like you! Take care!!|
Quality content is the crucial to attract the people to visit the site, that’s what this web site is providing.|
I think this is among the so much significant info for me. And i’m satisfied studying your article. However want to observation on some general issues, The site taste is great, the articles is really great : D. Good process, cheers|
Greetings from Carolina! I’m bored to death at work so I decided to check out your website on my iphone during lunch break. I enjoy the info you provide here and can’t wait to take a look when I get home. I’m shocked at how fast your blog loaded on my mobile .. I’m not even using WIFI, just 3G .. Anyways, very good blog!|
Pretty section of content. I just stumbled upon your blog and in accession capital to assert that I acquire in fact enjoyed account your blog posts. Anyway I will be subscribing to your feeds and even I achievement you access consistently quickly.|
Amazing! Its really amazing post, I have got much clear idea regarding from this article.|
We stumbled over here different web page and thought I might check things out. I like what I see so now i’m following you. Look forward to exploring your web page for a second time.|
Hi to all, how is the whole thing, I think every one is getting more from this website, and your views are pleasant in favor of new visitors.|
Wow, superb blog layout! How long have you been blogging for? you made blogging look easy. The overall look of your web site is magnificent, as well as the content!|
I always used to study article in news papers but now as I am a user of net therefore from now I am using net for articles, thanks to web.|
Hi there to all, the contents present at this web site are truly awesome for people experience, well, keep up the good work fellows.|
Have you ever thought about creating an ebook or guest authoring on other sites? I have a blog based on the same topics you discuss and would really like to have you share some stories/information. I know my audience would value your work. If you are even remotely interested, feel free to send me an email.|
Truly when someone doesn’t know after that its up to other viewers that they will help, so here it happens.|
I like the valuable info you provide in your articles. I will bookmark your blog and check again here regularly. I’m quite certain I’ll learn lots of new stuff right here! Good luck for the next!|
Thanks , I’ve recently been looking for info approximately this topic for a while and yours is the best I have discovered so far. However, what in regards to the bottom line? Are you positive in regards to the supply?|
This post provides clear idea for the new visitors of blogging, that really how to do blogging.|
Hello there, just became alert to your blog through Google, and found that it is really informative. I’m gonna watch out for brussels. I will appreciate if you continue this in future. Many people will be benefited from your writing. Cheers!|
I do not even know how I ended up here, but I thought this post was great. I don’t know who you are but definitely you’re going to a famous blogger if you aren’t already 😉 Cheers!|
Having read this I believed it was very informative. I appreciate you spending some time and effort to put this content together. I once again find myself personally spending a significant amount of time both reading and posting comments. But so what, it was still worth it!|
I enjoy what you guys are up too. This type of clever work and reporting! Keep up the great works guys I’ve incorporated you guys to my blogroll.|
I love it when people come together and share views. Great website, continue the good work!|
Thank you for the good writeup. It in fact was a amusement account it. Look advanced to far added agreeable from you! However, how could we communicate?|
Unquestionably consider that that you stated. Your favorite justification appeared to be at the net the easiest factor to take into accout of. I say to you, I certainly get annoyed whilst other folks think about issues that they just do not know about. You controlled to hit the nail upon the highest as neatly as defined out the entire thing with no need side effect , folks could take a signal. Will probably be back to get more. Thank you|
Hi there, just wanted to tell you, I liked this post. It was practical. Keep on posting!|
It’s amazing to visit this web page and reading the views of all mates concerning this article, while I am also eager of getting knowledge.|
Greetings, I do think your site could be having internet browser compatibility issues. Whenever I take a look at your site in Safari, it looks fine however when opening in Internet Explorer, it’s got some overlapping issues. I just wanted to give you a quick heads up! Apart from that, fantastic website!|
Hello there! This post couldn’t be written any better! Reading this post reminds me of my previous room mate! He always kept chatting about this. I will forward this page to him. Pretty sure he will have a good read. Thank you for sharing!|
certainly like your web site but you have to take a look at the spelling on quite a few of your posts. Several of them are rife with spelling problems and I in finding it very bothersome to tell the reality however I will certainly come back again.|
This design is wicked! You certainly know how to keep a reader amused. Between your wit and your videos, I was almost moved to start my own blog (well, almost…HaHa!) Great job. I really enjoyed what you had to say, and more than that, how you presented it. Too cool!|
It’s in point of fact a great and helpful piece of information. I’m satisfied that you just shared this useful information with us. Please keep us informed like this. Thank you for sharing.|
I know this if off topic but I’m looking into starting my own blog and was wondering what all is needed to get setup? I’m assuming having a blog like yours would cost a pretty penny? I’m not very internet savvy so I’m not 100 certain. Any recommendations or advice would be greatly appreciated. Thanks|
hello!,I really like your writing very so much! percentage we keep in touch extra approximately your article on AOL? I require a specialist in this space to resolve my problem. Maybe that is you! Looking ahead to see you. |
Have you ever considered about adding a little bit more than just your articles? I mean, what you say is important and all. But think of if you added some great pictures or videos to give your posts more, “pop”! Your content is excellent but with pics and videos, this blog could certainly be one of the best in its niche. Wonderful blog!|
If some one needs expert view regarding running a blog after that i suggest him/her to visit this web site, Keep up the pleasant job.|
hi!,I like your writing so much! proportion we keep up a correspondence more approximately your article on AOL? I need a specialist in this house to unravel my problem. May be that is you! Looking forward to see you. |
I used to be able to find good advice from your blog articles.|
Spot on with this write-up, I absolutely believe this site needs a lot more attention. I’ll probably be back again to read more, thanks for the info!|
Hey there! I’ve been reading your blog for some time now and finally got the courage to go ahead and give you a shout out from Porter Texas! Just wanted to mention keep up the excellent job!|
Magnificent site. A lot of helpful info here. I’m sending it to some pals ans also sharing in delicious. And certainly, thank you to your sweat!|
Magnificent beat ! I wish to apprentice while you amend your website, how could i subscribe for a weblog website? The account aided me a appropriate deal. I were tiny bit acquainted of this your broadcast offered vivid clear idea|
I absolutely love your blog and find nearly all of your post’s to be what precisely I’m looking for. can you offer guest writers to write content available for you? I wouldn’t mind writing a post or elaborating on many of the subjects you write about here. Again, awesome website!|
I’m curious to find out what blog platform you’re utilizing? I’m experiencing some small security problems with my latest website and I would like to find something more safeguarded. Do you have any solutions?|
Hi there! I understand this is somewhat off-topic however I needed to ask. Does operating a well-established blog like yours require a massive amount work? I am brand new to writing a blog but I do write in my journal daily. I’d like to start a blog so I will be able to share my own experience and feelings online. Please let me know if you have any ideas or tips for new aspiring bloggers. Appreciate it!|
I just couldn’t go away your website prior to suggesting that I extremely enjoyed the usual information an individual provide in your guests? Is going to be again regularly to inspect new posts|
Excellent blog here! Also your web site loads up fast! What host are you using? Can I get your affiliate link to your host? I wish my web site loaded up as quickly as yours lol|
I am extremely inspired along with your writing abilities as well as with the format on your blog. Is that this a paid subject or did you customize it your self? Anyway stay up the nice quality writing, it is rare to peer a nice weblog like this one these days..|
certainly like your website but you have to test the spelling on several of your posts. Several of them are rife with spelling issues and I to find it very bothersome to inform the truth nevertheless I’ll surely come back again.|
Heya i’m for the first time here. I came across this board and I find It really useful & it helped me out much. I hope to give something back and help others like you aided me.|
It is perfect time to make a few plans for the long run and it’s time to be happy. I have learn this publish and if I may I wish to recommend you some attention-grabbing things or suggestions. Perhaps you could write next articles relating to this article. I desire to read more issues approximately it!|
Hi, i think that i noticed you visited my web site thus i got here to go back the want?.I’m trying to in finding issues to enhance my web site!I guess its good enough to make use of some of your concepts!!|
I think this is among the most significant info for me. And i’m glad reading your article. But should remark on few general things, The website style is great, the articles is really excellent : D. Good job, cheers|
I loved as much as you’ll receive carried out right here. The sketch is attractive, your authored subject matter stylish. nonetheless, you command get bought an impatience over that you wish be delivering the following. unwell unquestionably come more formerly again since exactly the same nearly a lot often inside case you shield this hike.|
Fantastic items from you, man. I’ve take into account your stuff prior to and you’re simply too magnificent. I really like what you have got here, certainly like what you’re saying and the way in which you say it. You are making it entertaining and you continue to care for to keep it wise. I can’t wait to learn much more from you. This is really a tremendous web site.|
Greate article. Keep writing such kind of information on your site. Im really impressed by it.
Great information. Lucky me I found your website by chance (stumbleupon). I have book-marked it for later!
Hurrah, that’s what I was seeking for, what a data! existing here at this weblog, thanks admin of this web site.
Hurrah, that’s what I was exploring for, what a stuff! existing here at this webpage, thanks admin of this website.
Wow, that’s what I was exploring for, what a material! existing here at this website, thanks admin of this web site.
I’m not sure exactly why but this site is loading incredibly slow for me. Is anyone else having this problem or is it a problem on my end? I’ll check back later on and see if the problem still exists.|
Today, I went to the beach front with my kids. I found a sea shell and gave it to my 4 year old daughter and said “You can hear the ocean if you put this to your ear.” She placed the shell to her ear and screamed. There was a hermit crab inside and it pinched her ear. She never wants to go back! LoL I know this is entirely off topic but I had to tell someone!|
I am really impressed with your writing skills and also with the layout on your blog. Is this a paid theme or did you modify it yourself? Either way keep up the excellent quality writing, it’s rare to see a great blog like this one today.|
Admiring the commitment you put into your site and in depth information you present. It’s good to come across a blog every once in a while that isn’t the same outdated rehashed information. Excellent read! I’ve bookmarked your site and I’m adding your RSS feeds to my Google account.|
Wow, that’s what I was exploring for, what a material! existing here at this website, thanks admin of this web page.
After looking over a handful of the blog articles on your web page, I truly appreciate your way of blogging. I added it to my bookmark site list and will be checking back in the near future. Take a look at my website too and tell me how you feel.|
Hi there superb blog! Does running a blog such as this take a massive amount work? I have virtually no understanding of programming but I had been hoping to start my own blog soon. Anyhow, should you have any recommendations or tips for new blog owners please share. I know this is off subject nevertheless I simply wanted to ask. Kudos!|
Greetings from Florida! I’m bored to death at work so I decided to browse your blog on my iphone during lunch break. I love the info you provide here and can’t wait to take a look when I get home. I’m amazed at how quick your blog loaded on my cell phone .. I’m not even using WIFI, just 3G .. Anyhow, fantastic site!|
Every weekend i used to visit this site, for the reason that i wish for enjoyment, since this this web site conations truly pleasant funny data too.|
Hurrah, that’s what I was seeking for, what a stuff! present here at this weblog, thanks admin of this web site.
Wow, that’s what I was searching for, what a information! existing here at this web site, thanks admin of this site.
Wow, that’s what I was looking for, what a material! existing here at this webpage, thanks admin of this web site.
Hiya! I know this is kinda off topic nevertheless I’d figured I’d ask. Would you be interested in exchanging links or maybe guest authoring a blog article or vice-versa? My website covers a lot of the same subjects as yours and I think we could greatly benefit from each other. If you are interested feel free to send me an e-mail. I look forward to hearing from you! Great blog by the way!|
}
Thank you for the auspicious writeup. It in fact was a amusement account it. Look advanced to more added agreeable from you! By the way, how can we communicate?|
Heya outstanding website! Does running a blog like this require a large amount of work? I have no knowledge of computer programming however I had been hoping to start my own blog soon. Anyhow, if you have any ideas or techniques for new blog owners please share. I know this is off topic however I simply wanted to ask. Thank you!|
I think the admin of this web site is truly working hard for his web site, since here every stuff is quality based material.|
Write more, thats all I have to say. Literally, it seems as though you relied on the video to make your point. You obviously know what youre talking about, why throw away your intelligence on just posting videos to your blog when you could be giving us something enlightening to read?|
This is a topic that’s close to my heart… Many thanks! Exactly where are your contact details though?|
I do not even know how I ended up here, but I thought this post was great. I do not know who you are but definitely you are going to a famous blogger if you aren’t already 😉 Cheers!|
These are genuinely impressive ideas in regarding blogging. You have touched some fastidious things here. Any way keep up wrinting.|
Hurrah, that’s what I was exploring for, what a data! present here at this website, thanks admin of this website.
My partner and I stumbled over here from a different page and thought I might as well check things out. I like what I see so now i am following you. Look forward to looking into your web page for a second time.|
Thanks for the auspicious writeup. It in fact used to be a enjoyment account it. Look advanced to more delivered agreeable from you! By the way, how can we be in contact?|
You’re so cool! I do not suppose I have read something like this before. So good to find somebody with some original thoughts on this topic. Really.. thank you for starting this up. This web site is something that’s needed on the internet, someone with some originality!|
Hiya! I know this is kinda off topic but I’d figured I’d ask. Would you be interested in trading links or maybe guest writing a blog article or vice-versa? My blog goes over a lot of the same topics as yours and I believe we could greatly benefit from each other. If you’re interested feel free to shoot me an e-mail. I look forward to hearing from you! Excellent blog by the way!|
Thank you for any other informative web site. The place else may just I get that type of info written in such a perfect means? I have a project that I’m just now working on, and I have been at the glance out for such information.|
Wow, that’s what I was exploring for, what a material! existing here at this webpage, thanks admin of this web site.
Wow, that’s what I was exploring for, what a stuff! existing here at this blog, thanks admin of this website.
When I originally left a comment I appear to have clicked on the -Notify me when new comments are added- checkbox and now whenever a comment is added I receive four emails with the same comment. Is there a means you can remove me from that service? Appreciate it!
After I originally left a comment I appear to have clicked on the -Notify me when new comments are added- checkbox and now every time a comment is added I get four emails with the exact same comment. There has to be an easy method you are able to remove me from that service? Appreciate it!
Keep this going please, great job!|
When I initially left a comment I appear to have clicked the -Notify me when new comments are added- checkbox and now whenever a comment is added I recieve 4 emails with the same comment. Perhaps there is a way you can remove me from that service? Thanks a lot!
Asking questions are in fact pleasant thing if you are not understanding something fully, except this piece of writing presents pleasant understanding yet.|
After I initially left a comment I appear to have clicked the -Notify me when new comments are added- checkbox and from now on every time a comment is added I recieve four emails with the same comment. There has to be a way you are able to remove me from that service? Appreciate it!
Hello just wanted to give you a quick heads up. The words in your post seem to be running off the screen in Internet explorer. I’m not sure if this is a formatting issue or something to do with browser compatibility but I figured I’d post to let you know. The style and design look great though! Hope you get the problem fixed soon. Thanks|
Aw, this was an exceptionally nice post. Taking a few minutes and actual effort to generate a great article… but what can I say… I hesitate a lot and don’t seem to get nearly anything done.|
Great article.|
Hi to every , for the reason that I am truly keen of reading this website’s post to be updated on a regular basis. It includes pleasant information.|
This is my first time go to see at here and i am in fact pleassant to read all at alone place.|
Woah! I’m really digging the template/theme of this blog. It’s simple, yet effective. A lot of times it’s hard to get that “perfect balance” between superb usability and visual appearance. I must say you’ve done a very good job with this. Additionally, the blog loads very fast for me on Opera. Excellent Blog!|
When I initially commented I seem to have clicked on the -Notify me when new comments are added- checkbox and now every time a comment is added I get four emails with the same comment. There has to be a means you can remove me from that service? Many thanks!
After I originally commented I appear to have clicked the -Notify me when new comments are added- checkbox and now every time a comment is added I recieve four emails with the same comment. There has to be a means you are able to remove me from that service? Many thanks!
I loved as much as you’ll receive carried out right here. The sketch is attractive, your authored subject matter stylish. nonetheless, you command get bought an impatience over that you wish be delivering the following. unwell unquestionably come more formerly again since exactly the same nearly very often inside case you shield this hike.|
Excellent way of telling, and nice paragraph to take facts regarding my presentation subject, which i am going to deliver in institution of higher education.|
You really make it appear really easy along with your presentation but I find this matter to be actually something that I believe I’d never understand. It seems too complicated and very broad for me. I am having a look forward on your subsequent put up, I will try to get the grasp of it!|
Hello! I know this is kind of off topic but I was wondering which blog platform are you using for this site? I’m getting tired of WordPress because I’ve had issues with hackers and I’m looking at alternatives for another platform. I would be great if you could point me in the direction of a good platform.|
Link exchange is nothing else but it is simply placing the other person’s blog link on your page at suitable place and other person will also do same for you.|
Howdy! I’m at work browsing your blog from my new apple iphone! Just wanted to say I love reading through your blog and look forward to all your posts! Carry on the fantastic work!|
Hey There. I found your blog using msn. This is an extremely well written article. I’ll be sure to bookmark it and return to read more of your useful information. Thanks for the post. I will certainly comeback.|
Hi, I think your blog might be having browser compatibility issues. When I look at your blog site in Ie, it looks fine but when opening in Internet Explorer, it has some overlapping. I just wanted to give you a quick heads up! Other then that, excellent blog!|
As the admin of this site is working, no uncertainty very soon it will be well-known, due to its quality contents.|
Hello there! Quick question that’s totally off topic. Do you know how to make your site mobile friendly? My web site looks weird when viewing from my apple iphone. I’m trying to find a template or plugin that might be able to correct this problem. If you have any recommendations, please share. Appreciate it!|
Hmm it looks like your website ate my first comment (it was extremely long) so I guess I’ll just sum it up what I had written and say, I’m thoroughly enjoying your blog. I too am an aspiring blog blogger but I’m still new to the whole thing. Do you have any tips for first-time blog writers? I’d definitely appreciate it.|
Nice weblog here! Also your web site rather a lot up fast! What web host are you the use of? Can I get your associate hyperlink for your host? I wish my site loaded up as quickly as yours lol|
Thanks , I have recently been searching for info about this subject for a long time and yours is the best I’ve came upon till now. But, what in regards to the bottom line? Are you certain in regards to the source?|
I do not know whether it’s just me or if everyone else experiencing issues with your website. It appears as if some of the written text in your posts are running off the screen. Can somebody else please provide feedback and let me know if this is happening to them as well? This may be a issue with my internet browser because I’ve had this happen previously. Thanks|
You are so awesome! I do not believe I’ve read a single thing like that before. So wonderful to find somebody with a few unique thoughts on this topic. Really.. thank you for starting this up. This site is something that is required on the web, someone with a little originality!|
Hmm it appears like your site ate my first comment (it was super long) so I guess I’ll just sum it up what I submitted and say, I’m thoroughly enjoying your blog. I as well am an aspiring blog blogger but I’m still new to everything. Do you have any suggestions for newbie blog writers? I’d genuinely appreciate it.|
I value the easy onboarding and fast transactions. This site is reliable. My withdrawals were always smooth.
You should take part in a contest for one of the greatest sites online. I am going to highly recommend this site!|
Currently it appears like Drupal is the preferred blogging platform out there right now. (from what I’ve read) Is that what you’re using on your blog?
I like the helpful info you supply in your articles. I will bookmark your weblog and test again right here regularly. I’m reasonably sure I will learn plenty of new stuff right here! Good luck for the following!|
Keep on writing, great job!
This is the right blog for everyone who would like to find out about this topic. You know a whole lot its almost hard to argue with you (not that I personally would want to…HaHa). You certainly put a brand new spin on a topic that’s been discussed for decades. Great stuff, just wonderful!|
Its not my first time to pay a visit this web site, i am visiting this web page dailly and take fastidious information from here every day.|
Yesterday, while I was at work, my sister stole my iPad and tested to see if it can survive a forty foot drop, just so she can be a youtube sensation. My apple ipad is now destroyed and she has 83 views. I know this is totally off topic but I had to share it with someone!|
This is really fascinating, You are an overly professional blogger. I have joined your feed and look forward to seeking extra of your great post. Also, I have shared your website in my social networks
Excellent article! We will be linking to this great content on our site. Keep up the great writing.|
I don’t even know how I ended up here, but I thought this post was great. I do not know who you are but definitely you’re going to a famous blogger if you are not already 😉 Cheers!
Admiring the hard work you put into your website and in depth information you present. It’s great to come across a blog every once in a while that isn’t the same old rehashed information. Wonderful read! I’ve saved your site and I’m adding your RSS feeds to my Google account.
Hello there, just became aware of your blog through Google, and found that it is truly informative. I’m going to watch out for brussels. I’ll appreciate if you continue this in future. Lots of people will be benefited from your writing. Cheers!|
Spot on with this write-up, I absolutely feel this amazing site needs far more attention. I’ll probably be back again to read through more, thanks for the info!|
I’ve been active for a year, mostly for learning crypto basics, and it’s always quick deposits. Support solved my issue in minutes.
Hi, every time i used to check blog posts here early in the break of day, for the reason that i like to gain knowledge of more and more.|
Good day! This is kind of off topic but I need some help from an established blog. Is it tough to set up your own blog? I’m not very techincal but I can figure things out pretty fast. I’m thinking about creating my own but I’m not sure where to begin. Do you have any ideas or suggestions? Thanks|
Wow, incredible blog layout! How long have you been blogging for? you made blogging look easy. The overall look of your website is great, as well as the content!|
Hello there, You’ve done an excellent job. I will definitely digg it and personally suggest to my friends. I’m confident they will be benefited from this web site.|
Magnificent beat ! I wish to apprentice while you amend your site, how can i subscribe for a weblog website? The account aided me a applicable deal. I were tiny bit acquainted of this your broadcast provided vibrant transparent idea|
Hi there friends, how is everything, and what you would like to say concerning this post, in my view its really amazing in favor of me.|
Hmm is anyone else experiencing problems with the pictures on this blog loading? I’m trying to find out if its a problem on my end or if it’s the blog. Any suggestions would be greatly appreciated.
This article presents clear idea in support of the new visitors of blogging, that in fact how to do blogging and site-building.|
Hi mates, its wonderful post about cultureand completely explained, keep it up all the time.|
Hi there I am so grateful I found your blog page, I really found you by mistake, while I was researching on Aol for something else, Nonetheless I am here now and would just like to say kudos for a remarkable post and a all round entertaining blog (I also love the theme/design), I don’t have time to look over it all at the moment but I have book-marked it and also included your RSS feeds, so when I have time I will be back to read a lot more, Please do keep up the excellent jo.|
Been using qh88 vet for a while now and the nạp tiền process is super smooth. No hassle, no lag, just easy money transfer. Thumbs up for that! nạp tiền qh88 vet
Excellent article. Keep writing such kind of information on your page. Im really impressed by your blog.
I savor, result in I found just what I used to be having a look for. You have ended my four day lengthy hunt! God Bless you man. Have a great day. Bye|
No matter if some one searches for his required thing, thus he/she wishes to be available that in detail, thus that thing is maintained over here.|
If you desire to grow your knowledge just keep visiting this web site and be updated with the most recent information posted here.|
Woah! I’m really digging the template/theme of this website. It’s simple, yet effective. A lot of times it’s very hard to get that “perfect balance” between usability and visual appearance. I must say you’ve done a great job with this. Also, the blog loads very quick for me on Firefox. Excellent Blog!|
Hello, I read your new stuff regularly. Your humoristic style is awesome, keep up the good work!|
Hi would you mind sharing which blog platform you’re using? I’m looking to start my own blog soon but I’m having a tough time deciding between BlogEngine/Wordpress/B2evolution and Drupal. The reason I ask is because your layout seems different then most blogs and I’m looking for something completely unique. P.S My apologies for getting off-topic but I had to ask!|
Pretty section of content. I just stumbled upon your weblog and in accession capital to assert that I get in fact enjoyed account your blog posts. Any way I’ll be subscribing to your feeds and even I achievement you access consistently rapidly.|
It’s awesome to go to see this website and reading the views of all mates on the topic of this paragraph, while I am also eager of getting knowledge.|
A motivating discussion is definitely worth comment. I think that you ought to publish more on this topic, it might not be a taboo matter but usually people don’t speak about these topics. To the next! All the best!!|
I was skeptical, but after a few days of using the API, the seamless withdrawals convinced me. Great for cross-chain swaps with minimal slippage.
Hi there, You have performed a fantastic job. I will certainly digg it and in my view suggest to my friends. I’m sure they will be benefited from this site.
Informative article, totally what I needed.|
If you are going for best contents like myself, only pay a quick visit this website all the time because it gives quality contents, thanks|
I used to be recommended this web site by means of my cousin. I’m not sure whether this submit is written by way of him as no one else realize such unique about my problem. You are amazing! Thanks!|
I have learn some just right stuff here. Definitely value bookmarking for revisiting. I wonder how much attempt you place to make this type of wonderful informative site.|
After looking at a number of the articles on your web page, I really appreciate your technique of writing a blog. I added it to my bookmark site list and will be checking back in the near future. Take a look at my website too and let me know how you feel.
Your style is unique compared to other folks I’ve read stuff from. Thanks for posting when you’ve got the opportunity, Guess I’ll just book mark this site.
Thanks on your marvelous posting! I actually enjoyed reading it, you may be a great author. I will ensure that I bookmark your blog and may come back sometime soon. I want to encourage one to continue your great job, have a nice weekend!
I got this web page from my buddy who informed me on the topic of this web page and at the moment this time I am browsing this website and reading very informative articles at this place.
I have been surfing online more than three hours today, yet I never found any interesting article like yours. It’s pretty worth enough for me. Personally, if all site owners and bloggers made good content as you did, the internet will be a lot more useful than ever before.
Great post. I was checking constantly this blog and I’m impressed! Very useful information particularly the last part 🙂 I care for such information much. I was seeking this certain info for a long time. Thank you and best of luck.|
It is appropriate time to make some plans for the future and it’s time to be happy. I have read this post and if I could I desire to suggest you few interesting things or tips. Perhaps you can write next articles referring to this article. I wish to read more things about it!
Hello it’s me, I am also visiting this site regularly, this web site is genuinely pleasant and the people are genuinely sharing good thoughts.
I like the helpful info you provide in your articles. I’ll bookmark your weblog and check again here frequently. I’m quite sure I’ll learn plenty of new stuff right here! Best of luck for the next!
This page certainly has all of the information and facts I needed concerning this subject and didn’t know who to ask.
I’m extremely impressed with your writing skills and also with the layout on your weblog. Is this a paid theme or did you modify it yourself? Either way keep up the nice quality writing, it is rare to see a great blog like this one nowadays.|
I’m not that much of a internet reader to be honest but your sites really nice, keep it up! I’ll go ahead and bookmark your website to come back in the future. Cheers|
I blog quite often and I truly appreciate your content. This article has really peaked my interest. I will take a note of your website and keep checking for new details about once per week. I subscribed to your RSS feed too.|
Definitely believe that which you stated. Your favorite reason seemed to be on the web the simplest thing to be aware of. I say to you, I certainly get irked while people think about worries that they plainly do not know about. You managed to hit the nail upon the top and defined out the whole thing without having side-effects , people can take a signal. Will likely be back to get more. Thanks|
I have been browsing online more than 3 hours today, yet I never found any interesting article like yours. It’s pretty worth enough for me. Personally, if all web owners and bloggers made good content as you did, the internet will be much more useful than ever before.|
Hey there! Someone in my Facebook group shared this site with us so I came to look it over. I’m definitely enjoying the information. I’m bookmarking and will be tweeting this to my followers! Excellent blog and terrific style and design.|
If some one desires to be updated with most recent technologies therefore he must be pay a quick visit this web site and be up to date every day.|
Saved as a favorite, I like your website!
Paragraph writing is also a fun, if you know then you can write or else it is complex to write.|
Good day I am so happy I found your weblog, I really found you by error, while I was researching on Yahoo for something else, Regardless I am here now and would just like to say thanks a lot for a fantastic post and a all round entertaining blog (I also love the theme/design), I don’t have time to look over it all at the moment but I have saved it and also included your RSS feeds, so when I have time I will be back to read a lot more, Please do keep up the excellent work.|
We absolutely love your blog and find almost all of your post’s to be what precisely I’m looking for. Would you offer guest writers to write content for yourself? I wouldn’t mind composing a post or elaborating on a few of the subjects you write regarding here. Again, awesome web site!|
Excellent post! We will be linking to this particularly great article on our site. Keep up the great writing.|
excellent issues altogether, you just won a logo new reader. What would you suggest about your submit that you just made a few days in the past? Any positive?|
Hello, I think your site might be having browser compatibility issues. When I look at your blog in Firefox, it looks fine but when opening in Internet Explorer, it has some overlapping. I just wanted to give you a quick heads up! Other then that, terrific blog!|
Hey there! Do you know if they make any plugins to safeguard against hackers? I’m kinda paranoid about losing everything I’ve worked hard on. Any recommendations?|
Truly no matter if someone doesn’t understand after that its up to other viewers that they will help, so here it happens.|
I don’t even understand how I ended up right here, but I assumed this post was once great. I do not understand who you’re but definitely you’re going to a famous blogger in case you are not already. Cheers!|
Because the admin of this site is working, no uncertainty very quickly it will be renowned, due to its feature contents.|
I am really impressed with your writing skills as well as with the layout on your blog. Is this a paid theme or did you customize it yourself? Anyway keep up the excellent quality writing, it’s rare to see a nice blog like this one these days.|
I have been exploring for a little for any high quality articles or blog posts in this sort of space . Exploring in Yahoo I ultimately stumbled upon this site. Reading this info So i am satisfied to exhibit that I have an incredibly just right uncanny feeling I discovered exactly what I needed. I so much certainly will make sure to don?t put out of your mind this website and give it a look on a continuing basis.|
If you are going for most excellent contents like I do, only pay a quick visit this website all the time because it presents quality contents, thanks|
Good day! I know this is somewhat off topic but I was wondering which blog platform are you using for this website? I’m getting fed up of WordPress because I’ve had issues with hackers and I’m looking at alternatives for another platform. I would be fantastic if you could point me in the direction of a good platform.|
Howdy! I simply wish to offer you a big thumbs up for the great info you have got here on this post. I will be coming back to your blog for more soon.|
You actually make it seem so easy with your presentation but I to find this matter to be really something that I feel I might never understand. It kind of feels too complex and extremely huge for me. I am having a look forward in your next put up, I’ll attempt to get the grasp of it!|
Hey I know this is off topic but I was wondering if you knew of any widgets I could add to my blog that automatically tweet my newest twitter updates. I’ve been looking for a plug-in like this for quite some time and was hoping maybe you would have some experience with something like this. Please let me know if you run into anything. I truly enjoy reading your blog and I look forward to your new updates.|
This design is incredible! You obviously know how to keep a reader entertained. Between your wit and your videos, I was almost moved to start my own blog (well, almost…HaHa!) Wonderful job. I really enjoyed what you had to say, and more than that, how you presented it. Too cool!|
What’s Happening i am new to this, I stumbled upon this I have found It absolutely helpful and it has helped me out loads. I am hoping to contribute & help different users like its helped me. Great job.|
We’re a group of volunteers and opening a brand new scheme in our community. Your web site provided us with valuable information to work on. You’ve performed a formidable task and our entire neighborhood will likely be grateful to you.|
Hi there! This is kind of off topic but I need some help from an established blog. Is it very difficult to set up your own blog? I’m not very techincal but I can figure things out pretty quick. I’m thinking about setting up my own but I’m not sure where to begin. Do you have any points or suggestions? Thank you|
I read this paragraph fully concerning the resemblance of most recent and preceding technologies, it’s awesome article.|
Amazing! This blog looks just like my old one! It’s on a completely different subject but it has pretty much the same layout and design. Wonderful choice of colors!|
The site is easy to use and the great support keeps me coming back. My withdrawals were always smooth.
Can you tell us more about this? I’d want to find out some additional information.|
Greetings from Ohio! I’m bored to tears at work so I decided to browse your website on my iphone during lunch break. I really like the info you provide here and can’t wait to take a look when I get home. I’m shocked at how fast your blog loaded on my phone .. I’m not even using WIFI, just 3G .. Anyhow, very good site!|
Paragraph writing is also a fun, if you be familiar with then you can write otherwise it is difficult to write.|
It’s going to be ending of mine day, except before finish I am reading this great paragraph to improve my know-how.|
Wonderful post however I was wanting to know if you could write a litte more on this topic? I’d be very thankful if you could elaborate a little bit further. Cheers!|
I every time spent my half an hour to read this web site’s articles every day along with a cup of coffee.|
No matter if some one searches for his required thing, so he/she needs to be available that in detail, so that thing is maintained over here.|
Hi! I’m at work browsing your blog from my new iphone! Just wanted to say I love reading your blog and look forward to all your posts! Carry on the outstanding work!|
You need to be a part of a contest for one of the best blogs on the net. I most certainly will highly recommend this web site!|
Hello just wanted to give you a quick heads up. The words in your article seem to be running off the screen in Firefox. I’m not sure if this is a format issue or something to do with internet browser compatibility but I figured I’d post to let you know. The layout look great though! Hope you get the problem fixed soon. Many thanks|
Hello there! Do you know if they make any plugins to safeguard against hackers? I’m kinda paranoid about losing everything I’ve worked hard on. Any recommendations?|
If some one needs expert view on the topic of blogging and site-building after that i advise him/her to pay a quick visit this weblog, Keep up the fastidious job.|
Thanks a bunch for sharing this with all people you actually recognise what you are speaking approximately! Bookmarked. Kindly additionally visit my site =). We could have a hyperlink alternate agreement among us|
It’s a shame you don’t have a donate button! I’d definitely donate to this fantastic blog! I suppose for now i’ll settle for bookmarking and adding your RSS feed to my Google account. I look forward to new updates and will share this blog with my Facebook group. Talk soon!|
I absolutely love your website.. Great colors & theme. Did you make this web site yourself? Please reply back as I’m planning to create my very own website and want to find out where you got this from or what the theme is called. Thank you!|
I’ve been active for almost a year, mostly for using the mobile app, and it’s always reliable uptime.
Wow, that’s what I was searching for, what a stuff! present here at this webpage, thanks admin of this web site.|
My partner and I stumbled over here coming from a different website and thought I should check things out. I like what I see so now i am following you. Look forward to checking out your web page yet again.|
Hello to all, as I am genuinely keen of reading this blog’s post to be updated daily. It consists of nice information.|
I was recommended this web site by my cousin. I’m not sure whether this post is written by him as nobody else know such detailed about my difficulty. You’re amazing! Thanks!|
When I originally commented I appear to have clicked on the -Notify me when new comments are added-
checkbox and now each time a comment is added I get four
emails with the exact same comment. There has to be an easy method you can remove
me from that service? Thank you!
This design is steller! You obviously know how to keep a reader amused. Between your wit and your videos, I was almost moved to start my own blog (well, almost…HaHa!) Wonderful job. I really loved what you had to say, and more than that, how you presented it. Too cool!|
Great article! This is the type of info that should be shared around the internet. Shame on the search engines for not positioning this put up higher! Come on over and consult with my website . Thanks =)|
I am in fact happy to read this webpage posts which contains plenty of helpful data, thanks for providing such information.|
Hi would you mind stating which blog platform you’re working with? I’m planning to start my own blog soon but I’m having a hard time selecting between BlogEngine/Wordpress/B2evolution and Drupal. The reason I ask is because your design and style seems different then most blogs and I’m looking for something unique. P.S My apologies for getting off-topic but I had to ask!|
The learning crypto basics process is simple and the reliable uptime makes it even better. The mobile app makes daily use simple.
Please let me know if you’re looking for a article author for your site. You have some really good articles and I think I would be a good asset. If you ever want to take some of the load off, I’d really like to write some content for your blog in exchange for a link back to mine. Please shoot me an e-mail if interested. Thank you!
What i don’t understood is in truth how you’re not really much more neatly-preferred than you may be now. You’re very intelligent. You recognize therefore considerably relating to this matter, made me for my part imagine it from a lot of various angles. Its like women and men don’t seem to be involved unless it is one thing to do with Woman gaga! Your personal stuffs nice. At all times care for it up!|
Hi there are using WordPress for your blog platform? I’m new to the blog world but I’m trying to get started and create my own. Do you need any html coding expertise to make your own blog? Any help would be really appreciated!
When I originally commented I clicked the “Notify me when new comments are added” checkbox and now each time a comment is
added I get several emails with the same comment.
Is there any way you can remove me from that service?
Thanks!
Its like you read my mind! You appear to know a lot about this, like you wrote the book in it or something. I think that you could do with a few pics to drive the message home a little bit, but other than that, this is excellent blog. A fantastic read. I will definitely be back.
Greetings! Very helpful advice in this particular post! It’s the little changes that produce the largest changes. Thanks a lot for sharing!|
Wonderful, what a blog it is! This web site presents valuable information to us, keep it up.|
It’s very easy to find out any topic on web as compared to books, as I found this piece of writing at this site.|
Attractive section of content. I just stumbled upon your weblog and in accession capital to assert that I get in fact enjoyed account your blog posts. Any way I’ll be subscribing to your augment and even I achievement you access consistently quickly.|
Hi, i read your blog from time to time and i own a similar one and i was just curious if you get a lot of spam feedback? If so how do you reduce it, any plugin or anything you can advise? I get so much lately it’s driving me insane so any support is very much appreciated.|
I’m very pleased to discover this site. I want to to thank you for ones time due to this fantastic read!! I definitely appreciated every bit of it and i also have you saved as a favorite to check out new things in your website.|
We stumbled over here coming from a different website and thought I should check things out. I like what I see so i am just following you. Look forward to going over your web page repeatedly.
You’ve made some really good points there. I checked on the internet for more information about the issue and found most individuals will go along with your views on this web site.|
It’s appropriate time to make some plans for the long run and it’s time to be happy. I have read this publish and if I may I wish to recommend you some attention-grabbing things or tips. Perhaps you could write next articles relating to this article. I wish to learn more things approximately it!|
You actually make it seem so easy with your presentation but I find this matter to be really something which I think I would never understand. It seems too complicated and extremely broad for me. I am looking forward for your next post, I will try to get the hang of it!|
We’re a group of volunteers and starting a new scheme in our community. Your site offered us with valuable info to work on. You have done a formidable task and our whole group might be thankful to you.
Thanks for ones marvelous posting! I definitely enjoyed reading it, you can be a great author.I will always bookmark your blog and will eventually come back at some point. I want to encourage continue your great job, have a nice morning!
Hi! I’m at work surfing around your blog from my new apple iphone! Just wanted to say I love reading through your blog and look forward to all your posts! Carry on the superb work!
I am really inspired with your writing skills as well as with the layout on your weblog. Is that this a paid topic or did you modify it your self? Either way stay up the excellent quality writing, it’s rare to look a nice blog like this one these days..|
You have made some really good points there. I checked on the net for additional information about the issue and found most individuals will go along with your views on this website.|
Thanks for sharing. I read many of your blog posts, cool, your blog is very good.
I enjoy, lead to I discovered just what I used to be taking a look for. You’ve ended my 4 day lengthy hunt! God Bless you man. Have a great day. Bye|
Your method of telling the whole thing in this article is actually pleasant, every one can without difficulty understand it, Thanks a lot.|
Thank you for your sharing. I am worried that I lack creative ideas. It is your article that makes me full of hope. Thank you. But, I have a question, can you help me? https://www.binance.com/si-LK/register?ref=LBF8F65G
I’m impressed, I must say. Rarely do I encounter a blog that’s equally educative and engaging, and without a doubt, you have hit the nail on the head. The issue is something that not enough folks are speaking intelligently about. Now i’m very happy that I came across this in my search for something relating to this.|
Please let me know if you’re looking for a article author for your site. You have some really great articles and I think I would be a good asset. If you ever want to take some of the load off, I’d love to write some content for your blog in exchange for a link back to mine. Please shoot me an e-mail if interested. Kudos!|
It’s genuinely very complicated in this active life to listen news on TV, thus I simply use web for that reason, and get the most up-to-date news.|
Howdy would you mind letting me know which web host you’re using? I’ve loaded your blog in 3 completely different internet browsers and I must say this blog loads a lot faster then most. Can you recommend a good hosting provider at a fair price? Thanks, I appreciate it!|
Wonderful beat ! I would like to apprentice whilst you amend your web site, how could i subscribe for a weblog site? The account helped me a appropriate deal. I had been tiny bit acquainted of this your broadcast provided shiny clear concept|
This is a good tip especially to those fresh to the blogosphere. Simple but very precise info… Thanks for sharing this one. A must read post!|
It’s remarkable to pay a visit this web site and reading the views of all friends on the topic of this piece of writing, while I am also eager of getting experience.|
What’s up mates, its wonderful piece of writing concerning tutoringand entirely explained, keep it up all the time.|
Pretty section of content. I just stumbled upon your blog and in accession capital to assert that I get in fact enjoyed account your blog posts. Anyway I will be subscribing to your augment and even I achievement you access consistently rapidly.|
Because the admin of this web page is working, no uncertainty very soon it will be famous, due to its quality contents.|
I really like what you guys are up too. This kind of clever work and exposure! Keep up the excellent works guys I’ve incorporated you guys to my own blogroll.
WOW just what I was looking for. Came here by searching for keyword|
I feel this is among the such a lot important info for me. And i’m glad reading your article. But want to remark on few general things, The web site taste is ideal, the articles is in point of fact great : D. Good task, cheers|
Marvelous, what a web site it is! This webpage gives useful facts to us, keep it up.|
An intriguing discussion is worth comment. I do think that you should write more on this issue, it may not be a taboo subject but typically people don’t discuss such issues. To the next! All the best!!|
Hey there! I could have sworn I’ve been to this blog before but after reading through some of the post I realized it’s new to me. Nonetheless, I’m definitely happy I found it and I’ll be bookmarking and checking back often!
Hey there, You have done an incredible job. I will definitely digg it and personally suggest to my friends. I am sure they will be benefited from this site.|
Hi there mates, its fantastic article regarding teachingand entirely defined, keep it up all the time.|
What i don’t realize is in reality how you are no longer actually a lot more neatly-appreciated than you might be right now. You are very intelligent. You realize thus significantly in the case of this topic, produced me individually believe it from numerous varied angles. Its like men and women aren’t fascinated except it’s one thing to accomplish with Girl gaga! Your own stuffs outstanding. All the time care for it up!|
Hello, I believe your web site could possibly be having internet browser compatibility problems. Whenever I take a look at your website in Safari, it looks fine however when opening in IE, it has some overlapping issues. I merely wanted to provide you with a quick heads up! Apart from that, great site!|
Very nice post. I just stumbled upon your blog and wanted to say that I have truly enjoyed browsing your blog posts. In any case I’ll be subscribing to your feed and I hope you write again soon!|
This blog was… how do you say it? Relevant!! Finally I have found something that helped me. Appreciate it!
My programmer is trying to convince me to move to .net from PHP. I have always disliked the idea because of the costs. But he’s tryiong none the less. I’ve been using WordPress on a number of websites for about a year and am worried about switching to another platform. I have heard good things about blogengine.net. Is there a way I can import all my wordpress content into it? Any kind of help would be really appreciated!
When someone writes an paragraph he/she retains the image of a user in his/her brain that how a user can understand it. Thus that’s why this article is amazing. Thanks!
Hi there just wanted to give you a quick heads up. The words in your content seem to be running off the screen in Opera. I’m not sure if this is a format issue or something to do with internet browser compatibility but I figured I’d post to let you know. The style and design look great though! Hope you get the problem solved soon. Kudos|
Howdy very nice web site!! Guy .. Excellent .. Wonderful .. I’ll bookmark your web site and take the feeds additionally? I am glad to find a lot of useful info right here within the submit, we want develop extra techniques on this regard, thank you for sharing. . . . . .|
We’re a bunch of volunteers and starting a brand new scheme in our community. Your web site offered us with helpful info to work on. You have performed an impressive task and our whole group shall be grateful to you.|
Ridiculous story there. What happened after? Thanks!|
You really make it seem so easy with your presentation but I find this matter to be actually something that I think I would never understand. It seems too complex and very broad for me. I am looking forward for your next post, I will try to get the hang of it!|
Hi there, I wish for to subscribe for this website to obtain hottest updates, so where can i do it please help out.|
Asking questions are genuinely good thing if you are not understanding anything totally, but this piece of writing provides pleasant understanding yet.|
Do you mind if I quote a few of your posts as long as I provide credit and sources back to your website? My blog is in the exact same niche as yours and my visitors would certainly benefit from some of the information you present here. Please let me know if this okay with you. Thank you!|
Excellent beat ! I would like to apprentice at the same time as you amend your website, how could i subscribe for a weblog website? The account aided me a applicable deal. I have been a little bit familiar of this your broadcast offered vibrant clear concept|
Greetings from Carolina! I’m bored to tears at work so I decided to check out your blog on my iphone during lunch break. I really like the info you provide here and can’t wait to take a look when I get home. I’m surprised at how fast your blog loaded on my phone .. I’m not even using WIFI, just 3G .. Anyways, very good site!
Good way of explaining, and fastidious piece of writing to get data on the topic of my presentation topic, which i am going to present in university.|
This piece of writing offers clear idea in favor of the new people of blogging, that really how to do blogging.|
Hi there to all, how is the whole thing, I think every one is getting more from this website, and your views are good in support of new visitors.|
Thank you for any other informative website. The place else may I get that kind of info written in such a perfect approach? I’ve a undertaking that I’m simply now working on, and I have been on the look out for such information.|
Hey there! This is my 1st comment here so I just wanted to give a quick shout out and say I truly enjoy reading through your articles. Can you suggest any other blogs/websites/forums that cover the same subjects? Thank you so much!|
Greetings from Ohio! I’m bored to tears at work so I decided to check out your website on my iphone during lunch break. I really like the info you provide here and can’t wait to take a look when I get home. I’m amazed at how fast your blog loaded on my mobile .. I’m not even using WIFI, just 3G .. Anyways, excellent site!|
I think the admin of this web site is really working hard in favor of his web page, for the reason that here every information is quality based data.|
Wow that was odd. I just wrote an extremely long comment but after I clicked submit my comment didn’t show up. Grrrr… well I’m not writing all that over again. Anyway, just wanted to say excellent blog!
This paragraph will assist the internet visitors for setting up new weblog or even a blog from start to end.|
Wow, incredible blog layout! How long have you been blogging for? you made blogging look easy. The overall look of your web site is fantastic, let alone the content!|
Hello, after reading this amazing article i am also glad to share my know-how here with mates.
Wonderful site you have here but I was curious about if you knew of any community forums that cover the same topics talked about in this article? I’d really like to be a part of group where I can get responses from other knowledgeable people that share the same interest. If you have any recommendations, please let me know. Kudos!
Hi I am so excited I found your web site, I really found you by mistake, while I was looking on Bing for something else, Regardless I am here now and would just like to say thank you for
a remarkable post and a all round enjoyable blog (I also love the theme/design),
I don’t have time to look over it all at the minute but I have saved it and also included your RSS feeds, so when I have
time I will be back to read much more, Please do keep up the fantastic work.
I’m amazed, I must say. Seldom do I come across a blog that’s both equally educative and engaging, and without a doubt, you’ve hit the nail on the head. The problem is an issue that not enough men and women are speaking intelligently about. I’m very happy I came across this during my hunt for something relating to this.
I’m not certain where you’re getting your info, however great topic. I needs to spend some time learning more or understanding more. Thanks for wonderful information I used to be looking for this information for my mission.
This blog was… how do I say it? Relevant!! Finally I’ve found something which helped me. Kudos!
What a stuff of un-ambiguity and preserveness of precious familiarity on the topic of unpredicted feelings.|
Hi there, You’ve done an excellent job. I will certainly digg it and personally recommend to my friends. I am confident they’ll be benefited from this site.|
Incredible story there. What happened after? Thanks!|
Great goods from you, man. I have understand your stuff previous to and you’re just extremely wonderful. I really like what you have acquired here, certainly like what you’re stating and the way in which you say it. You make it enjoyable and you still care for to keep it wise. I can’t wait to read far more from you. This is really a tremendous web site.|
It’s wonderful that you are getting ideas from this article as well as from our argument made at this place.|
Just wish to say your article is as surprising. The clearness in your post is just excellent and i can assume you are an expert on this subject. Well with your permission let me to grab your feed to keep up to date with forthcoming post. Thanks a million and please keep up the gratifying work.|
Heya i am for the primary time here. I found this board and I in finding It truly useful & it helped me out a lot. I hope to give something back and aid others such as you helped me.|
Nice post. I used to be checking constantly this weblog and I’m impressed! Extremely useful info specifically the ultimate part 🙂 I take care of such info a lot. I used to be looking for this particular information for a long time. Thanks and best of luck. |
I’m really enjoying the design and layout of your site. It’s a very easy on the eyes which makes it much more enjoyable for me to come here and visit more often. Did you hire out a developer to create your theme? Superb work!|
My family all the time say that I am killing my time here at web, however I know I am getting know-how every day by reading such nice articles or reviews.|
I blog often and I really appreciate your information. The article has really peaked my interest. I will book mark your site and keep checking for new details about once per week. I opted in for your Feed too.|
Very nice post. I just stumbled upon your weblog and wanted to say that I have really enjoyed surfing around your blog posts. In any case I will be subscribing to your rss feed and I hope you write again soon!|
I’m very happy to uncover this site. I wanted to thank you for your time for this wonderful read!! I definitely appreciated every little bit of it and i also have you bookmarked to look at new things on your web site.|
Excellent way of telling, and nice article to obtain facts regarding my presentation topic, which i am going to convey in institution of higher education.|
Thanks a lot for sharing this with all of us you actually realize what you are talking approximately! Bookmarked. Please also consult with my web site =). We could have a link trade agreement among us
I really love your blog.. Very nice colors & theme. Did you make this web site yourself? Please reply back as I’m hoping to create my own blog and want to find out where you got this from or just what the theme is called. Appreciate it!|
I think the admin of this web page is in fact working hard in favor of his website, as here every material is quality based stuff.|
Its like you read my mind! You seem to know so much about this, like you wrote the book in it or something. I think that you could do with some pics to drive the message home a bit, but instead of that, this is wonderful blog. A great read. I will definitely be back.|
I’ve been exploring for a little bit for any high quality articles or blog posts on this kind of space . Exploring in Yahoo I ultimately stumbled upon this site. Reading this information So i’m happy to exhibit that I have an incredibly good uncanny feeling I came upon just what I needed. I so much unquestionably will make certain to don?t overlook this website and give it a glance regularly.|
Very nice write-up. I definitely appreciate this website. Stick with it!
What’s up mates, how is all, and what you want to say about this paragraph, in my view its truly awesome for me.
It’s actually very complex in this active life to listen news on TV, thus I just use the web for that purpose, and get the hottest information.
Hello, yes this post is genuinely pleasant and I have learned lot of things from it on the topic of blogging. thanks.|
I blog often and I genuinely appreciate your content. This great article has truly peaked my interest. I’m going to book mark your website and keep checking for new details about once a week. I subscribed to your RSS feed too.|
I don’t think the title of your article matches the content lol. Just kidding, mainly because I had some doubts after reading the article. https://www.binance.com/register?ref=QCGZMHR6
Just found linhvaow88, looks promising for accessing W88. Hopefully, it works without any hiccups. Trying it out now. Access it through linhvaow88.
My brother recommended I might like this web site. He used to be entirely right. This post actually made my day. You can not imagine simply how so much time I had spent for this information! Thank you!
We are a group of volunteers and opening a brand new scheme in our community. Your web site offered us with useful info to work on. You have done an impressive task and our entire community shall be thankful to you.
If you are going for finest contents like myself, only visit this web page every day because it presents feature contents, thanks
It’s an awesome paragraph for all the internet users; they will take advantage
from it I am sure.
You could certainly see your expertise in the work you write. The world hopes for even more passionate writers such as you who are not afraid to mention how they believe. Always go after your heart.
Asking questions are really fastidious thing if you are not understanding anything entirely, however this piece of writing presents nice understanding even.
If some one needs to be updated with hottest technologies afterward he must be pay a visit this web site and be up to date all the time.
Good way of describing, and nice article to obtain information regarding my presentation focus, which i am going to deliver in college.
Simply want to say your article is as surprising. The clarity in your post is simply excellent and i can assume you’re an expert on this subject. Well with your permission let me to grab your feed to keep updated with forthcoming post. Thanks a million and please continue the enjoyable work.
Your article helped me a lot, is there any more related content? Thanks!
Incredible story there. What occurred after? Take care!
This is really attention-grabbing, You’re a very skilled blogger. I have joined your rss feed and look ahead to looking for more of your excellent post. Additionally, I’ve shared your website in my social networks
obviously like your web-site however you have to check the spelling on quite a few of your posts. Many of them are rife with spelling issues and I in finding it very troublesome to tell the reality however I’ll certainly come again again.
Pretty section of content. I just stumbled upon your site and in accession capital to assert that I acquire actually enjoyed account your blog posts. Any way I will be subscribing to your augment and even I achievement you access consistently quickly.
Can you be more specific about the content of your article? After reading it, I still have some doubts. Hope you can help me.
Can you be more specific about the content of your article? After reading it, I still have some doubts. Hope you can help me.
Hey! Quick question that’s completely off topic. Do you know how to make your site mobile friendly? My site looks weird when viewing from my iphone 4. I’m trying to find a theme or plugin that might be able to fix this problem. If you have any recommendations, please share. With thanks!
Really good read. It felt sincere, carefully considered, and worth the time, so thank you for posting it.
Amazing blog! Is your theme custom made or did you download it from somewhere? A design like yours with a few simple adjustements would really make my blog shine. Please let me know where you got your theme. Thanks a lot|
I’m curious to find out what blog platform you happen to be utilizing? I’m having some minor security issues with my latest website and I’d like to find something more safeguarded. Do you have any suggestions?|
I was able to find good information from your articles.|
An impressive share! I have just forwarded this onto a friend who has been doing a little homework on this. And he in fact bought me breakfast simply because I discovered it for him… lol. So let me reword this…. Thanks for the meal!! But yeah, thanks for spending time to discuss this subject here on your web site.|
Valuable info. Lucky me I found your website accidentally, and I am shocked why this accident didn’t happened earlier! I bookmarked it.|
Hurrah, that’s what I was exploring for, what a stuff! existing here at this website, thanks admin of this site.|
This article is in fact a good one it assists new internet people, who are wishing in favor of blogging.|
This is really interesting, You are a very skilled blogger. I have joined your rss feed and look forward to seeking more of your excellent post. Also, I have shared your site in my social networks!|
Heya i am for the first time here. I found this board and I find It really useful & it helped me out a lot. I hope to give something back and help others like you aided me.
Hey I know this is off topic but I was wondering if you knew of any widgets I could add to my blog that automatically tweet my newest twitter updates. I’ve been looking for a plug-in like this for quite some time and was hoping maybe you would have some experience with something like this. Please let me know if you run into anything. I truly enjoy reading your blog and I look forward to your new updates.
Howdy! I could have sworn I’ve been to this site before but after browsing through a few of the articles I realized it’s new to me. Anyways, I’m certainly pleased I came across it and I’ll be book-marking it and checking back often!
great issues altogether, you just received a new reader. What would you recommend about your post that you simply made a few days ago? Any positive?
We’re a group of volunteers and opening a new scheme in our community. Your site provided us with valuable info to work on. You’ve done a formidable job and our whole community will be thankful to you.|
It’s genuinely very difficult in this full of activity life to listen news on TV, so I only use the web for that purpose, and obtain the latest news.|
If some one desires expert view concerning blogging then i propose him/her to pay a visit
this webpage, Keep up the pleasant job.
certainly like your web site however you have to check the spelling on quite a few of your posts. A number of them are rife with spelling issues and I to find it very bothersome to tell the truth however I’ll surely come back again.|
Hi, I think your website might be having browser compatibility issues. When I look at your blog site in Firefox, it looks fine but when opening in Internet Explorer, it has some overlapping. I just wanted to give you a quick heads up! Other then that, fantastic blog!
Excellent blog you have here.. It’s hard to find good quality writing like yours these days. I truly appreciate people like you! Take care!!|
Hey there! I know this is kinda off topic however I’d figured I’d ask. Would you be interested in trading links or maybe guest writing a blog post or vice-versa? My blog covers a lot of the same topics as yours and I think we could greatly benefit from each other. If you are interested feel free to shoot me an email. I look forward to hearing from you! Terrific blog by the way!
Jogo do Tigrinho multiplicador fixo: já ganhou 1000x com aposta baixa?
Your way of describing everything in this article is actually fastidious, all be able to effortlessly be aware of it, Thanks a lot.|
Aw, this was a very nice post. Taking a few minutes and actual effort to make a superb article… but what can I say… I procrastinate a whole lot and never manage to get anything done.|
I am really impressed with your writing abilities and also with the layout on your weblog. Is that this a paid subject or did you customize it yourself? Anyway keep up the excellent quality writing, it’s rare to see a nice blog like this one nowadays..
It is not my first time to pay a quick visit this website, i am visiting this website dailly and take fastidious information from here all the time.|
Piece of writing writing is also a excitement, if you know afterward you can write or else it is complicated to write.|
Howdy! Would you mind if I share your blog with my facebook group? There’s a lot of folks that I think would really enjoy your content. Please let me know. Cheers
Way cool! Some very valid points! I appreciate you penning this write-up and the rest of the site is also really good.
What’s up, for all time i used to check blog posts here early in the dawn, for the reason that i like to learn more and more.|
Heya i am for the primary time here. I came across this board and I to find It really useful & it helped me out a lot. I’m hoping to offer one thing back and aid others like you aided me.|
Wow, awesome blog layout! How long have you been blogging for? you made blogging look easy. The overall look of your site is great, let alone the content!|
Hey there! I’ve been following your weblog for a long time now and finally got the bravery to go ahead and give you a shout out from New Caney Tx! Just wanted to mention keep up the excellent job!|
Hi, I do believe this is an excellent web site. I stumbledupon it 😉 I’m going to come back once again since i have saved as a favorite it. Money and freedom is the best way to change, may you be rich and continue to help other people.|
For newest information you have to pay a visit internet and on web I found this web site as a finest site for most recent updates.|
Thanks in support of sharing such a good opinion, post is good, thats why i have read it fully|
First off I would like to say superb blog! I had a quick question which I’d like to ask if you do not mind. I was interested to know how you center yourself and clear your thoughts prior to writing. I’ve had a difficult time clearing my thoughts in getting my ideas out. I truly do take pleasure in writing however it just seems like the first 10 to 15 minutes are usually wasted just trying to figure out how to begin. Any ideas or hints? Thank you!|
Hello there, just became aware of your blog through Google, and found that it’s really informative. I’m going to watch out for brussels. I will appreciate if you continue this in future. Many people will be benefited from your writing. Cheers!
Having read this I thought it was very enlightening. I appreciate you finding the time and effort to put this information together. I once again find myself personally spending a significant amount of time both reading and leaving comments. But so what, it was still worth it!|
Greetings from Florida! I’m bored at work so I decided to check out your blog on my iphone during lunch break. I really like the info you present here and can’t wait to take a look when I get home. I’m shocked at how fast your blog loaded on my cell phone .. I’m not even using WIFI, just 3G .. Anyways, awesome blog!|
My spouse and I stumbled over here from a different page and thought I should check things out. I like what I see so i am just following you. Look forward to exploring your web page yet again.|
Hi there, I desire to subscribe for this website to obtain most recent updates, therefore where can i do it please help out.|
Thanks for sharing such a good thought, paragraph is good, thats why i have read it entirely|
Ahaa, its nice discussion regarding this article at this place at this weblog, I have read all that, so now me also commenting at this place.|
Hi there, all is going perfectly here and ofcourse every one is sharing information, that’s truly excellent, keep up writing.
This article presents clear idea for the new visitors of blogging, that in fact how to do running a blog.|
What’s up, just wanted to mention, I loved this post. It was practical. Keep on posting!|
I’d like to find out more? I’d love to find out some additional information.|
Thank you for any other informative blog. The place else may just I get that type of info written in such a perfect method? I’ve a challenge that I am just now operating on, and I’ve been on the look out for such information.|
Hey! I just wanted to ask if you ever have any problems with hackers? My last blog (wordpress) was hacked and I ended up losing several weeks of hard work due to no back up. Do you have any methods to protect against hackers?|
Spot on with this write-up, I truly believe that this amazing site needs a lot more attention. I’ll probably be back again to read through more, thanks for the info!|
Very rapidly this web site will be famous amid all blogging visitors, due to it’s good posts|
Very great post. I just stumbled upon your weblog and wanted to mention that I’ve truly loved surfing around your blog posts. In any case I will be subscribing for your rss feed and I hope you write once more soon!|
Your article helped me a lot, is there any more related content? Thanks!
Howdy I am so grateful I found your web site, I really found you by accident, while I was researching on Digg for something else, Anyways I am here now and would just like to say thanks for a marvelous post and a all round entertaining blog (I also love the theme/design), I don’t have time to browse it all at the moment but I have saved it and also added your RSS feeds, so when I have time I will be back to read much more, Please do keep up the awesome job.
I do agree with all the ideas you’ve presented for your post. They are very convincing and can certainly work. Nonetheless, the posts are too short for starters. May just you please lengthen them a little from next time? Thanks for the post.|
My brother suggested I may like this blog. He used to be totally right. This put up actually made my day. You cann’t believe just how so much time I had spent for this info! Thanks!|
After I initially commented I seem to have clicked the -Notify me when new comments are added- checkbox and from now on every time a comment is added I get 4 emails with the exact same comment. Is there a means you are able to remove me from that service? Thanks a lot!|
hi!,I really like your writing so a lot! proportion we be in contact extra about your post on AOL? I need a specialist on this space to unravel my problem. May be that is you! Taking a look ahead to look you. |
Admiring the hard work you put into your blog and detailed information you provide. It’s good to come across a blog every once in a while that isn’t the same out of date rehashed material. Fantastic read! I’ve saved your site and I’m adding your RSS feeds to my Google account.|
You made some good points there. I looked on the web for more info about the issue and found most people will go along with your views on this site.|
WOW just what I was looking for. Came here by searching for meta_keyword|
I’m extremely impressed with your writing skills as well as with the layout on your blog. Is this a paid theme or did you customize it yourself? Either way keep up the excellent quality writing, it’s rare to see a nice blog like this one these days.|
Magnificent goods from you, man. I’ve understand your stuff previous to and you are just extremely fantastic. I actually like what you have acquired here, certainly like what you are stating and the way in which you say it. You make it enjoyable and you still take care of to keep it smart. I can not wait to read far more from you. This is really a tremendous site.|
Do you mind if I quote a few of your articles as long as I provide credit and sources back to your webpage? My blog site is in the very same area of interest as yours and my users would really benefit from some of the information you provide here. Please let me know if this okay with you. Appreciate it!|
What’s up everyone, it’s my first go to see at this web site, and post is in fact fruitful in support of me, keep up posting such posts.|
Hello! Do you use Twitter? I’d like to follow you if that would be okay. I’m absolutely enjoying your blog and look forward to new updates.|
Hi there, i read your blog from time to time and i own a similar one and i was just wondering if you get a lot of spam feedback? If so how do you protect against it, any plugin or anything you can advise? I get so much lately it’s driving me insane so any help is very much appreciated.|
Hello, its good article concerning media print, we all be aware of media is a enormous source of facts.|
I believe what you posted made a lot of sense. However, think about this, what if you composed a catchier title? I am not suggesting your content is not good., however what if you added a headline that makes people want more? I mean BLOG_TITLE is kinda plain. You should look at Yahoo’s home page and note how they create post headlines to get viewers to open the links. You might add a related video or a related pic or two to grab people interested about everything’ve written. Just my opinion, it could make your blog a little livelier.|
I’ve learn a few just right stuff here. Definitely worth bookmarking for revisiting. I wonder how a lot effort you put to create one of these magnificent informative web site.|
Hi there, its pleasant post concerning media print, we all know media is a great source of information.|
Hmm it appears like your site ate my first comment (it was extremely long) so I guess I’ll just sum it up what I submitted and say, I’m thoroughly enjoying your blog. I too am an aspiring blog writer but I’m still new to everything. Do you have any points for novice blog writers? I’d definitely appreciate it.|
I know this if off topic but I’m looking into starting my own weblog and was wondering what all is needed to get setup? I’m assuming having a blog like yours would cost a pretty penny? I’m not very internet savvy so I’m not 100 sure. Any suggestions or advice would be greatly appreciated. Thank you|
Way cool! Some very valid points! I appreciate you penning this article and the rest of the website is very good.|
I’ve learn some just right stuff here. Definitely worth bookmarking for revisiting. I wonder how much attempt you place to create this sort of magnificent informative website.|
Wow, this article is pleasant, my younger sister is analyzing these things, thus I am going to convey her.|
Good post. I learn something new and challenging on websites I stumbleupon on a daily basis. It will always be interesting to read articles from other authors and use something from other sites. |
For most up-to-date information you have to pay a visit world wide web and on world-wide-web I found this web page as a finest web page for most recent updates.|
Hey there! I know this is kinda off topic however , I’d figured I’d ask. Would you be interested in exchanging links or maybe guest authoring a blog post or vice-versa? My blog goes over a lot of the same subjects as yours and I think we could greatly benefit from each other. If you’re interested feel free to shoot me an e-mail. I look forward to hearing from you! Wonderful blog by the way!|
I just like the valuable information you supply on your articles. I will bookmark your weblog and take a look at once more right here frequently. I’m reasonably certain I’ll be told lots of new stuff proper here! Good luck for the next!|
It is in point of fact a great and useful piece of information. I am satisfied that you just shared this helpful information with us. Please stay us informed like this. Thank you for sharing.|
I always emailed this blog post page to all my contacts, as if like to read it next my friends will too.|
I’m not that much of a internet reader to be honest but your blogs really nice, keep it up! I’ll go ahead and bookmark your website to come back down the road. Many thanks|
Incredible! This blog looks exactly like my old one! It’s on a completely different subject but it has pretty much the same page layout and design. Superb choice of colors!|
Hi, this weekend is fastidious designed for me, for the reason that this moment i am reading this enormous informative paragraph here at my house.|
Hey there, You’ve performed an excellent job. I’ll definitely digg it and in my opinion recommend to my friends. I’m sure they will be benefited from this web site.|
Your article helped me a lot, is there any more related content? Thanks!
You actually make it appear so easy along with your presentation however I find this topic to be really something which I think I might by no means understand. It seems too complex and very large for me. I’m having a look forward for your subsequent put up, I will try to get the cling of it!
My developer is trying to persuade me to move to .net from PHP. I have always disliked the idea because of the costs. But he’s tryiong none the less. I’ve been using Movable-type on a number of websites for about a year and am worried about switching to another platform. I have heard good things about blogengine.net. Is there a way I can transfer all my wordpress content into it? Any help would be really appreciated!
Can you tell us more about this? I’d love to find out some additional information.|
Howdy fantastic website! Does running a blog such as this require a large amount of work? I have no expertise in computer programming however I was hoping to start my own blog in the near future. Anyway, should you have any ideas or techniques for new blog owners please share. I understand this is off topic however I just wanted to ask. Cheers!|
Hi just wanted to give you a quick heads up and let you know a few of the images aren’t loading properly. I’m not sure why but I think its a linking issue. I’ve tried it in two different browsers and both show the same outcome.|
You made some really good points there. I checked on the internet for more info about the issue and found most individuals will go along with your views on this web site.|
Hi Dear, are you truly visiting this site daily, if so then you will without doubt obtain fastidious knowledge.|
I blog often and I truly thank you for your information. Your article has truly peaked my interest. I am going to bookmark your website and keep checking for new details about once a week. I opted in for your RSS feed too.|
Hey there this is kinda of off topic but I was wanting to know if blogs use WYSIWYG editors or if you have to manually code with HTML. I’m starting a blog soon but have no coding know-how so I wanted to get advice from someone with experience. Any help would be greatly appreciated!|
What a stuff of un-ambiguity and preserveness of valuable knowledge concerning unexpected emotions.|
I like the helpful info you provide in your articles. I’ll bookmark your weblog and check again here frequently. I am quite sure I’ll learn many new stuff right here! Good luck for the next!|
hello!,I really like your writing very much! percentage we keep in touch extra about your article on AOL? I require an expert on this space to unravel my problem. Maybe that’s you! Having a look forward to see you. |
Magnificent goods from you, man. I have understand your stuff previous to and you’re just extremely excellent. I actually like what you have acquired here, really like what you’re stating and the way in which you say it. You make it entertaining and you still take care of to keep it sensible. I cant wait to read far more from you. This is really a great website.|
Hi my loved one! I want to say that this post is awesome, great written and come with almost all significant infos. I’d like to see more posts like this .|
Your article helped me a lot, is there any more related content? Thanks!
It’s very trouble-free to find out any matter on net as compared to books, as I found this article at this web page.
I don’t think the title of your article matches the content lol. Just kidding, mainly because I had some doubts after reading the article.
Unquestionably believe that which you stated. Your favourite reason appeared to be on the web the simplest factor to be mindful of. I say to you, I definitely get annoyed at the same time as other folks consider worries that they plainly do not realize about. You managed to hit the nail upon the top and outlined out the entire thing without having side effect , other folks can take a signal. Will likely be again to get more. Thank you|
I do trust all the concepts you have presented for your post. They are very convincing and will definitely work. Nonetheless, the posts are too short for newbies. May you please lengthen them a little from next time? Thank you for the post.|
Hello There. I discovered your weblog the use of msn. That is a really smartly written article. I’ll be sure to bookmark it and come back to learn extra of your useful information. Thanks for the post. I will certainly return.
Amazing blog! Do you have any recommendations for aspiring writers? I’m planning to start my own site soon but I’m a little lost on everything. Would you propose starting with a free platform like WordPress or go for a paid option? There are so many choices out there that I’m completely overwhelmed .. Any ideas? Cheers!|
Hey There. I discovered your weblog the use of msn. That is an extremely smartly written article. I’ll make sure to bookmark it and come back to learn more of your helpful info. Thanks for the post. I will definitely comeback.|
I read this piece of writing completely regarding the comparison of latest and previous technologies, it’s amazing article.|
It’s amazing to pay a quick visit this website and reading the views of all friends on the topic of this paragraph, while I am also eager of getting experience.|
Your style is very unique compared to other folks I’ve read stuff from. I appreciate you for posting when you’ve got the opportunity, Guess I’ll just book mark this site.|
I would like to thank you for the efforts you have put in writing this website. I am hoping to see the same high-grade blog posts by you in the future as well. In truth, your creative writing abilities has encouraged me to get my very own site now ;)|
Hey I know this is off topic but I was wondering if you knew of any widgets I could add to my blog that automatically tweet my newest twitter updates. I’ve been looking for a plug-in like this for quite some time and was hoping maybe you would have some experience with something like this. Please let me know if you run into anything. I truly enjoy reading your blog and I look forward to your new updates.|
Its like you read my mind! You seem to know so much about this, like you wrote the book in it or something. I think that you could do with some pics to drive the message home a bit, but instead of that, this is magnificent blog. An excellent read. I’ll certainly be back.|
Greate article. Keep posting such kind of info on your page. Im really impressed by your site.
It is the best time to make some plans for the future and it’s time to be happy. I have read this post and if I could I desire to suggest you few interesting things or suggestions. Perhaps you can write next articles referring to this article. I want to read even more things about it!|
Howdy! This blog post couldn’t be written any better! Looking through this article reminds me of my previous roommate! He continually kept preaching about this. I’ll send this post to him. Fairly certain he’ll have a great read. Many thanks for sharing!|
I do trust all the ideas you’ve introduced to your post. They are very convincing and will definitely work. Still, the posts are too quick for newbies. May just you please prolong them a bit from next time? Thank you for the post.
I read this article completely regarding the comparison of hottest and earlier technologies, it’s amazing article.
Ahaa, its fastidious conversation about this piece of writing here at this blog, I have read all that, so now me also commenting at this place.|
This website was… how do you say it? Relevant!! Finally I have found something that helped me. Many thanks!|
Article writing is also a excitement, if you be familiar with then you can write or else it is complex to write.|
Greate post. Keep writing such kind of info on your blog. Im really impressed by your blog.
Ahaa, its good dialogue concerning this post at this place at this webpage, I have read all that, so now me also commenting here.
Hi just wanted to give you a quick heads up and let you know a few of the pictures aren’t loading correctly. I’m not sure why but I think its a linking issue. I’ve tried it in two different web browsers and both show the same results.
Thanks , I’ve just been looking for info approximately this subject for a while and yours is the best I’ve came upon till now. However, what about the bottom line? Are you positive in regards to the supply?
I always used to read piece of writing in news papers but now as I am a user of net therefore from now I am using net for articles or reviews, thanks to web.
Your article helped me a lot, is there any more related content? Thanks!
Saved as a favorite, I like your website!
Your article helped me a lot, is there any more related content? Thanks!
Good day! This is my first comment here so I just wanted to give a quick shout out and tell you I truly enjoy reading your blog posts. Can you recommend any other blogs/websites/forums that cover the same topics? Thanks a lot!
Everything is very open with a precise explanation of the challenges. It was really informative. Your site is very useful. Thank you for sharing!
Your point of view caught my eye and was very interesting. Thanks. I have a question for you.
This site was… how do I say it? Relevant!! Finally I’ve found something which helped me. Thanks a lot!
I got this site from my friend who shared with me concerning this site and at the moment this time I am visiting this web site and reading very informative articles or reviews at this place.
Đọc bài của bác thấy mở mang quá. Nhân tiện đây, tớ muốn chia sẻ một nhà cái cực kỳ
uy tín là thương hiệu 79KING. Để truy cập an toàn nhất nằm ở địa chỉ 79kingbet.life nha.
Ghé qua 79kingbet.life, để tận hưởng ngay tỷ lệ trả thưởng cực khủng cùng ngập tràn khuyến mãi.
Bác nào đang xa bờ hãy đăng ký ngay tại 79kingbet.life.
Hy vọng anh em về bờ an toàn.
Hey! Do you know if they make any plugins to assist with Search Engine Optimization? I’m trying to get my blog to rank for some targeted keywords but I’m not seeing very good success. If you know of any please share. Thanks!
You should be a part of a contest for one of the most useful sites on the internet. I am going to recommend this web site!
My developer is trying to persuade me to move to .net from PHP. I have always disliked the idea because of the costs. But he’s tryiong none the less. I’ve been using Movable-type on several websites for about a year and am nervous about switching to another platform. I have heard excellent things about blogengine.net. Is there a way I can import all my wordpress content into it? Any kind of help would be greatly appreciated!
I was able to find good advice from your articles.
Having read this I believed it was very informative. I appreciate you taking the time and effort to put this informative article together. I once again find myself spending a significant amount of time both reading and commenting. But so what, it was still worth it!
I believe that is among the so much vital info for me. And i’m satisfied reading your article. However should commentary on few basic things, The website style is wonderful, the articles is really great : D. Just right activity, cheers
Hi this is kind of of off topic but I was wondering if blogs use WYSIWYG editors or if you have to manually code with HTML. I’m starting a blog soon but have no coding knowledge so I wanted to get guidance from someone with experience. Any help would be greatly appreciated!
We are a group of volunteers and starting a new scheme in our community. Your site offered us with valuable info to work on. You’ve done an impressive job and our whole community will be grateful to you.
Hi there friends, its great paragraph about educationand entirely defined, keep it up all the time.
Fortune Dragon cresce entre quem busca experiência visual intensa.
Your article helped me a lot, is there any more related content? Thanks!
This is really interesting, You are a very skilled blogger. I’ve joined your rss feed and look forward to seeking more of your excellent post. Also, I have shared your site in my social networks!|
Hi would you mind sharing which blog platform you’re using? I’m going to start my own blog soon but I’m having a tough time making a decision between BlogEngine/Wordpress/B2evolution and Drupal. The reason I ask is because your layout seems different then most blogs and I’m looking for something completely unique. P.S Sorry for getting off-topic but I had to ask!|
Excellent post. I’m dealing with many of these issues as well..
Hi, I do believe this is an excellent web site. I stumbledupon it 😉 I may return yet again since i have saved as a favorite it. Money and freedom is the greatest way to change, may you be rich and continue to help other people.
I do not know whether it’s just me or if everybody else encountering problems with your blog. It appears as if some of the text in your content are running off the screen. Can somebody else please comment and let me know if this is happening to them too? This might be a issue with my web browser because I’ve had this happen previously. Thank you|
After looking over a few of the articles on your blog, I really appreciate your technique of blogging. I added it to my bookmark webpage list and will be checking back in the near future. Take a look at my web site as well and let me know how you feel.|
I do not even know how I ended up here, but I thought this post was great. I don’t know who you are but definitely you’re going to a famous blogger if you aren’t already 😉 Cheers!|
I was curious if you ever thought of changing the structure of your site? Its very well written; I love what youve got to say. But maybe you could a little more in the way of content so people could connect with it better. Youve got an awful lot of text for only having 1 or two images. Maybe you could space it out better?|
Having read this I thought it was rather enlightening. I appreciate you spending some time and effort to put this information together. I once again find myself spending a lot of time both reading and commenting. But so what, it was still worthwhile!
Hello there! I could have sworn I’ve been to this site before but after checking through some of the post I realized it’s new to me. Anyways, I’m definitely glad I found it and I’ll be bookmarking and checking back frequently!|
fantastic points altogether, you just gained a new reader. What would you suggest about your publish that you just made some days ago? Any certain?|
An interesting discussion is definitely worth comment. I think that you should publish more on this subject matter, it may not be a taboo subject but usually people do not talk about these issues. To the next! Kind regards!!|
I used to be able to find good advice from your blog posts.|
I read this article completely about the resemblance of most up-to-date and earlier technologies, it’s amazing article.|
Hello there, You’ve done a fantastic job. I’ll certainly digg it and personally recommend to my friends. I’m sure they will be benefited from this web site.|
Have you ever thought about writing an e-book or guest authoring on other blogs? I have a blog centered on the same topics you discuss and would love to have you share some stories/information. I know my subscribers would value your work. If you are even remotely interested, feel free to send me an e-mail.
Your point of view caught my eye and was very interesting. Thanks. I have a question for you. https://accounts.binance.info/hu/register?ref=IQY5TET4
I think the admin of this web page is truly working hard for his website, since here every data is quality based information.
You need to take part in a contest for one of the best websites on the net. I’m going to highly recommend this blog!
Howdy! This is my 1st comment here so I just wanted to give a quick shout out and tell you I genuinely enjoy reading through your articles. Can you recommend any other blogs/websites/forums that go over the same topics? Thank you!
It’s actually a great and helpful piece of information. I am satisfied that you shared this useful info with us. Please stay us up to date like this. Thank you for sharing.|
That is a great tip particularly to those fresh to the blogosphere. Brief but very accurate information… Appreciate your sharing this one. A must read article!|
When some one searches for his vital thing, therefore he/she needs to be available that in detail, thus that thing is maintained over here.|
When I originally commented I clicked the “Notify me when new comments are added” checkbox and now each time a comment is added I get several e-mails with the same comment. Is there any way you can remove me from that service? Thanks!|
Greetings! Very helpful advice in this particular article! It’s the little changes that produce the biggest changes. Thanks for sharing!|
My family all the time say that I am killing my time here at net, but I know I am getting experience all the time by reading thes good articles.|
Wow, fantastic blog layout! How long have you been blogging for? you made blogging look easy. The overall look of your site is fantastic, as well as the content!|
Appreciate this post. Will try it out.|
Hello excellent blog! Does running a blog like this take a large amount of work? I’ve very little understanding of programming but I had been hoping to start my own blog soon. Anyways, if you have any suggestions or tips for new blog owners please share. I understand this is off topic but I just needed to ask. Cheers!
Write more, thats all I have to say. Literally, it seems as though you relied on the video to make your point. You obviously know what youre talking about, why throw away your intelligence on just posting videos to your blog when you could be giving us something informative to read?|
It is the best time to make some plans for the future and it is time to be happy. I’ve read this post and if I could I wish to suggest you few interesting things or tips. Maybe you can write next articles referring to this article. I desire to read even more things about it!
Pretty component of content. I simply stumbled upon your weblog and in accession capital to claim that I get in fact enjoyed account your weblog posts. Anyway I’ll be subscribing on your augment and even I success you get admission to constantly quickly.
I just could not depart your web site before suggesting that I really loved the standard information an individual supply to your guests? Is gonna be again steadily to check up on new posts
I’m not sure where you’re getting your info, but good topic. I needs to spend some time learning more or understanding more. Thanks for fantastic information I was looking for this information for my mission.
magnificent post, very informative. I wonder why the other specialists of this sector do not understand this. You must continue your writing. I am sure, you have a huge readers’ base already!
You could definitely see your expertise within the article you write. The world hopes for more passionate writers like you who aren’t afraid to say how they believe. All the time follow your heart.|
Your means of explaining the whole thing in this article is really pleasant, all be able to without difficulty know it, Thanks a lot.
Hello! This is kind of off topic but I need some advice from an established blog. Is it very hard to set up your own blog? I’m not very techincal but I can figure things out pretty quick. I’m thinking about setting up my own but I’m not sure where to begin. Do you have any points or suggestions? With thanks
Thông tin quá tuyệt vời, cảm ơn admin. Góp vui với các bác
một chút, mình xin review nhanh về sân chơi NEW88 – sân chơi đẳng cấp
số 1 hiện nay.
NEW88 nổi tiếng với kho game đa dạng và tỷ lệ trả thưởng cực cao.
Theo kinh nghiệm của mình, cổng vào chuẩn nhất của NEW88 hiện nay anh em cứ gõ
thẳng tên miền new88.help nha.
Vào thẳng trang new88.help, anh em sẽ lấy được link trang chủ chính thức
của NEW88. Vào new88.help đăng ký để húp trọn khuyến mãi
nha.
Hey! Do you know if they make any plugins to assist with SEO? I’m trying to get my blog to rank for some targeted keywords but I’m not seeing very good success. If you know of any please share. Kudos!
Greetings! Very helpful advice within this article! It is the little changes that will make the greatest changes. Thanks a lot for sharing!
I like what you guys are up too. This kind of clever work and reporting! Keep up the awesome works guys I’ve included you guys to blogroll.|
Hi there, i read your blog occasionally and i own a similar one and i was just curious if you get a lot of spam responses? If so how do you protect against it, any plugin or anything you can advise? I get so much lately it’s driving me mad so any assistance is very much appreciated.
Can you be more specific about the content of your article? After reading it, I still have some doubts. Hope you can help me. https://accounts.binance.info/es-AR/register-person?ref=UT2YTZSU
You have made some good points there. I checked on the web for more info about the issue and found most people will go along with your views on this web site.
We are a group of volunteers and opening a new scheme in our community. Your site provided us with valuable info to work on. You have done an impressive job and our whole community will be grateful to you.|
Very quickly this web site will be famous among all blogging viewers, due to it’s nice content
Hi to all, as I am truly eager of reading this website’s post to be updated daily. It contains fastidious information.
Hello everyone, it’s my first visit at this web page, and article is really fruitful designed for me, keep up posting such articles or reviews.|
When some one searches for his required thing, thus he/she needs to be available that in detail, therefore that thing is maintained over here.
Thanks for the marvelous posting! I actually enjoyed reading it, you can be a great author.I will be sure to bookmark your blog and may come back later in life. I want to encourage that you continue your great work, have a nice holiday weekend!|
I am really impressed with your writing skills as well as with the layout on your weblog. Is this a paid theme or did you modify it yourself? Anyway keep up the excellent quality writing, it’s rare to see a great blog like this one today.|
Saved as a favorite, I love your website!
I’m gone to say to my little brother, that he should also go to see this blog on regular basis to take updated from most up-to-date information.|
Very shortly this web site will be famous amid all blogging and site-building users, due to it’s nice articles|
Attractive section of content. I just stumbled upon your website and in accession capital to say that I get actually enjoyed account your blog posts. Any way I’ll be subscribing in your augment and even I success you access constantly quickly.
Asking questions are really pleasant thing if you are not understanding something completely, but this article offers fastidious understanding even.
Hello! I know this is kinda off topic but I was wondering which blog platform are you using for this website? I’m getting sick and tired of WordPress because I’ve had problems with hackers and I’m looking at options for another platform. I would be great if you could point me in the direction of a good platform.|
No matter if some one searches for his vital thing, so he/she needs to be available that in detail, therefore that thing is maintained over here.|
Hey There. I found your blog using msn. This is a really well written article. I will be sure to bookmark it and return to read more of your useful info. Thanks for the post. I’ll definitely return.
Incredible! This blog looks exactly like my old one! It’s on a totally different topic but it has pretty much the same page layout and design. Outstanding choice of colors!
I just could not depart your site before suggesting that I really loved the usual information a person supply on your visitors? Is gonna be again incessantly in order to inspect new posts|
Excellent post. I was checking continuously this blog and I am impressed! Very helpful information specially the last part 🙂 I care for such information a lot. I was seeking this particular info for a very long time. Thank you and best of luck.
It is the best time to make some plans for the future and it is time to be happy. I’ve read this post and if I could I want to suggest you few interesting things or suggestions. Perhaps you could write next articles referring to this article. I want to read more things about it!
Have you ever considered about adding a little bit more than just your articles? I mean, what you say is valuable and all. However think about if you added some great graphics or videos to give your posts more, “pop”! Your content is excellent but with images and videos, this site could undeniably be one of the best in its field. Amazing blog!|
You could certainly see your skills in the work you write. The sector hopes for even more passionate writers such as you who are not afraid to say how they believe. Always go after your heart.|
What’s up, after reading this remarkable post i am as well glad to share my experience here with colleagues.|
Can you be more specific about the content of your article? After reading it, I still have some doubts. Hope you can help me.
You really make it seem so easy with your presentation but I find this topic to be actually something which I think I would never understand. It seems too complicated and very broad for me. I’m looking forward for your next post, I will try to get the hang of it!|
Hi there, You have done a great job. I’ll definitely digg it and personally recommend to my friends. I am confident they will be benefited from this site.
This information is worth everyone’s attention. How can I find out more?|
It’s not my first time to pay a quick visit this site, i am visiting this site dailly and get fastidious facts from here every day.|
It’s awesome to pay a quick visit this website and reading the views of all colleagues about this post, while I am also keen of getting familiarity.|
Thanks for any other wonderful post. Where else may anybody get that kind of information in such a perfect means of writing? I have a presentation next week, and I am on the look for such info.|
Hello everybody, here every person is sharing such experience, so it’s fastidious to read this blog, and I used to pay a quick visit this weblog daily.
Hi, yes this post is really pleasant and I have learned lot of things from it concerning blogging. thanks.
Hey I know this is off topic but I was wondering if you knew of any widgets I could add to my blog that automatically tweet my newest twitter updates. I’ve been looking for a plug-in like this for quite some time and was hoping maybe you would have some experience with something like this. Please let me know if you run into anything. I truly enjoy reading your blog and I look forward to your new updates.
Very quickly this web site will be famous amid all blog people, due to it’s pleasant content|
No matter if some one searches for his vital thing, so he/she desires to be available that in detail, thus that thing is maintained over here.|
This piece of writing will assist the internet users for creating new website or even a blog from start to end.|
You could certainly see your expertise within the work you write. The world hopes for more passionate writers like you who are not afraid to mention how they believe. At all times follow your heart.
Very nice post. I just stumbled upon your blog and wished to say that I’ve really loved surfing around your weblog posts. After all I will be subscribing on your feed and I hope you write once more soon!
Hey! I’m at work browsing your blog from my new apple iphone! Just wanted to say I love reading your blog and look forward to all your posts! Carry on the great work!
What i do not realize is if truth be told how you’re no longer actually much more smartly-preferred than you might be now. You’re very intelligent. You understand thus significantly in the case of this topic, made me in my opinion consider it from a lot of numerous angles. Its like men and women aren’t interested except it is one thing to accomplish with Lady gaga! Your personal stuffs nice. All the time deal with it up!
I think the admin of this site is genuinely working hard in support of his website, since here every stuff is quality based material.
I think the admin of this site is actually working hard for his website, as here every material is quality based material.